Making buns from yeast dough. How beautiful to make buns from yeast dough
Many housewives try to diversify their family's menu, including pastries in the diet. You can of course buy ready-made buns or muffins in the nearest store. But, homemade pastries, made by the caring hands of the hostess, are much tastier and healthier than store-bought ones. And in order for the sweet dessert to be not only tasty, but also outwardly attractive, it is recommended to learn how to make buns of the original form.

Network
Probably the most common form of buns from yeast dough, is a braided line. The size of the finished product can be both large and small, portioned.
To form a braid, you must:
- make three bundles from the dough,
- connect them at the top with one point of contact,
- braid a pigtail out of bundles.

To obtain tasty and lush pastries, yeast dough blanks are left for a few 5-10 minutes.
When the braids fit a little, having increased in size, each one needs to be greased with an egg-milk mixture. You can supplement the buns with poppy seed, which is sprinkled on the buns before going into the oven. Prepared braids should be baked according to the recipe in the oven.
Buns in the form of hearts
Heart-shaped yeast dough pastry looks original and very appetizing. To make such buns step by step, you should prepare the dough based on yeast, and then divide it into several parts. Roll out each part and grease with melted butter, sprinkle with sugar on top. We twist the resulting workpiece with a roll. Then fold the roll in half and fasten the edges at the top. Beautiful forms of yeast dough buns with sugar will be obtained if each of them is cut as shown in the photo. We straighten the cut bun, giving it nice shape hearts.

Butterfly-shaped bun
Making a step-by-step butterfly from yeast dough is not difficult. To begin with, just as in the case of hearts, we prepare the dough, cut it into small pieces and roll each of them. Do not forget to grease the workpieces with oil and sprinkle with sugar.

- Roll up the dough.
- We fold each roll in half again and fix the ends in the middle of the product.
- We cut the folded roll on both sides in the middle.
- To make the shape of the bun beautiful, the cut should not be continuous, but partial, not reaching one centimeter to the center of the roll.
- We straighten the dough, giving it the original shape of a butterfly.
- The buns are baked for 10 minutes at a temperature of 200 0 C, then, lowering the temperature to 180 0 C, they bake for another 20 minutes.
Stuffed pastries
Having practiced making beautiful forms of yeast dough buns, every hostess will want to please guests with buns with filling. How to make a beautiful form of baking and at the same time not lose all the stuffing? And although the filling options may be different, many begin to make poppy seed buns. Having done yeast dough according to a personal recipe, it must be divided into 2 parts. Roll out each part until you get a thin cake. Lubricate the cake with melted butter and sprinkle with poppy seeds.

Having rolled the cake into a roll, cut the workpiece into small pieces of 10-12 cm wide. From each segment we form a rose. Then we bake each rose according to the recipe.

Braids with poppy
Beautiful forms of yeast dough buns can be made in the form of a braid. To make a delicious, braided bun, you need to make a yeast dough, put it on a table sprinkled with flour. Then we roll out the dough to the shape of a rectangle, while the thickness should not be thin. The next step is to distribute the filling over the surface of the rectangle. Toppings should not be enough. But a lot of poppy should also not be put in the dough.

Then, fold the rectangle in half, and then in half again. The resulting roll is cut across into strips. At correct execution technology should get 10-12 strips. We scroll each strip in a spiral and form a ring out of it. You should get rounded products resembling bagels made from dough twisted into a spiral.
Braids with apples
Fillings for yeast dough buns can be different. For example, in autumn, when there is an abundance of apples and pears, you can use these fruits for baking fillings.

How to make a braid with apples step by step?
You can learn about the most interesting forms of yeast dough buns from the video file.
Making a conclusion
It’s not difficult to make beautiful buns from yeast dough step by step. Having chosen the filling and the shape of the future product, it is recommended to read the advice of experienced chefs. Confectioners are advised to start with the simplest forms of baking. Having learned how to make braids and hearts, you can move on to more complex forms of yeast buns.
On sale today there is a sufficient selection of confectionery. Only homemade cakes should not even be compared with purchased products. Lush and ruddy for tea are the most popular dessert. They are made from yeast, rich, puff pastry, giving them varied form which makes them look even more appetizing.
wicker pastries
One of the popular forms of buns is a variety of wickerwork. They can be made from different types test and made in the form:
- spindles;
- pigtails;
- spikelet.
Spindle buns are very easy to make. You need to separate a small part from the dough, roll two sausages out of it, fasten them and twist them together. After that, fasten the other tips of the flagella so that they do not disperse during baking.
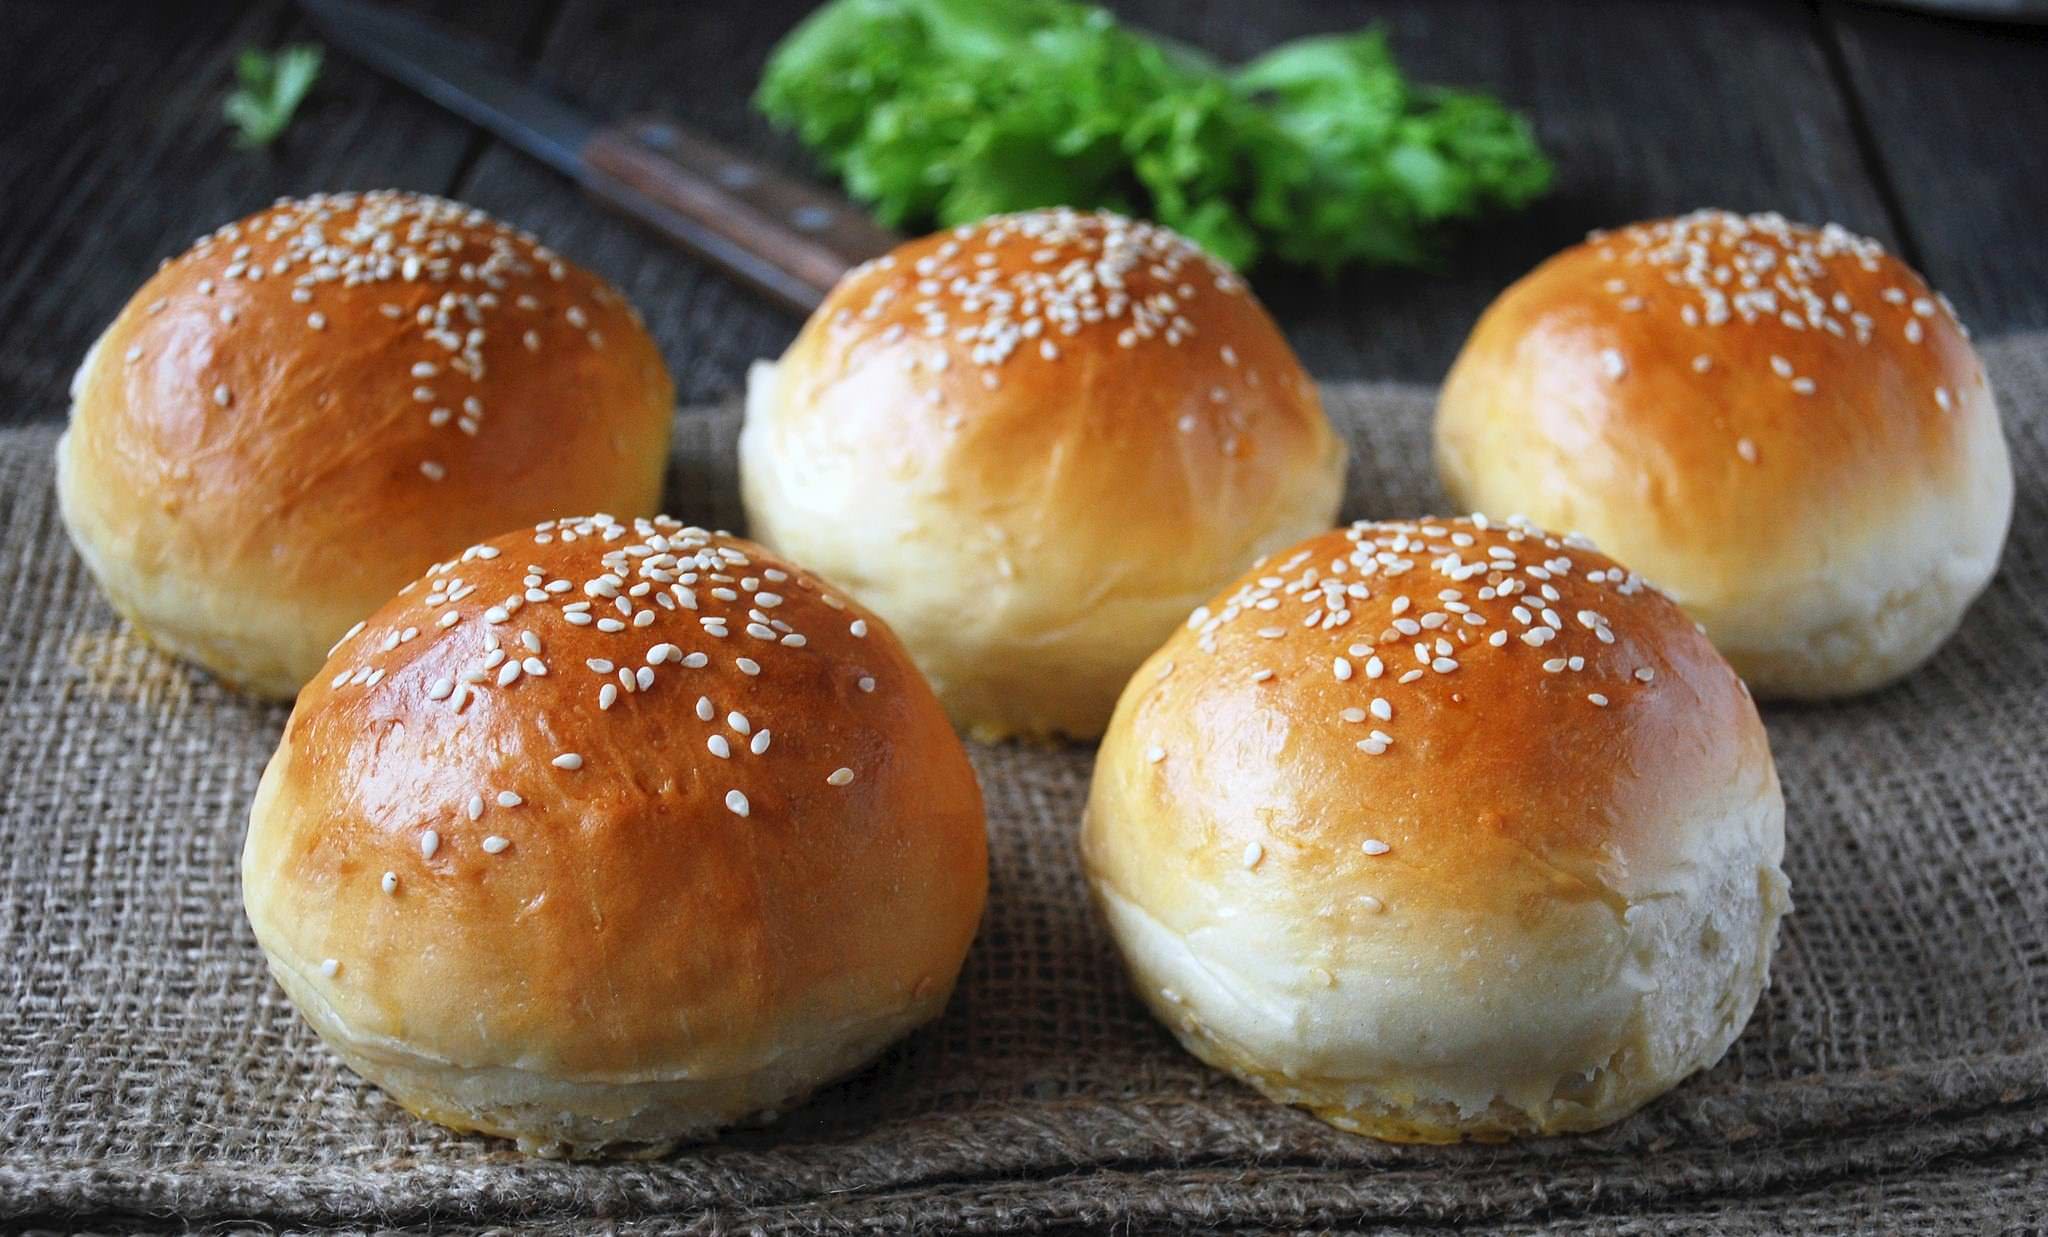
Advice. To make the buns beautifully browned, they are smeared with a beaten egg before baking. Also use egg and milk mixture.
Without much effort, you can also weave in the form of a pigtail. To do this, you will need to roll three flagella from the dough, connecting them from one edge to each other. Then do not braid them too tightly, and then carefully fasten the edges.

Buns braided into a spikelet also look very attractive. To make such weaving, you must first roll out the dough into a rectangle. Then cut the layer into strips from the sides, not reaching the middle. On the uncut part, you can put the filling (cream, jam or something else), and then alternately weave the strips together. As a result of these actions, the filling will be inside, and beautiful weaving will cover it from above.
Simple options for buns without filling
Many housewives make cute buns without filling:
- Scallop. Roll small sausages from the dough, flatten them slightly, on one side make notches with a knife at an equal distance from each other.

- Sun. Roll out the sausage a little so that the dough is thinner than in the previous version. Make the notches thinner too. Then connect the edges together, wrapping in the shape of a circle.
- Herringbone. Roll out the dough with a cake, cut it into triangles, and make notches on both sides. Flatten the ends of the resulting strips with your fingers so that they begin to resemble spruce branches.
- Chamomile. Form small cakes, make several cuts from the edges, leaving the center free. You can flatten the middle of the bun, then put jam inside, or bake the product without filling.
- Pretzel. Prepare a thin sausage, wrap both ends of it inside, then twist each other once or twice and stick to the middle of the product.

Beautiful burgers
It is not too difficult to make beautiful pastries and with various types toppings, as well as simply with poppy seeds, sugar or cinnamon. Among the most popular forms of buns, there are several:
- Hearts. A small cake, rolled out in the form of a square, grease with butter, sprinkle with sugar on top. Then roll it up and fold it in half, connecting the ends. Make a longitudinal cut, but not completely, then straighten the edges of the bun.

- Butterflies. In the same way as in the previous version, prepare the roll, but make cuts on both sides, leaving the middle intact. Then carefully unfold the edges. Get a bun in the shape of a butterfly.
- Roses. Not too thin roll out a rectangular cake, grease its surface with oil, then sprinkle with poppy seeds. Then roll up the layer with a roll, cut into pieces (7-10 cm each). Carefully straighten the edges of each of them, forming roses.

Attention! It is advisable not to roll the dough too tightly. It is better to wrap the layer looser.
- Curls and spirals. A rectangular layer is also prepared for such buns, a poppy seed or other filling is laid on it, but the dough is not wrapped in a roll, but overlapped on both sides in the middle. After they are cut into strips across, twisted several times - these are the spirals. If you connect them into a ring, you get curls.
- Envelopes. Cut the dough into squares, put cottage cheese or other filling in the middle. Then, forming a bun with an envelope, wrap the edges and fasten them.
Beautiful and mouth-watering buns can be made in other shapes. Possible options lots of. Everything here depends only on the imagination of the hostess and the available skills. You can start with something simpler, and then proceed to more complex confectionery products.
What kind of buns do you make?
How to sculpt buns: video
How to wrap buns different stuffing? Many novice housewives are interested in this question. In the article, we will first consider how to prepare yeast dough for rich sweet buns, how to make different fillings. Step-by-step explanations and the presented photos will help you understand how to roll out and wrap the dough so that the pastries turn out to be outwardly original and even more appetizing.
How to make yeast dough - recipe number 1
To prepare yeast dough, you need to prepare following products:
- 15 grams of yeast (it is better to use dry in a pack);
- 2 tbsp. l. sunflower oil;
- 50 grams butter;
- half a glass of granulated sugar;
- 1 egg;
- cow's milk- 700 ml;
- sifted wheat flour - 800 grams;
- a pinch of salt.
Slightly warmed milk is poured into a bowl and dry yeast is bred in it. Set the container aside while we combine the rest of the ingredients. In another bowl, mix the egg with soft butter (you must put it out of the refrigerator in advance). warm place). When a homogeneous mass is obtained, add sugar and again carefully knead everything. We combine the contents of the first and second bowls together and pour in the sunflower oil. We measure the right amount of flour and add a pinch of salt to it. After mixing in loose form, pour it into the rest of the ingredients.
It remains only to knead the dough with your hands and cover the bowl with a cotton napkin. We set aside the workpiece in a warm place for 1-1.5 hours. During this time, the dough should be lowered twice. As a result, during the waiting time, the dough should rise due to the action of yeast three times. Then you can bake buns. We will consider how to wrap buns beautifully a little later, and now we will learn another popular recipe for making yeast dough at home.
The second way to make yeast dough
This recipe is for 24 buns. The following ingredients are used in the recipe:
- Half a liter of milk.
- 5 tablespoons of granulated sugar.
- 4 tablespoons plus 1 kg of sifted white flour.
- 150 grams of creamy margarine or butter.
- 25 grams of yeast.
- 3 chicken eggs.
- A pinch of salt.
The milk is heated to 45 degrees and poured into a separate bowl, add 2 tablespoons of sugar and stir until completely dissolved. If the yeast is fresh, then they are mixed with 3-4 tablespoons of flour, and then added to milk. If they are dry, then you need 2.5 teaspoons. Mix everything well and put in a warm place, covered with a napkin.
When the dough begins to bubble, add eggs beaten with three tablespoons of sugar. Pour melted margarine (or butter), add the rest of the flour with salt. Knead the dough and place it in a bowl greased with vegetable oil. Be sure to cover it with a towel and put it in a warm place. Knead the dough once, letting it sink. After the yeast dough has risen a second time, you can begin to roll out the buns.
How to wrap yeast dough buns
Yeasted dough buns can be baked by rolling out simple balls, but products with an unusual, specially wrapped shape look much more beautiful. They make pastries simply from dough and with different fillings. In the photo below, the buns are shaped like a pumpkin. These buns can be made for Halloween, surprising your guests.
How to wrap buns so that they resemble small pumpkins? Very simple. First, the finished dough must be rolled into a long sausage and divided with a knife or kitchen scissors into equal pieces. Roll each of them into a round ball and flatten it slightly in the palms of your hands. Then thick pancakes are cut in a circle into segments of the same size. They do not reach the middle so as not to cut the bun in half. Let the dough rest and rise for 20 minutes. To do this, put the balls of buns on a baking sheet, greased with oil, and cover with a lid or napkin.
After the dough has risen slightly, the buns are greased with butter so that they shine beautifully. The brush is turned with the other side, the stick is dipped in vegetable oil and a hole is made in the center. Then the blanks are placed in the oven and baked until cooked. After the buns are cooked, a half is inserted into each middle walnut. It is best to dry them first.
Simple nodules
Another way to wrap buns from simple test without filling, we will consider further. The dough is rolled out into a long sausage and cut with a knife into equal small pieces. To prevent the dough from sticking to the knife, it must be lowered with a blade into a handful of flour. Then each piece is rolled out into a thin sausage and a knot is tied from the dough, straightening its ends so that they look in opposite directions.

The workpiece is smeared with whipped yolk with a brush so that a dark fried crust forms during baking. Let the dough rise for a while and sprinkle with sugar. It is interesting to make buns for dinner by spreading the dough with garlic juice and sprinkling with dry herbs.
Complex nodules
Below we will consider how to wrap buns with sugar, sesame seeds or poppy seeds. Inside the bun has no filler, so the powder is sprinkled on top, after the dough has been given such a twisted shape, as in the photo below. Ready dough, as in the previous version of simple knots, rolled into long sausages of the same size. Then one knot is tied in the center. How to wrap buns to make a ball?

The remaining long ends are bent towards each other, crossed at the meeting point and bent inward with ends from opposite sides. If the bun turned out to be an elongated shape, do not be discouraged, you just need to give it roundness with your hands. After the yeast dough stands warm for a while, it will rise, and after increasing in volume, it will fill all the holes between the knots. The result is a beautiful round bun. It is smeared with a beaten egg and sprinkled with the chosen addition.
Rosette with cinnamon
Buns rolled in the shape of a rose look very impressive. Cinnamon filling will give an unusual flavor to pastries. How to wrap is clearly visible on step by step photo below. Identical pieces are torn off from the yeast dough and rolled into small balls in the palms. Then they are rolled out with a rolling pin into thin circles like blanks for dumplings or dumplings.

To make a beautiful rose from dough, four circles are stacked on top of each other, but with an offset to the middle of the next part. In the middle, a handful of cinnamon (to taste) is poured in a strip through all the circles, and they are rolled together with a tube. lower part roses are pressed together tightly, and the top resembles a bud of several petals. For such baking, it is best to use a silicone baking sheet with round recesses. Let the buns rise slightly, grease them with a beaten egg and send them to the oven for baking.
Cheesecake with cottage cheese
Before you beautifully wrap yeast dough buns, get to know how to do it right curd filling for them. While the dough is rising, start mixing the ingredients. You need to mix 400 grams of fresh cottage cheese in a separate bowl, add 1 large chicken egg (2 small ones are possible), a few tablespoons of sugar (depending on the sweetness of the cottage cheese itself) and 1 packet of vanilla sugar for flavor. You can replace vanilla, just throw a little, literally at the tip of a knife. Mix everything thoroughly.

To wrap the cheesecake, roll out the same circles. A spoonful of the prepared filling is placed in the center, and the remaining parts of the circle are cut into 4 sectors. First, the curd is wrapped in two opposite parts, tightly fastening them around the filling. Then the two remaining parts are lifted and pinched to the workpiece from the other sides. Then everything is laid out for another circle, cut into sectors, like the previous blank. The whole procedure is repeated again. Let the dough rise for 20 minutes, grease with a mixture of one yolk and two tablespoons of milk and set to bake.
Layered bun with a hole in the middle
This bun is not easy to make. First you need to roll out a few pancakes from the dough, at least 4-5 pieces. Then all layers are cut from the middle to the edges by sectors. The step-by-step photo shows that the cuts are not completely made. Then all the notched corners rise in layers and turn out to the opposite side.

They are arranged with a slight shift so that all the details are clearly visible. Sharp edges are bent under the base of the workpiece. After raising the dough, the workpiece is smeared with an egg and sprinkled with sugar or sesame seeds.
Stuffed turntables
To make an angular pinwheel, it is enough to roll out the dough in big leaf and cut it with a knife into squares of the same size. In the middle spread a spoonful of cottage cheese or jam. You can wrap the buns with an envelope, then the filling will be completely hidden inside.

It is interesting to learn how to wrap buns with jam with pinwheels. Rolled squares are cut from the corners to the middle diagonally. A spoonful of thick jam is placed in the center and wrapped to the middle with corners, tightly connecting them together.
Figure eights with raisins
If you do not know how to wrap raisin buns, we can advise you on a fairly easy baking option. Raisins are added both to the dough and to decorate the bun. From the prepared dough, roll out a long sausage on a plank.

Then one end is folded inward on the left, and the other in the same way, only from the opposite side. It turns out a figure resembling a figure eight. Large raisins are inserted into the middle of the curls.
How to wrap poppy seed buns
Let's prepare the poppy seed filling first. To do this, pour 100 grams of poppy seeds into a bowl, pour boiling water over it and let it sour. Then grind in a mill or pass through a special poppy seed grater, similar to a meat grinder. Add four tablespoons of sugar and two tablespoons of butter to the crushed poppy seeds. Everything is mixed until a homogeneous mass - the filling is ready.

The dough is rolled out on the surface of the table, sprinkled with flour, into a thin layer. Then the poppy seed filling is evenly spread over the entire surface and distributed with a rubber spatula even in the corners. Then the sheet is carefully wrapped in a roll.
It remains to cut it into equal parts, turn each blank in your hands in different directions, as in the photo. In the resulting bun, all layers of poppy will be clearly visible. After the dough has risen, you can put the baking sheet in the oven.
In the article, we introduced readers to several options for wrapping rich pastries so that they look original and interesting on the table. Cook with us! Good luck!
The further civilization moves, the more attention humanity pays to the aesthetic side of any phenomenon. These trends also did not pass pastries: if primitive man it was enough to grind the grains of wild cereals, mix flour with water and bake an insipid dry cake on hot stones, then later people learned to bake not only cakes, but also cakes, buns, cookies, pies and pies of the most different shapes, the most bizarre shapes.
Sleight of hand and nothing else
When it comes to baking, not all products are on equal rights. For example, the shape of buns cannot be too varied - and there is no need for it: by definition, a bun is a round-shaped yeast dough product without filling. True, some sources also refer other products to buns: the same buns that can have a more complex shape, for example, bows.
But if we need to make simple, ordinary buns, we, without further ado, bake them round or oval. If it is or hot dogs, you can sprinkle their surface with sesame seeds.
Other such products home baking you can sprinkle:
- sugar;
- crumble of nuts.
You can make geometric patterns on them:
- small notches sharp knife(this applies to oblong buns);
- bitmap with the cloves of a fork, but dipping them very shallowly;
- press a raisin, candied fruit or nut into the center of the bun.
How to step by step the formation of buns from yeast dough
- The risen and kneaded dough is divided into portions. To do this, the lump of dough is divided into several parts, rolled out, and then either the necessary pieces are cut off or torn off by hand.
- Placed between the palms, roll out the dough so that it becomes rounded.
- The surface is sprinkled after proofing.
- Lubricate the buns with yolk for ruddy and bake.

If you are interested in baking options with filling, then this does not apply to buns, but rather pies. But variety can also be added to rich buns by adding steamed and floured raisins to the dough when kneading.
In a pie, not only the content is important, but also the form (photo)!
What kind of pies we don’t bake, what we just don’t put inside ...
Pies can be:
- with jam;
- with cottage cheese;
- with fruits and berries;
- with cabbage;
- with meat;
- with mushrooms.
But the design does not particularly concern us - except that we try to somehow diversify the top of the pies so that we can distinguish products with different fillings when there are several of them.
For distinction, you can form a curly comb on top of them, slightly pinching the dough, you can press raisins or nuts.
Meanwhile, you can form pies in other shapes:
- square;
- triangular;
- braided ("pigtails")
Here is the recipe for forming triangular pies step by step:
- Roll out the dough, spread the filling in the middle.
- We take three edges and bring them together over the filling.
- We slightly crush the blinded triangle so that it is flat, but we do it carefully so as not to damage it.

But besides pies, there are also pies - large, beautiful, always with filling.
As for pies, they can be:
- open;
- closed.
Open pies consist of two layers: the bottom is the dough, the top is the filling. In closed tops put another layer of dough on top of the filling.
How to diversify the shape of large pies
Usually, to decorate such products, dough scraps are used, which remain after the cake is “tried on” under the oven, more precisely, under the baking sheet, and the excess is cut off.
Pie decorating options:
- The edges of the lower layer can be left a little more than a baking sheet, so that later, after laying the filling, wrap the edge of the dough, making a beautiful side at open pie.
- If the cake is closed, put the top layer and pinch together with the bottom one, while forming a beautiful scallop along the edge or a curly ribbon, or whatever else fantasy tells.
- If there are trimmings, we roll them into thin sausages, which we then flatten a little. We lay out patterns from these strips of dough, as in the pictures. The simplest is the lattice. This is a traditional pattern for an open jam pie.

As for the braided pie or “pigtail”: it can only be sculpted with a fairly thick and not very crumbly filling. It is best to make them with chopped fruit.
We braid the pie "pigtail":
- Roll out the dough into a rectangle.
- In the middle we lay out the path from the filling.
- We cut the edges obliquely, not reaching 2-2.5 cm to the filling.
- We close the filling with these oblique strips, bending them one by one.
- Top can be sprinkled with sugar, cinnamon.

Cookies: how to make at least a star, at least a crescent
But who is lucky, it's a cookie.
The shape of cookies can be very diverse:
- round;
- square;
- asterisks;
- crescents
On sale there are sets of forms for making cookies, so the molding of these products is done quickly and easily.
How to shape cookies:
- A layer of dough is rolled out to the desired thickness.
- The desired mold is taken, its edges are lightly smeared with vegetable oil so that the dough does not stick: with proper processing of the molds, after extrusion, the cookies remain on the table, and the mold rises without sticking.
- As a mold, you can use glass thin-walled dishes of small diameter: a small glass, a glass, a stack.
- You can squeeze out any pattern, sprinkle with sugar, cinnamon, nuts.
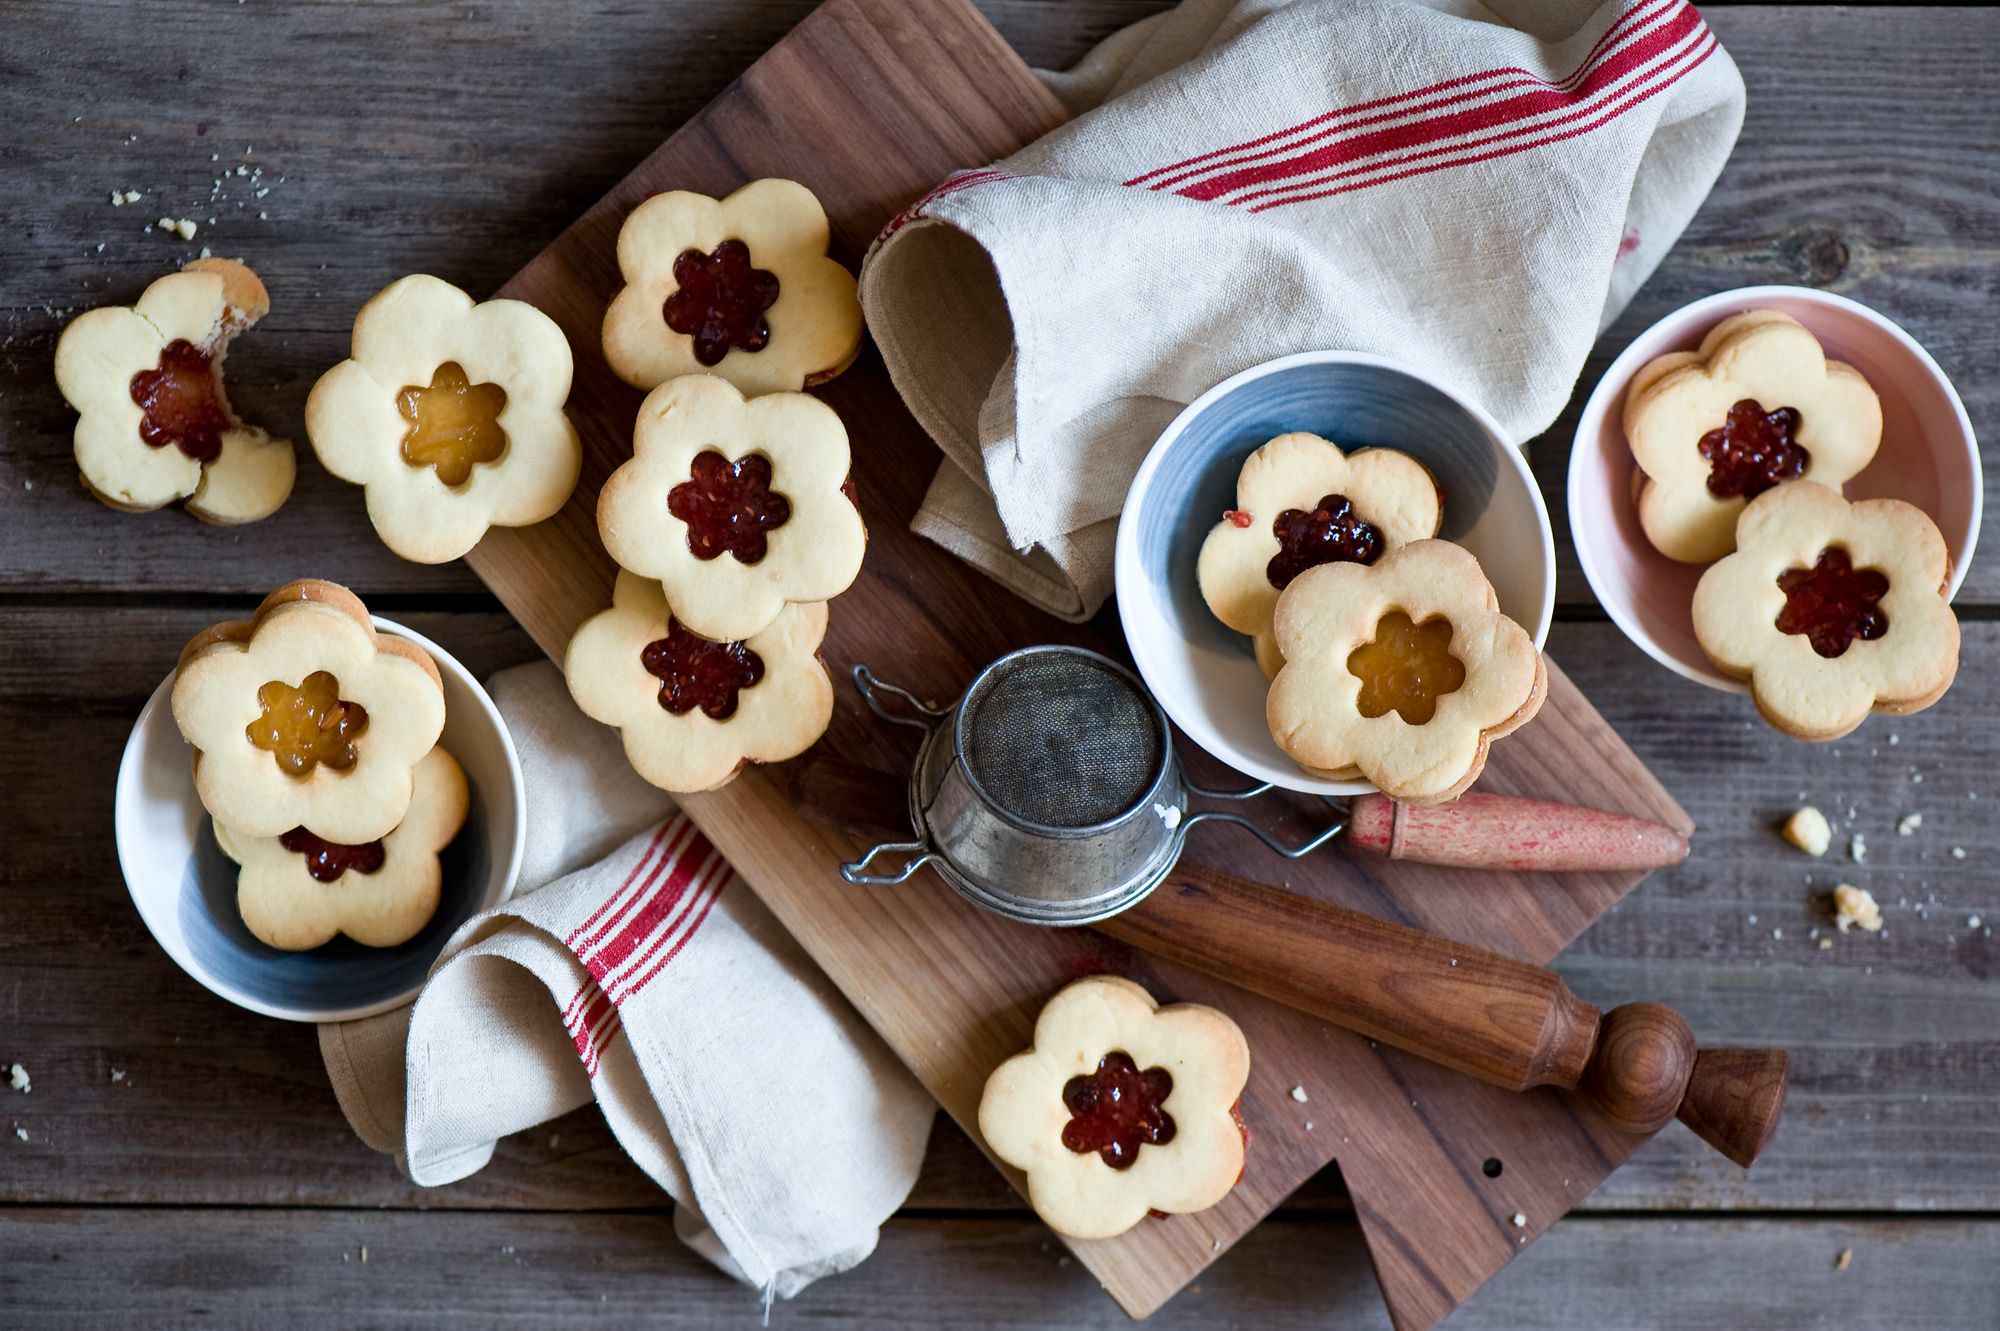
A two-layer cookie is very beautiful when two cookies are fastened with:
- cream;
- condensed milk (including boiled);
- jam;
- jams:
- jam

It should be remembered that only baked halves can be fastened.
How to shape cookies "nuts"
Separately, it is necessary to mention such a type of cookie as "nuts". They are baked using a special device, which is called hazelnut.

Formation algorithm:
- A layer of dough is placed on the bottom surface of the hazelnut.
- Covered with a second surface, pressed.
- The excess dough that appears must be carefully removed and stuck to the remaining lump of dough: if this is not done, it will burn.
- The folded hazel is placed on the stove, after baking on one side, everything is turned over and the other is baked.
- We remove the hazel from the fire, open it, let it cool slightly and take out the resulting baked halves.
- We bake all the dough in this way, let the “shells” cool, and then fill it with boiled condensed milk or cream.
7 ways to beautifully wrap buns (video)
If you want to impress your guests, you can bake mushrooms in the same way using a similar device. After they have cooled, their hats are dipped in melted chocolate. The legs can be covered with sugar icing.
Surely there are no such people who would not love homemade buns. Different forms (how to make pastries, we will tell a little further) not everyone is able to give such products. Therefore, we decided to devote this article to this topic. From it you will learn how to make buns, form curls and classic buns.
Forms are different: how to do it?
As a rule, they are prepared only from a rich yeast base. In other words, yeast, or margarine, as well as granulated sugar should be added to the dough for such products. After kneading the soft base, it is covered with a towel and left aside for 80-90 minutes. During this time, the dough should rise several times, become as soft and lush as possible.
Since making different It should be noted that most housewives prepare such pastries without relying on any recipes. Therefore, you can give one form or another to the buns at your own discretion.
However, there are those cooks who prefer to cook only certain pastries of specific sizes and shapes. Let's look at some of these options in more detail.

Classic pieces
How to make buns of different shapes? Before answering this question, we should tell you how classic round products are formed. To do this, a piece the size of a fist is pinched off from a rich yeast base, and then it is lubricated with vegetable oil and rolled into a ball. In this form, the semi-finished product is placed in a deep form, and then all other products are laid out there. At the same time, there is no need to leave one or another distance between them. Indeed, after baking, semi-finished products, flavored with oil, depart from each other very well.
We form buns
Now you know how classic buns are formed. The forms are different (how to make buns, we will tell right now) you can invent such products yourself. However, in this section of the article, we decided to tell you how to make beautiful and neat buns.
A small piece is torn off from the approached pastry and rolled into a round cake with a diameter of about 12 centimeters and a thickness of 7-8 millimeters. After that, the products are sprinkled with fine sugar and rolled into a tight roll. In the future, it is folded in half, the middle part is cut, leaving the ends intact. Then the product is laid out on a greased baking sheet, after opening the cut part of the semi-finished product. Lubricated on top chicken egg and sent to the oven.

We form curls
Before you make buns of different shapes, you should decide which products you want to get. If the presence of the filling is not important for you, then you can use the methods presented above to form homemade cakes. Otherwise, it is recommended to pay attention to the following method.
So how do you make homemade buns? different forms(a photo of the products is presented in this article) such pastries can be given very easily. However, we will consider only the fastest and most popular way. To do this, all the pastry is laid out on a board, sprinkled with flour and rolled into a rectangular layer no more than 8 millimeters thick. Then they lay out the filling on it (for example, poppy seeds, thick jam, dried fruits, fruits, nuts, etc.) and wrap it tightly in a roll. After that, the product is cut into pieces. Their thickness should not exceed 4-5 centimeters.
At the end, the formed curls are laid out on a greased sheet or baking sheet and sent to the oven. At a temperature of 200 degrees, they are baked for 52 minutes, and then carefully removed.
It should be noted that the famous cinnabon buns are baked according to this principle.
Summing up
Now you know how to make delicious homemade buns. The forms are different (how to make buns and curls, we examined above) it is quite easy to give them. The main thing at the same time is to use only a rich yeast base and show maximum creative imagination.

By the way, in addition to the options presented, there are many more various ways forming beautiful homemade buns. For example, someone makes them in the form of braids, someone in the form of a sliced loaf, and someone even gives the buns the look of French croissants.