How to sculpt pies from yeast. How to make pies from yeast dough
Ingredients:
- Wheat flour
- Yeast dough
How to form triangular pies from yeast dough with stuffing step by step instructions with a photo:
We will need:
- Cutting board
- rolling pin
- Cup
Ingredients:
- Wheat flour
- Yeast dough
How to properly form pies from yeast dough
Pies are one of the favorite treats of both adults and children. They are served with borscht, soups instead of bread. Sweet pies are delicious with tea or milk. Pies can be taken with you on the road, on a picnic, to school or to work. But everyone notices that one hostess often has pies on the table, while the other almost never.
This is due not only to the fact that not every hostess is fully amenable to yeast dough, but also with the fact that the filling flows out of the pies during baking, they unfold, crack along the seam and as a result have a not very appetizing look. In order for the pies to look attractive, and the filling does not leak out, the pies should be formed correctly.
Depending on the filling, you can form open or closed pies. If you cook pies at the same time with different fillings, then giving them different shape, you mark them well. And your family will be able to accurately choose from the common slide exactly the pie with the filling that they like. Well, no one will argue that beautifully formed pies always look very appetizing.
How to form pies from yeast dough with filling long step by step instructions with a photo:
Step 1
For work, we need pie yeast dough, pie filling, flour, rolling pin, cutting board.
Step 10
And then put the pie with the folded edges down. This method of molding is very suitable if you are very afraid of leaking liquid filling.
We will need:
- Cutting board
- rolling pin
Ingredients:
- Wheat flour
- Yeast dough
How to properly form pies from yeast dough
Pies are one of the favorite treats of both adults and children. They are served with borscht, soups instead of bread. Sweet pies are delicious with tea or milk. Pies can be taken with you on the road, on a picnic, to school or to work. But everyone notices that one hostess often has pies on the table, while the other almost never.
This is due not only to the fact that not every housewife fully succumbs to yeast dough, but also to the fact that the filling flows out of the pies during baking, they unfold, crack along the seam and as a result have a not very appetizing look. In order for the pies to look attractive, and the filling does not leak out, the pies should be formed correctly.
Depending on the filling, you can form open or closed pies. If you cook pies with different fillings at the same time, then by giving them a different shape, you will mark them well. And your family will be able to accurately choose from the common slide exactly the pie with the filling that they like. Well, no one will argue that beautifully formed pies always look very appetizing.
How to form pies from yeast dough with filling round step by step instructions with a photo:
Step 1
For work we need yeast pie dough, flour for dusting, rolling pin, cutting board.
We will need:
- rolling pin
- Cutting board
- Cup
Ingredients:
- Wheat flour
- Yeast dough
How to properly form pies from yeast dough
Pies are one of the favorite treats of both adults and children. They are served with borscht, soups instead of bread. Sweet pies are delicious with tea or milk. Pies can be taken with you on the road, on a picnic, to school or to work. But everyone notices that one hostess often has pies on the table, while the other almost never.
This is due not only to the fact that not every housewife fully succumbs to yeast dough, but also to the fact that the filling flows out of the pies during baking, they unfold, crack along the seam and as a result have a not very appetizing look. In order for the pies to look attractive, and the filling does not leak out, the pies should be formed correctly.
Depending on the filling, you can form open or closed pies. If you cook pies with different fillings at the same time, then by giving them a different shape, you will mark them well. And your family will be able to accurately choose from the common slide exactly the pie with the filling that they like. Well, no one will argue that beautifully formed pies always look very appetizing.
How to form pies from yeast dough with crescent moon filling step by step instructions with a photo:
Step 1
For work, we need pie yeast dough, filling for pies, a glass, a rolling pin, a cutting board.
We will need:
- rolling pin
- Cutting board
Ingredients:
- Wheat flour
- Yeast dough
How to properly form pies from yeast dough
Pies are one of the favorite treats of both adults and children. They are served with borscht, soups instead of bread. Sweet pies are delicious with tea or milk. Pies can be taken with you on the road, on a picnic, to school or to work. But everyone notices that one hostess often has pies on the table, while the other almost never.
This is due not only to the fact that not every housewife fully succumbs to yeast dough, but also to the fact that the filling flows out of the pies during baking, they unfold, crack along the seam and as a result have a not very appetizing look. In order for the pies to look attractive, and the filling does not leak out, the pies should be formed correctly.
Depending on the filling, you can form open or closed pies. If you cook pies with different fillings at the same time, then by giving them a different shape, you will mark them well. And your family will be able to accurately choose from the common slide exactly the pie with the filling that they like. Well, no one will argue that beautifully formed pies always look very appetizing.
How to form pies from yeast dough with filling with voluminous strips step by step instructions with a photo:
Step 1
For work, we need yeast pie dough, pie filling, flour for dusting, rolling pin, knife, cutting board.
Step 4
On the one hand, across the entire width, lay out the filling on the rectangle, and on the other hand, up to half of the rectangle, make cuts with a knife.
We will need:
- rolling pin
- Cutting board
Ingredients:
- Wheat flour
- Yeast dough
How to properly form pies from yeast dough
Pies are one of the favorite treats of both adults and children. They are served with borscht, soups instead of bread. Sweet pies are delicious with tea or milk. Pies can be taken with you on the road, on a picnic, to school or to work. But everyone notices that one hostess often has pies on the table, while the other almost never.
This is due not only to the fact that not every housewife fully succumbs to yeast dough, but also to the fact that the filling flows out of the pies during baking, they unfold, crack along the seam and as a result have a not very appetizing look. In order for the pies to look attractive, and the filling does not leak out, the pies should be formed correctly.
Dough pies for tea - it's not just tasty food. This is an opportunity to spend time with family cooking together, and the exchange of experience between generations, as well as the joy and good mood your loved ones.
Dough pies: how to cook
For the preparation of pies, the most different types dough: yeast, yeast-free, puff, on kefir. In this case, only yeast dough can be kneaded in dozens different ways: someone pours the yeast directly into the flour, others first dilute them in warm milk, while others add to the composition chicken eggs. In any case, to find your ideal pie dough, there is only one way - to try.
The easiest yeast dough for pies
You will need:
1 kg of flour; - a pack of dry yeast; - 2-3 tablespoons of sugar; - salt to taste; - a pack of butter; - 350-400 g of water.
Sift flour into a saucepan or bowl, mix with yeast, sugar and salt. Then melt a pack of butter in water, make a well in the flour and pour the resulting mixture into it. After that, you can knead the dough. Do it right in the pan or put the dough on the table - it's up to you. The result should be an elastic homogeneous mass.
Try first to pour out not the whole kilogram, but 800 g of flour. If the dough is not thick enough, feel free to add more
Cover the finished dough with plastic wrap and set to reach warm place for an hour and a half. After it rises, punch it down and let it rise for another 30 minutes. At this time, you can do the stuffing for pies. The filling of apples with cinnamon is well suited to such a test.
Delicious filling for sweet pies
You will need: - about 1 kg of apples (preferably soft, but a fresh crop is also suitable); - 1 cup of sugar (or less, it depends on your taste); - 1-2 pinches of ground cinnamon.
Peel the apples from the seeds and core, cut into medium slices (you can leave the peel on) and mix with sugar and cinnamon. In order for the sweet syrup not to leak out of the pies during frying or baking, the filling must be simmered. Put the apple-sugar mixture over low heat and let the sugar dissolve. Stir constantly, but do not let the filling boil - the whole process should not take more than 2-3 minutes.
Every woman wants to pamper her loved ones various pies and buns. It is by baking that you can determine the level of skill of the hostess. After all, you need to show imagination when choosing not only the filling, but also the shape of future products. Not everyone knows how to mold a pie beautifully.
Baking is an art. Recipes for various pies have been passed down from generation to generation for many centuries. On the this moment there are many ways to prepare them. What are the pies? Baking can be:
It is worth noting that the menu of many foreign restaurants includes pies and pies. The uniqueness of baking lies not only in the filling, but also in the choice of dough. It can be:
- Yeast - rich, used for pies and buns.
- Yeast-free - custard and puff.
However, not every housewife can make beautiful pies, the photo of which is presented below. The form of baking can be absolutely any:
- Round.
- Oval.
- triangular.
- square and so on.
It is best to cook pies and buns from yeast dough, as in the process of cooking it becomes more magnificent and airy. 
We make oval pies
How beautiful to mold oval-shaped pies? It is worth noting that this option allows you to use almost any filling. That is why the oval shape is considered the most popular. To make original pies, you need:
- Divide the dough into small pieces and roll into balls.
- Such blanks should be rolled into flagella, and then cut into cubes (about 4 centimeters each).
- Each piece must be rolled into an oval-shaped cake. The thickness of the dough should be no more than 5 millimeters.
- In the middle of the workpiece, you need to put a little filling. After that, one edge of the cake must be thrown over the second and pinched. The result should be a crescent.
That's all. The oval-shaped pie is ready. When baking or frying, the blanks should be laid out with the seam down. 
Original round pies
How to sculpt beautiful round pies? Actually, it's easy. It is worth noting that this form is ideal for baking with fruit filling. To make the products exactly round, you need:
- Divide the yeast dough into pieces, and then roll it out so that neat cakes with a thickness of no more than 5 millimeters are formed as a result.
- Put the filling in the center of the round blank.
- Carefully gather the edges of the cake in the center and carefully pinch. The result should be a bag.
When baking, these pies should be laid out with a clamp. Otherwise, the cake will spread.
cute little squares
How to mold a pie beautifully from yeast dough? If the filling consists of dry products, such as potatoes or minced meat, then it is best to make square-shaped pastries. It takes a little time. It is worth noting that the fruit or vegetable filling from such pies may leak out. To prepare square-shaped products, you need:
- Roll out cakes from the dough, preferably medium-sized.
- Put the required amount of filling in the middle of each blank.
- Gently lift the corners of the dough and pinch together.
Spread these pies on a baking sheet or in a pan with the seam up. This way the cake won't spread.

triangular baking
How to mold beautiful pies from yeast dough to festive table? In this case, a triangular shape is ideal. The pies are baked very quickly and easily. This form is suitable for baking with open filling. To make triangular pies, you need:
- Roll out the dough so that you get a neat triangle.
- Put the filling in the center of the resulting workpiece.
- Fold the two edges so that an arrow forms.
- Fold the rest of the edges up.

The secrets of making pies from yeast dough
- So that during the modeling process the dough does not stick to your fingers, you need to grease your hands with sunflower oil.
- To make the edges of the cakes stick together well, craftsmen advise lubricating them with water.
- Before baking, the workpiece should be covered with cling film, pre-lubricated vegetable oil. In this case, it is better to use corn. The pies should stand under the film for about 15 minutes. As a result, the pastries will turn out to be more magnificent.
- The tops of the pies should be greased with a beaten egg or milk. Thanks to this, during the baking process, the products will acquire an appetizing crust.
If the dough is yeast-free
If there is no desire to mess with yeast, you can use regular dough, puff or custard. In this case, you can make pies:
- From circles.
- From harnesses.
- With original embossed outlines.
In this case, you can use modeling options, as for yeast dough.
Pies-mugs
How to mold a pie beautifully from yeast-free dough? The manufacturing technology is quite simple:
- First you need to roll out the dough into a fairly thin layer. The thickness must exceed 5 millimeters.
- From the dough, cut out round-shaped blanks, preferably of the same diameter.
- In the center of the cake you need to put the filling, and then close the second cake. The edges of the blanks must be carefully pinched.
Put the finished pies on a baking sheet or in a pan. 
Flagella pies
It's another one original way molding pies from yeast-free dough. Preparing such a cake is very simple. For this you need:
- Roll out the dough and cut out small rectangles. From the side of each corner it is worth making cuts.
- Put the filling in the center of the workpiece.
- After that, each edge must be lifted and folded crosswise. The edges must be sealed.
Pies prepared in this way must be laid out on a baking sheet.
Embossed pies
Want to make a beautiful pie? Photos of ready-made pastries, lovingly prepared by the hands of skilled culinary experts, are simply mesmerizing, causing appetite and a burning desire to try at least a piece of such a delicacy! However, getting embossed pies is not so difficult. The main thing is to follow the sequence. For the manufacture of original baking, not so much is required:
- The dough should be rolled out so that oval-shaped layers are obtained.
- Put the stuffing in the form of a sausage in the middle of each blank.
- Tuck the bottom and top of the cake about a quarter.
- Fold the corners along the wide edge twice crosswise.
It remains only to bake pies in the oven.
Rules for sculpting from yeast-free dough
Yeast-free dough is much denser than muffin. It can be prepared from meatless pies with various fillings. To make the finished baking look appetizing, you should follow certain rules:
- If you want to get pies with an appetizing and golden brown crust, then grease it with egg white before baking.
- If you bake everything in the oven, then you should only heat it up to 100 degrees. The temperature must be increased gradually during cooking to the desired level.
- To make pies out of the oven airy and soft, you need to sprinkle them with water immediately after baking.

In conclusion
Now you know how beautifully to mold pies from puff pastry, yeast or custard. The technology is quite simple. If necessary, you can master several ways of sculpting. This will make pastries not only tasty, but also original. Do not forget that a certain filling requires its own form of baking. For example, for a liquid filling, square pies or triangular shape. In this case, it is better to make products round or oval. The main thing is to follow the rules and recommendations of professionals.
This dough is suitable for a wide variety of pies and buns. The situation is similar with the filling: sweet, unsweetened, vegetable, meat, fruit, etc. The type of filling also determines how best to wrap the pie so that it not only holds tight, but also looks beautiful.
Standard way:
- Pinch off a piece of dough from the risen dough. For one pie, a piece the size of 2 will be enough walnuts. But this value can be changed depending on your wishes.
- Let the lumps lie down and come up for another 15 minutes.
- Now we put it on the palm of our hand (it should be powdered with flour) and turn it into a cake with our fingers.
- Put the filling in the center of the resulting cake (it should not be wet).
- We combine the edges of the cake and press them together with your finger.
- We put the pie on the table, powdered with flour, and pull our seam up, additionally squeezing the edges. The main thing here is not to overdo it, so as not to tear them.
- If you plan to fry them in a pan, then it is better to tighten the edges to the middle and slightly crush the pie in the center. Thus, during the frying process, the dough inside will not be raw. And you need to fry immediately, seam down.
- If it is an oven pie, then the location of the seam is not important. So, if the seam is ordinary, you can hide it at the bottom and get a beautiful and fluffy pie at the same time. And if the seam is twisted (fingers wrap the seam when sculpting, putting a new twist on the previous one), then you can leave it on top. But at the same time brush it with whipped water egg yolk so that the seam does not come apart when baking.
How beautiful to make puff pastry pies
The most varied pastries are also made from this dough. From croissants and rolls to various filled flatbreads.
Standard way:
- This dough is rarely made on its own due to the complexity of the process. Its store version is sold in the form of a square or rectangle. The latter is more common. And in order not to damage the layers of dough, it is slightly rolled out without changing the original shape. The table should be well floured.
- Cut it with a sharp knife along the center of the long side, and also divide the resulting 2 halves into medium-sized squares. Usually 8 pies are obtained from the middle sheet of dough.
- Place a piece of filling in the middle of each piece.
- Then you need to roll the ends of one side to the other and close them up. This can be done with a fork and at the same time get not only strong, but also beautiful edges.
Triangular way 1:
- The first three points are similar to the previous option.
- Now you need to blind the edges of one side of the square with its side part, and attach the remaining sides to them, so that you have a pyramid or triangle.
- Brush the top with the yolk mixture.

Triangular way 2:
- To do this, the dough layer must be cut in the center of the long side.
- Cut the resulting strips into isosceles triangles.
- The filling is laid out in the center of the form.
- Connect the edges, and get a flat triangle.
The edges can be pressed with a fork and made them wavy.
Puff yeast dough
There are also many options for baking both in terms of filling and shape. Most often, such pies are made square or rectangular (as described above). You can make them a little non-standard, but at the same time incredibly beautiful and tasty.
Snail:
- If you have store-bought dough, then its shape is usually similar to puff pastry. Therefore, we also roll it into a layer, which must be cut in the middle.
- Cut long pieces so as to get 6 squares or rectangles.
- Each piece needs to be rolled out, slightly lengthening it.
- The filling should be soft, with the texture of plasticine. We smear it all over the piece without reaching the edge of a few millimeters.
- Roll up the pie along the long side into a roll and slightly blind its edges.
- Wrap the resulting roll into a snail, twisting one end into a spiral towards the other. Protect the joint.
- We put on proofing and after that you can send the pies to the oven.

Open snail:
- To do this, the dough is rolled into a layer, but not cut, but immediately smeared with filling.
- After that, roll it into a roll and pinch the long edge.
- With a sharp knife cut off the pieces and spread them on a baking sheet with the open side.
- Sweet filling can be sprinkled with sugar on top and baked after proofing.

Don't be afraid to get creative and step back a little. step by step instructions.
From sand dough
Cookies, cakes and cakes are most often made from this dough. Pies of them are made only with a sweet filling. And in fact it looks more like a closed cake than a pie.

There are 4 options:
- The standard way to sculpt a pie according to the principle of yeast dough. It does not need time for proofing, you need to bake such pies immediately.
- Any of the methods for sculpting puff and puff yeast dough is perfect. Also without proofing.
- Roll into a ball, slightly crush it in the center. Put, for example, half a peach into the recess. Sprinkle it with sugar and send it to the oven. The filling can be any.
- Carry out the manipulations similarly to the previous option, only pull the edges on four sides up and fasten over the filling. Brush with yolk mixture before baking.
- Puff pastry you can not fry in oil in a pan, otherwise it will completely lose its structure.
- Sugar can be sprinkled on pies both before proofing and updated after it.
- If it is bad to blind the edges in a pie, then when frying, the seam will open and all the filling will fall out.
- Puff and shortbread dough does not like long sculpting.
- For beginners, it is better to start with simple and standard ways to sculpt pies. The same applies to the filling. Difficult options may not work the first time and discourage the desire to create.
Wet fillings are the most difficult to work with; before applying them, sprinkle the place of laying with plenty of starch so that the juice does not make the dough liquid.
How beautiful to sculpt pies (video)
Pies and their modeling is a flight of your imagination. Having mastered the basic techniques, you can easily begin to make incredible culinary masterpieces, not only in terms of taste, but also in terms of appearance.
They started the dough for buns, pies and pretzels, but you don’t know how to cut the dough so that the fancy products turn out beautiful - see the step-by-step photo.
beautiful buns
Section "Orchid": roll out, cut out a square, fold in a triangle, make cuts along the sides, leave a section of dough without a cut, unfold the square, connect the cut ribbons in the center.

Section "Peony": roll out, cut out a square, fold in a triangle, make cuts along the sides, leave a section of dough without a cut, expand the square, fold the triangle with other corners, make cuts. Expand the square, connect the cut ribbons in the center. Put the stuffing into the flower petals.

Section "Curls": roll out the layer, flavor with stuffing, roll into rolls on both sides, cut across.
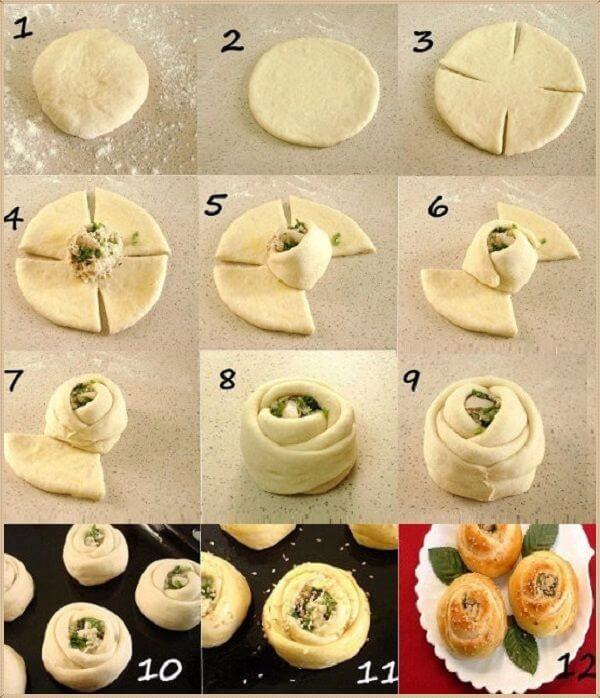
Cutting for muffin "Rose": roll up a bun, roll out a circle, make 4 cuts at equal intervals, put the filling in the middle, fold the rose petals in turn.

Sweet "Bows": roll up koloboks, roll out mugs, fold the circle in half, make cuts 4 external and 3 internal.

A simple flower made from sweet yeast dough: roll the sausages, connect them into rings, put the filling to the two walls inside the ring, connect in the center, as shown in the photo.

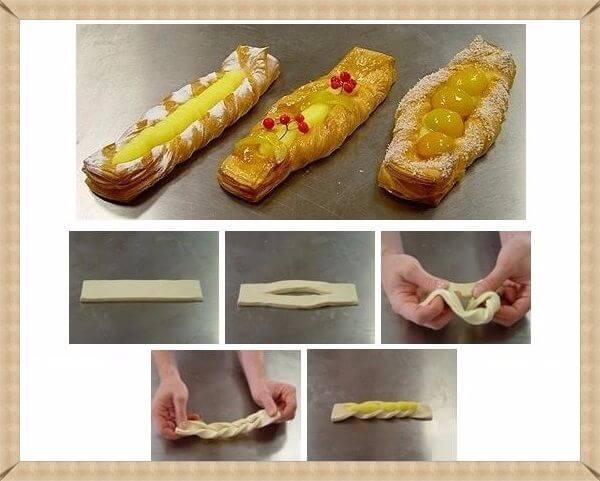
Beautiful puff Kalach: roll a bun out of it, roll out a circle, grease with filling, roll into a roll, cut the roll lengthwise, twist two puff ribbons together, connect the ends to make a roll.

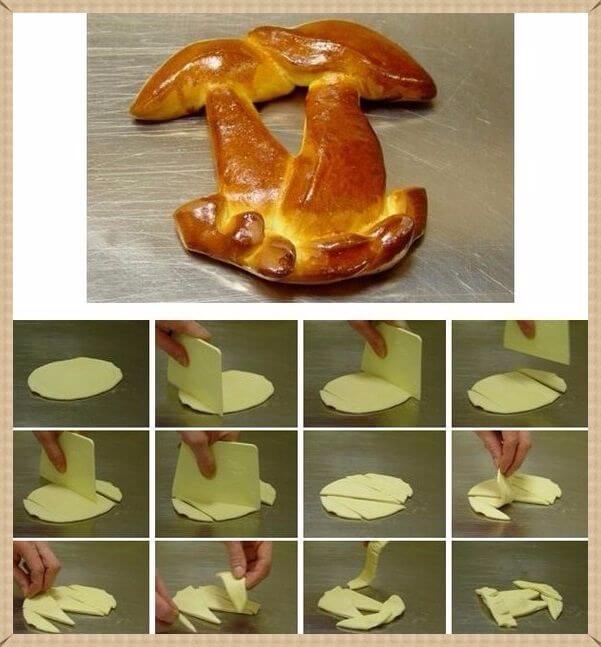
How to make "Piglets" from rich yeast dough. Roll out a circle, make a small incision on top, bend the corners - the ears. We sculpt a piglet for a pig in the lower part, bending the edge and flattening it a little. The piglets' eyes are made of raisins.
Sweet "Mushrooms": a circle is rolled out, which is then cut into pieces (see photo) and laid out in the form of mushrooms.
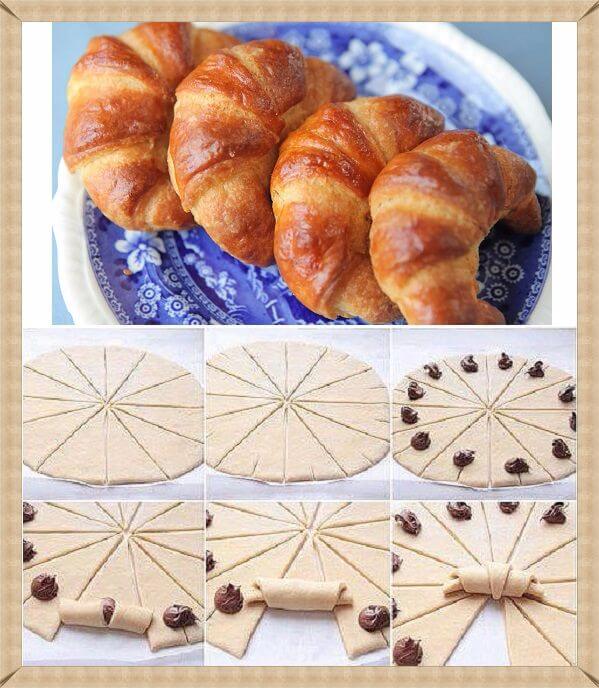
"Croissants". Roll out the circle and cut it into triangles, cutting from the center to the outer edge. An incision is made on the outer side of the triangle in the middle and the filling is laid out at its end. The croissant is rolled from the outer edge to the center.

Bun "Bird": roll up the sausage, wrap one end around the index finger and thread it into the resulting ring. With a small pinch, shape the dough into a beak shape. The tail needs to be flattened and cuts made, giving the appearance of feathers. Eyes are highlights.
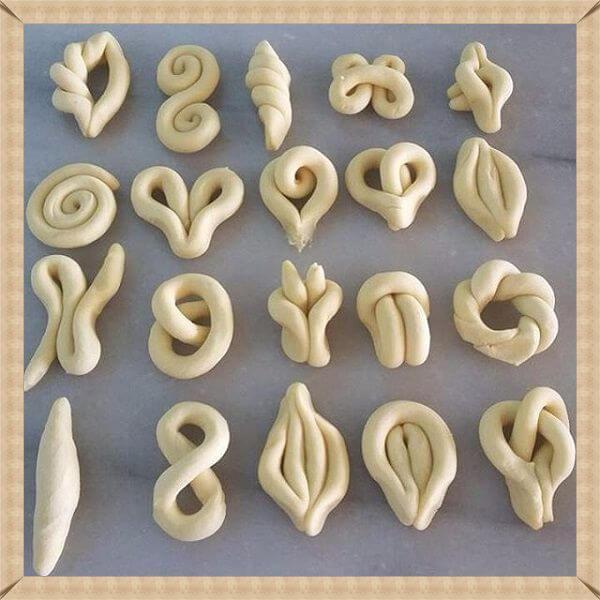
And here simple options beautiful buns made from sausages. By the way, even a child can make such forms. Involve the little ones in this entertaining baking process. At the same time develop fine motor skills and imagination.
How to decorate pies

Cake decoration "Flower": roll out a round-shaped layer, put a bun of filling in the center. Carefully distribute the rest of the filling in a circle, leaving space from the edges and the central bun. Cover everything on top with another layer of dough. With a small bowl or tea cup, press the edges around the center filling. Cut the outer edges with an openwork knife. Then evenly cut the dough with the filling, which you have goes along the outer ring. Slightly turn each "petal" stuffing up.
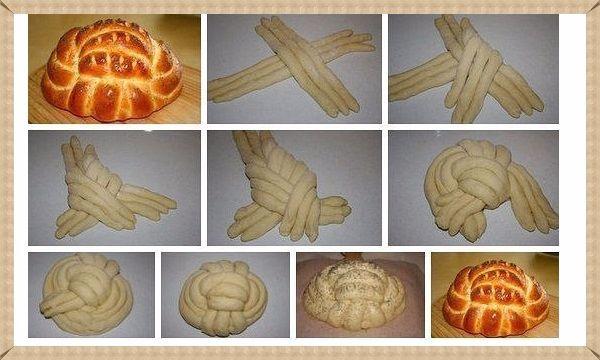
Cutting Butter Loaf. Roll up the flagella - sausages and weave a loaf of them, as shown in the step-by-step instructions in the photo.
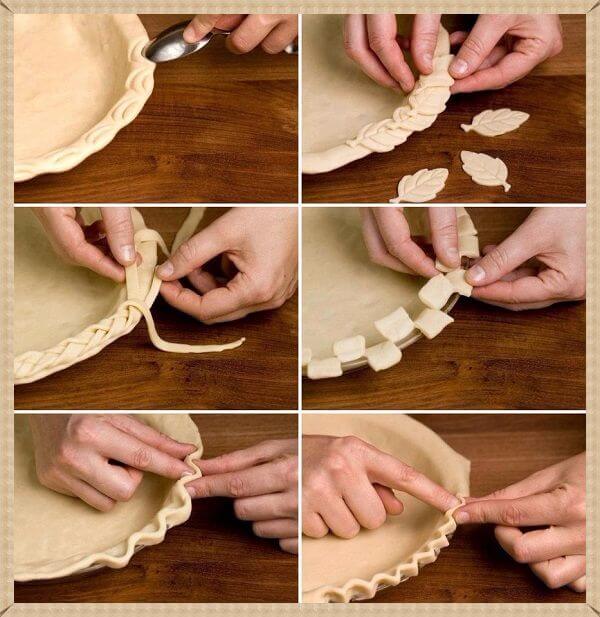
And here are the options for decorating the edge of the pie.
Cutting the dough "Pigtail" or "Spikelet"
The simplest version of "Pigtails". A rectangle is cut out of the rolled out layer of dough, a longitudinal incision is made in the center. Then, one edge is threaded several times through the resulting hole. Thus, the edges are twisted into a spiral. The filling is laid out in the center.

"Pigtail with sausage". Three sausages are connected by the upper edges. Then a slice of sausage is laid out between them. Weaves like a braid. The right harness is placed between the left and center, then the left is placed between the right (which is now on the left) and the center (which is on the right). Again, a slice of sausage is placed and the weaving of the pigtail continues.

Sausage in the dough "Pigtail". This delicacy is sometimes called "Obzhorka" in culinary shops. The sausage is laid out in the center of the dough cake. Then the edges stick to each other, and the sausage wrapped with dough is cut into equal parts. Each polka is turned inside out with the sausage side up and placed through one on opposite sides of the middle. Sent to the oven when half cooked. Sprinkle with cheese, herbs on top, grease with mayonnaise or ketchup (for an amateur). And bring the pastry to readiness.
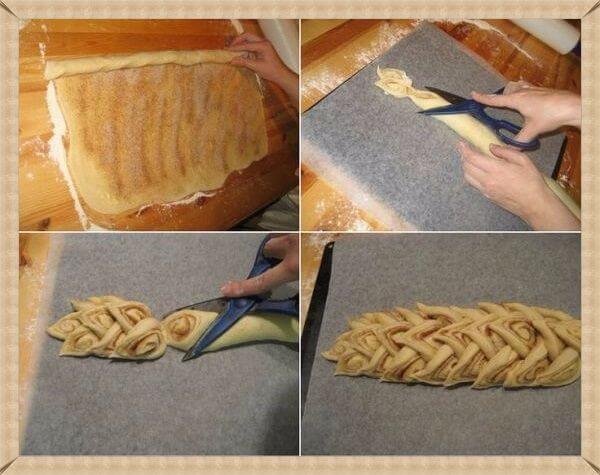
Beautiful bun "Spikelet". This baking option is done simply, but it looks very beautiful. We roll out a thin layer, grease with vegetable oil or an egg, sprinkle with sugar and cinnamon (poppy seeds). We turn the roll, which we then cut with scissors a little obliquely, as shown in the photo. We spread the resulting "spikelets" into one large beautiful bun.
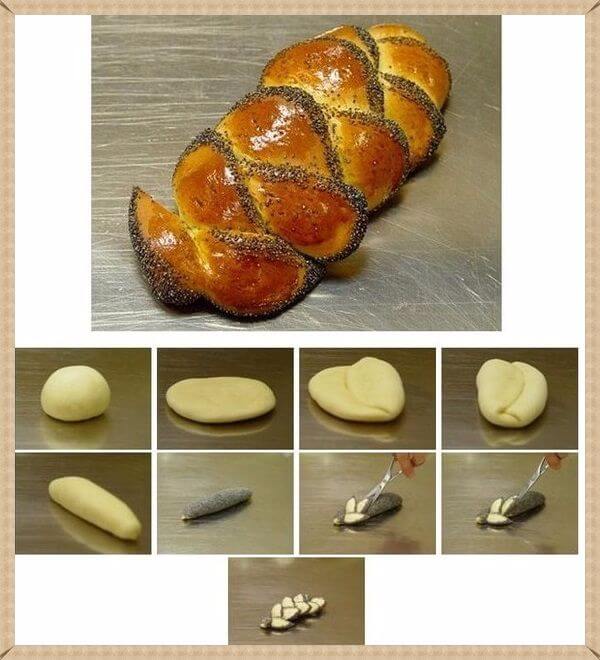
And this is a simple pigtail with a poppy. The sausage is covered with poppy seeds and cut with scissors, spreading the petals on different sides.