Download the program to create a bootable USB flash drive from iso. Creating a multiboot flash drive from scratch with your own hands
Previously, before writing windows to a USB flash drive, every time I searched new program. There are millions of them, but zero sense. Each time I managed to do it any, but every single one was inconvenient. In some there are too many settings, and the other records for a very long time. Paid programs slipped just as often, but if I wanted to pay, I would have had a disk with the original operating system.
The other day, I again needed to burn Windows and randomly I stumbled upon the Rufus program. Probably, as you may have guessed, Rufus touched me and became my favorite program. Yes, that's what I've been looking for for years. Easier programs than Rufus doesn't exist. It has a minimum of functions, and, by comparison, there are no more of them than the menu for formatting a flash drive.
Everything you see in the screenshot is all, there is nothing else there. In addition, it is completely free, you can download it and use it without restrictions.
I was also surprised by one moment: when I started recording a bootable USB flash drive from the old OS image, the recording was completed indecently and not habitually quickly. Truth, it was the fastestwindows to a flash drive! Earlier, on the same flash drive, the same image was recorded for 30-50 minutes. and this time 10 minutes - Lightning fast.
What canRufus:
I already said about the fast recording of the system, now let's see all the features of the program.
What can be written with Rufus:
NT Password Registry Editor
Ubuntu, Ultimate Boot CD
Download Rufus
https://yadi.sk/d/DUW30yh93RLmZq - Version 2.18
Download torrent - Version 2.8
Installation is not required. Just run the program and use it.
Support for many languages. By default the program is in Russian. Become on any version of windows OS.
The program is completely free. You can also distribute it on your own behalf, subject to GPLv3.
How to burn windows to a flash drive
An amazing subtitle in which I have nothing to say to you due to the simplicity of this program. Simply insert your flash drive into USB, select all the options as above and click on the floppy disk icon to select the image to burn. Everything, it remains only to press the start.
Program for Windows installation 7 from a flash drive eliminates the need to use a CD drive.
It is only required to prepare the distribution in advance, set the BIOS settings.
Important: the installation program should be selected as carefully as possible - you can accidentally download a virus, trojan. The situation is similar with the Windows distribution. If possible, you should use the licensed version. Otherwise, check all files with an antivirus.
UltraISO Program
The UltraISO program needs to be installed. There are no difficulties, for this you need to run the executable file and press the next button all the time.
Important: the program during installation should not ask for a phone number, other data - it is provided free of charge.
If something like this takes place, then it should be removed immediately. Most likely, the utility is infected with a virus.
Creation bootable flash drive happens like this:
- after launch, a window immediately opens in which you need to click on the “trial period” (Fig. No. 1);
- then the program will open the main working window, you must click on the context menu "open" - you must select the Windows distribution prepared in advance for installation;

- then the USB flash drive connector is inserted into the USB port;
- click on the menu under "boot" - select "write hard disk image";

- after installation, click on "format";
- after formatting the flash drive is completed, you need to click on "write" (Fig. No. 4);

Advice: it is not necessary to use third-party utilities to install - you can use standard means OS.
It is possible to use the official application to create a bootable USB flash drive.

To create a bootable device, again, you need a distribution kit - preferably in ISO format. The operation itself looks like this:
- launch is in progress;
- by clicking on "Browse" open the file with the distribution;

- Specify "USB device";

- To record to a USB disk, media must be inserted beforehand;

- Press "Start over".
After that, you must wait 5-15 minutes - until the creation of a bootable flash drive is completed.
WinToFlash program
You can also use the WinToFlash utility. You can download it for free on the official website - http://wintoflash.com/.
You only need to do two things:
- run the installed utility;
- select the appropriate menu - "transfer the Windows setup program to the drive";
- click start (Fig. No. 6).

WinSetupFromUSB program
A convenient utility for performing this task is WinSetupFromUSB. You will need an ISO image and a USB drive. After starting, do the following:
- format memory;
- run MasterBootRecord (MBR) in Bootice (Fig. No. 7);

- write everything you need using WinSetupFromUSB (Fig. No. 8).

BIOS setup
To install Windows 7 in this way, you will need to configure the BIOS accordingly.
If possible, you should familiarize yourself with the manual, it can be downloaded for free on the official website of the manufacturer.
Bios settings may have their own characteristics, some specifics. It is purely individual for each model - even from one manufacturer.
To enter the settings, it is usually enough to press the Delete key for another initial stage PC downloads. As a result, a window with a table view menu will appear (Fig. No. 9).

After successfully enabling Bios, you need to find the option that is responsible for the boot order from devices various types.
In all Bios, this menu is called differently. This is where the complexity lies.
But, as a rule, all such items contain the word boot in their name.
Download settings are made as follows:
- open the boot priority selection menu (Boot);
- select USB-HDD.

Important: you must first insert the USB drive into the connector - only after that it will appear in the list of devices from which you can start.
Operating system installation
It will be possible to download completely free of charge all programs from the Internet.
But it is worth familiarizing yourself with all the requirements in advance - to the quantity free space on the hard drive, RAM and other characteristics.
When all the preparatory work is completed, you can proceed to install Windows. This operation is carried out as follows:
- after bios settings and installing the drive in the port, you need to reboot, a window will appear asking you to press any key (Fig. No. 10);

- the OS installation window will open - you need to click on "next" (Fig. No. 11);

- in the future, a window will open - you need to click on the "install" button (Fig. No. 12);

- you need to select the version of the operating system to be installed - almost all pirated distributions allow you to do this (Fig. No. 13);

- the system requires you to read the license agreement, check the box next to "I accept the terms of the license" and click "next";
- select in the next window that opens full installation"(Fig. No. 14);

In articles on how to install Windows from a USB flash drive, we have already described some ways to create a bootable USB flash drive, but not all. Below are instructions on this topic, but we recommend that you first read the article itself - in it you will find new, simple and interesting ways.
This review will look at free utilities that allow you to create a bootable USB drive for installing Windows or Linux, as well as two programs for burning a multiboot USB flash drive. All download links in the article lead to the official websites of the programs.

Bootable flash drive Windows 10 and Windows 8.1 without programs
Those who have a modern computer equipped with a motherboard with UEFI software (A novice user can determine UEFI by the graphical interface when entering the "BIOS"), and who need to make a bootable USB flash drive to install Windows 10 or Windows 8.1 on this particular computer, can generally do not use any third-party programs to create a bootable USB flash drive.

Everything you need to use this method: support for EFI boot, a USB drive formatted in FAT32 and preferably an original ISO image or a disk with the specified versions of Windows OS (for non-original ones, it is more reliable to use the creation of a UEFI flash drive using the command line, which is described later in this material).
Microsoft Windows Installation Media Creation Tool
For a long time, the Windows 7 USB/DVD Download Tool was Microsoft's only official utility for creating a bootable flash drive (originally designed for Windows 7, described later in this article).
And now, after more than a year since the release of Windows 8 and 8.1, the following official program has been released - Windows Installation Media Creation Tool to burn an installation USB drive with the Windows 8.1 distribution kit of the version you need.

With this free program, you can easily make a bootable USB or ISO image by choosing a professional, single language or basic version of Windows 8.1, as well as the installation language, including Russian. This downloads the official distribution from the Microsoft website, which may be important for those who need the original Windows.
Detailed instructions for using this method and how to download the program from the official Microsoft website here: http://remontka.pro/installation-media-creation-tool/
Multiboot flash drives
First of all, I will talk about two tools designed to create a multiboot flash drive - an indispensable tool for any computer repairman and, with the skills, a great thing for the average computer user. As you can understand from the name, a multiboot flash drive allows you to boot in different modes and for different purposes, for example, one flash drive can have:
- Installing Windows 8
- Kaspersky Rescue Disk
- Hiren's Boot CD
- Installing Ubuntu Linux
This is just an example, in fact, the set may be completely different, depending on the goals and preferences of the owner of such a flash drive.
WinSetupFromUSB

Main program window
In my personal opinion, one of the most convenient utilities for creating a bootable USB flash drive. The functions are quite wide - in the program you can prepare a USB drive for its subsequent transformation into a bootable one, format it in a variety of ways and create the necessary boot record. The main function, which is also implemented quite simply and clearly, is to write a bootable USB flash drive from Linux installation images, utility disks, as well as Windows 8, Windows 7 and XP installations (Server versions are also supported). The usage is not as simple as some of the other programs in this review, but, nevertheless, if you are more or less familiar with how this kind of media is made, it will not be difficult for you to figure it out. For everyone else I will write one day detailed instructions with a description of the process of creating a multiboot flash drive for work.
Easy2Boot and Butler (Boutler)

Programs for creating a bootable and multiboot USB flash drive Easy2Boot and Butler are very similar to each other in terms of the principle of operation. AT in general terms, the principle is as follows:
- You prepare the USB drive in a special way
- Copy the bootable ISO images to the created folder structure on the flash drive
As a result, you get a bootable drive with images of Windows distributions (8.1, 8, 7 or XP), Ubuntu and other Linux distributions, utilities for computer recovery or virus treatment. In fact, the number of ISOs you can use is limited only by the size of the drive, which is very convenient, especially for specialists who really need it.

Of the disadvantages of both programs for novice users, one can note the need to understand what you are doing and be able to manually make changes to the disk if necessary (not everything always works the way you want by default). At the same time, Easy2Boot, given the availability of help only on English language and lack of a GUI, somewhat more complex than Boutler.
xboot
XBoot is a free utility for creating a multi-boot flash drive or ISO disk image with several versions of Linux, utilities, antivirus suites (for example, Kaspersky Rescue), Live CD (Hiren's Boot CD). Windows is not supported. However, if we need a very functional multi-boot flash drive, then we can first create an ISO in XBoot, and then use the resulting image in the WinSetupFromUSB utility. Thus, by combining these two programs, we can get a multi-boot flash drive for Windows 8 (or 7), Windows XP, and everything that we have written in XBoot. You can download it on the official website https://sites.google.com/site/shamurxboot/

Creating bootable media in this program is done by simply dragging the desired ISO files into the main window. Then it remains to click "Create ISO" or "Create USB".
Another opportunity provided by the program is to download the necessary disk images by selecting them from a fairly extensive list.
Windows bootable flash drives
This part presents programs whose purpose is to transfer the installation files of the Windows operating system to a USB flash drive for easy installation on netbooks or other computers that are not equipped with optical CD drives (does anyone say so?).
Microsoft Windows 7 USB/DVD Download Tool
Windows 7 USB/DVD Download Tool is official free program from Microsoft, designed to burn a bootable USB flash drive with Windows 7 or Windows 8. Despite the fact that the program was released for previous version operating system, with Windows 8 it also works fine.

Selecting a Windows ISO image in a utility from Microsoft
The use is not difficult - after installation, you will need to specify the path to the Windows disk image file (.iso), specify which USB drive to write to (all data will be deleted) and wait for the operation to complete. That's all, a bootable USB flash drive with Windows 8 (7) is ready.
Bootable flash drive in Windows command line
If you need a flash drive to install Windows 8, 8.1 or Windows 7, then it is not necessary to use any third party programs to create it. Moreover, some of these programs are simply a graphical interface, doing everything that you can do yourself using the command line.

The process of creating a bootable flash drive on the Windows command line (including with UEFI support) looks like this:
- You prepare the flash drive using diskpart on the command line.
- Copy all operating system installation files to the drive.
- Make some changes as needed (for example, if you need UEFI support when installing Windows 7).
There is nothing complicated in such a procedure, and even a novice user can handle it by following the instructions.
WiNToBootic
Another free and perfectly working utility for creating a bootable USB flash drive with Windows 8 or Windows 7. Little known enough, but, in my opinion, noteworthy program.

Benefits of WiNTBootic over Windows 7 USB/DVD Download Tool:
- Support for Windows ISO images, unpacked OS folder or DVD
- There is no need to install on a computer
- High operating speed
Using the program is as simple as the previous utility - we indicate the location of the files for installing Windows and which flash drive to write them to, after which we wait for the program to finish.
WinToFlash Utility

This free portable program allows you to create a bootable USB flash drive from the installation CD of Windows XP, Windows 7, Windows Vista, as well as Windows Server 2003 and 2008. And not only that: if you need a bootable MS DOS or Win PE flash drive, you can also make it using WinToFlash. Another feature of the program is the creation of a flash drive to remove the banner from the desktop.
Rufus
Rufus- free utility, which allows you to create a bootable USB flash drive for Windows or Linux. The program works on all relevant this moment versions of Windows OS and, among other functions, can check the flash drive for bad sectors, bad blocks. It is also possible to place various utilities on a flash drive, such as Hiren's Boot CD, Win PE and others. Another important advantage of this program in its latest versions is the simple creation of a bootable UEFI GPT or MBR flash drive.

The program itself is very easy to use, but quite limited. It is somewhat reminiscent of the truncated WinSetupFromUSB, which was mentioned above.
Considering the fact that many users in Russia do not pay very much for programs, using UltraISO to create bootable flash drives is quite common. Unlike all the other programs described here, UltraISO costs money, and allows, among other functions available in the program, to create a bootable Windows USB flash drive. The creation process is not entirely obvious, so we will describe it here.

- With a flash drive connected to the computer, launch UltraISO.
- Select the menu item (top) Boot.
- Specify the path to the distribution boot image to be written to the flash drive.
- If necessary, format the USB flash drive (done in the same window), then click "write".
That's all, a bootable Windows or Linux flash drive created using the UltraISO program is ready.
Other utilities related to bootable flash drives
Windows Bootable Image Creator - Create Bootable ISO

WBI Creator - is somewhat out of the general range of programs. It does not create a bootable USB flash drive, but a bootable ISO disk image from a folder with files for installing Windows 8, Windows 7 or Windows XP. All you need to do is select the folder where the installation files are located, select the version of the operating system (for Windows 8 we specify Windows 7), specify the desired DVD label (the disk label is present in the ISO file) and click the "Go" button. After that, you can create a bootable USB flash drive with other utilities from this list.

Universal USB Installer window
This program allows you to choose one of several available Linux distributions (as well as download it) and create a flash drive with it on board. The process is very simple: select the version of the distribution, specify the path to the file with this distribution, specify the path to the flash drive formatted in advance in FAT or NTFS and click Create. That's all, it remains only to wait.
These are not all programs designed for these purposes, there are many others for various platforms and purposes. For most common and not quite tasks, the listed utilities should be enough. I remind you that it is quite easy to create a bootable USB flash drive with Windows 8 or Windows 7 without using any additional utilities - just using the command line, which I wrote about in detail in the relevant articles.
In this article, I want to tell you how to burn Windows 7,8,10 to a USB drive. Two methods will be described. However, all versions of operating Windows systems written almost the same. To do this, I needed the following programs: Torrent UltraISO Operating system image USB drive
Three ways to burn Windows to a USB flash drive
To carry out this procedure, a USB drive with a capacity of at least four gigabytes was required. In my case, an 8 GB drive was used. So, for starters, it was necessary to format the media in NTFS format. I chose this format by first going to "My Computer". Seeing the flash drive in the list of connected drives, right-click on it. Select "Format" from the context menu
In the "File system type" field, select NTFS.

Burning Windows 7 to a USB flash drive using UltraISO
After formatting the flash drive, download the desired version of Windows (7,8,10) and the program for recording UltraISO. For the convenience of downloading the operating system, it is better to use a torrent, you can download it in any search engine.
Download UltraISO— http://ultraiso.ru.softonic.com/
First of all, install and run the UltraISO program. After the program is fully opened, in the top menu bar, select the “File” command, then “Open”.

After opening the window with local disks, we find the loaded Windows and double-click on it.

Before starting recording, make sure that the drive you want to record to is selected. To do this, look in the "Disk Drive" field. Also, in the "Write Method" field, I had the USB HDD value.

After the actions taken, the recording began, and, as a result, the creation of bootable media. After the recording is completed, the USB flash drive can be used to install Windows on a PC.
This method is also quite simple and you will need the winToBootic program to execute it. When you open the program immediately displayed flash drive. Next, we find the downloaded image of Windows 8 and by dragging the mouse moved the shortcut to the window open program. After we put a tick on the inscription "Quick Format" and clicked "Do it!".
Download winToBootic- http://www.softportal.com/get-38790-wintobootic.html

This program formats the media on its own after a preliminary warning. However, in my opinion, winToBootic is very easy to use and suitable for recording Windows 7,8 and 10 versions.
Burn Windows 10 to USB using Windows USB/DVD Download Tool
I will burn Windows 10 to USB using a utility from Microsoft - Windows USB / DVD Download Tool. You can download this utility from the official Microsoft website.
Download Windows USB/DVD Download Tool— http://wudt.codeplex.com/
After starting the program, we specify the location where the downloaded ISO image of Windows 10 is stored.

Then select the media type (USB).

The third stage is the selection of the desired flash drive.

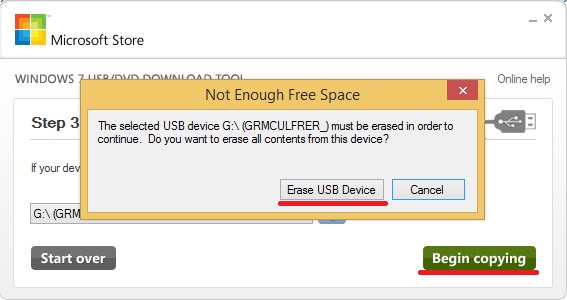
Once selected, click "Copy". The program said that all data on the USB will be deleted.
And finally, the fourth stage is the beginning of the recording.

Writing Windows to a USB flash drive is quite simple, you need to have only the most minimal set of programs for this. The UltraISO method works for almost all versions of Windows except 10. But there won’t be many problems with this version either, since the Microsoft utility is very easy to use and does not require special skills!
For every PC user, there comes a time when you need to reinstall Windows. But here's the problem. The disk drive is broken or it is not in the device at all. What then to do, there is only one way out - to create a bootable USB flash drive. How to make a bootable Windows USB flash drive, learn about it by reading this article.
Training
Before you create a bootable USB flash drive with Windows, you need to prepare. You must have with you:
- flash drive with sufficient memory
- Windows 7 ISO image;
- program for burning ISO-image.
The operating system required for reinstallation can be downloaded from the official Microsoft website. This can be done by paying a certain amount or by entering a special code that comes with the license. boot disk Windows. However, not every user can afford to purchase an operating system. In this case, the ISO image can be found on the World Wide Web without any problems. However, you should be careful. In hacked Operating Systems attackers can insert various malware. Therefore, you need to download the image only on proven resources.
It is also worth noting that the storage device will be completely formatted when the image is written. If it contains some valuable data, then it is worth writing them to a separate disk or any other storage medium.
Create a bootable flash drive
Making a bootable flash drive is very easy. Anyone can cope with this simple task if you follow certain instructions. There are at least 4 ways to install Windows 7 from a flash drive. They differ from each other in the software that is used to install Windows on a flash drive.
Windows 7 USB/DVD Download Tool
To create a bootable USB drive, you can use the official tool from Microsoft. The program can be downloaded directly from the Microsoft website. To create a bootable USB flash drive with Windows 7, follow the instructions below:
When the process of copying the image is completed, you will have a bootable USB flash drive with Windows 7 ISO at your disposal. Now you can install Windows 7 on your PC.
UltraISO
You can make a USB flash drive with Windows in a different way. This method implies a program called UltraISO. UltraISO- paid software to interact with images. You can download a 30-day trial version. The program has a fairly extensive functionality. With its help, you can record, edit, convert images, etc. But we are interested in the recording function. You can write a Windows 7 image to a USB flash drive using the following instructions:

As you could understand, the process of creating a bootable USB flash drive through UltraISO does not require any specialized knowledge. In the same way, a bootable USB flash drive for Windows XP can be made.
WinSetupFromUSB
To create a bootable Windows flash drive, you can use WinSetupFromUSB. The program has several functions for working with images. Nevertheless, we are interested in creating a bootable USB flash drive. The program consists of only one window and is quite simple in terms of operation. To create a flash drive, do the following:

Now the Windows 7 bootable USB flash drive is ready and you can use it.
Windows command line
You can create a bootable Windows flash drive using command line OS. Creating a bootable flash drive this way is a little trickier. However, you do not have to download any additional programs.

After preparation, you need to write the OS installation files to the device by simply unpacking the image downloaded from the Internet. And thus, at your disposal will be a flash drive with Windows written down.
Conclusion
This article addressed the question of how to create a bootable Windows 7 USB flash drive to reinstall this OS. To solve this problem, you can use one of the four methods proposed above. Each user has the right to choose any of them, based on their preferences or capabilities. To obtain the desired result, you must follow the instructions given above and related to the selected method.
Related videos