A program to work without a hard drive. Programs for recovering hard drives: an overview of the best
Even on the highest quality and most reliable HDDs, after some time after installation, bad sectors begin to appear in the PC. When the number of bad blocks becomes large, HDD stops working and needs to be replaced. However, often the hard drive can be restored using third-party software. This article will describe programs for the treatment hard drive and instructions for working with them.
Broken sectors
HDD writes user information to magnetic disks. Their surface is divided into tracks and sectors. If it is not possible to extract data from a sector, then it is called bad or bad. Restoring bad blocks, although difficult, is quite realistic.
Remember that after treatment, information from the HDD should be copied to another drive, and over time, the hard drive should be replaced. If bad sectors began to appear on the hard drive, then even after the repair their distribution will not stop. Another failure of the device can happen at any time.
VictoriaHDD
VictoriaHDD - a program for treating hard disk sectors, is considered one of the most effective and absolutely free. The application works in DOS mode, so it requires some preparatory steps. For starters, you should

- Download the VictoriaHDD utility image in ISO format.
- Also download the WinSetupFromUSB application and run it.
- From the drop-down menu, select the USB drive that will later become bootable.
- Check the box next to "Autoformat".
- Check the box "Linux ISO" and show full path to the image of the program VictoriaHDD.
- Click on the "Go" button to start the file burning process.
BIOS settings
Since hard drive cure programs work in DOS mode, you need to run BIOS setup.

- Restart your computer.
- After turning on, press the "DEL" or "F8" button several times to enter the utility " Setup BIOS". On some devices, other keys are set to launch BIOS settings. To find out which one is responsible for entering the "Setup BIOS" on your computer, read the information at the bottom of the screen immediately after turning on the machine.
- Go to the "Main" section and find the item "SATA Mode". Press "ENTER" and select "IDE".
- In the "First Boot Device" field, set the value to "USB".
- Press the "F10" key to save the settings changes.
- The computer will then restart.
Check and restore
If all the above actions are performed correctly, VictoriaHDD will start automatically after rebooting the PC. To start hard drive recovery:
- Press the c key English letter"P" on the keyboard.
- In the menu that opens, select the port to which the HDD is connected. Today, almost all drives work through the “SATA” socket, so you need to set the switch to the “Ext PCI ATA / SATA” position.
- Press "F9", the screen will display information taken from the SMART table. Special attention look at the "Current pending sectors" column. It is here that the number of sectors from which data is not read is indicated. Remember or write down this number.
- Press the "F4" key and start scanning in the "BB: Erase 256" mode. The utility will try to find all bad blocks and restore them. In this case, the information stored in them will be deleted.
- Reopen the SMART table and look at the number of bad sectors. If some of them could not be restored, it is worth scanning the HDD in another mode.
- Press the "F4" button and select "BB: Classic Remap". Now the application, when it finds a bad sector, will not restore it, but will mark it as non-working. This approach will stop the spread of bad blocks.
- When VictoriaHDD finishes checking, restart your PC.
Programs for treatment tools built into the OS
After scanning the drive with the VictoriaHDD utility, it is worth checking with the utility installed in the operating system by default.
- Open "My Computer".
- Right-click on the local disk icon.
- Go to the "Service" tab.
- Select "Perform verification".
- In the window that opens, check the box next to the inscription "Automatically correct errors."
- Click on the "Start" button and wait for the program to finish.
- Never turn off your PC until the verification process is complete.
HDD Regenerator
HDD Regenerator - free program for treatment The main advantages of the utility include a friendly interface. Many users choose HDD Regenerator for this very reason.

- Close all applications and start HDD Regenerator.
- Open the "Recovery" menu and click on the inscription "Start processing".
- If a window with a warning about BIOS settings appears on the screen, click on the "No" button.
- Select the drive that needs to be treated.
- After that, a command line will open on the screen, where you will need to enter a number from 1 to 4.
- Type "2" and press "ENTER".
- The utility will ask you to specify where to start scanning. Just click on the "Enter" button.
- The application will scan the HDD and give you information about bad blocks.
- When the check is completed, enter "2", now the utility will not only check the hard drive, but also try to recover bad sectors.
I must say that the Windows 7 hard disk repair program is very slow. Sometimes the process is delayed for 2-3 days. However, HDD Regenerator actually tries to restore the blocks' ability to store data, and does not just mark them as unused, which explains for a long time scanning.
MHDD
The functionality of MHDD is almost completely similar to VictoriaHDD. The application runs in DOS mode. With it, you can view the SMART table, diagnose and treat the hard drive. The program is not presented in Russian.

- Create a bootable flash drive, as for the VictoriaHDD utility.
- Perform BIOS setup and restart your computer.
- Press "F2" and select the device you want to work with.
- To scan the hard disk surface, type the word "SCAN" or use F4. The screen will display settings in which all destructive functions (erasing, deleting bad blocks) are disabled.
- Press "F4" again. Scanning will start, and a table will appear on the display, in which the colors of the cells will change during the scan: white, gray, green - the sector is operational; yellow - there is a risk of damage; red - the block is damaged.
If there are bad blocks on the drive:
- Copy all information to another HDD.
- Enter the ERASE command, which will completely erase the data from each sector. This will get rid of soft-bad blocks.
- If this does not solve the problem, press the "F4" key and enable the REMAP option. Now the utility, like the built-in Windows programs to treat a hard drive, it will simply mark bad sectors and they will no longer be used.
The hard drive stores all the files on your computer. The operation of each program and even the operating system itself depends largely on the operation of your hard drive. Therefore, it is important that he be in perfect condition and has been optimized.
Optimizing the hard drive in Windows 7
Disk optimization is difficult process, which includes several actions. These steps differ depending on whether you are using an SSD or HDD.
Advanced Disk Cleanup in Windows 7
The first step in optimizing disk performance should be to clean it up. Temporary files and other junk accumulate on the disk over time and slow it down. To remove them, we will use the Disk Cleanup system utility. We do the following:

In addition, you can delete additional files in the "Clean up system files" section. But that's not all. You can access Advanced Disk Cleanup by typing the command at the command prompt. For this:

Disk Defragmenter in Windows 7
Defragmenting a hard drive is the basis of its optimization. If, over time, your drive has started to work slower than before, and the response when opening files and launching programs has become significantly greater, then your hard drive needs to be defragmented. In itself, this process is to move fragments of files to each other for faster access to them. The need for defragmentation arises when these pieces, during active use of the disk, are written to different parts of this disk.
 During the defragmentation process, all red areas will be nearby, providing quick access to the file
Disk defragmentation should be performed as needed. Before defragmenting, you should allow the utility to analyze the fragmentation of all partitions and issue a report. If the proportion of fragmented files is 10% or more, then it is worth defragmenting them, but if it is less than 10%, then you can wait a little with defragmentation.
By default, Windows 7 has automatic defragmentation enabled. It is set to Wednesday and turns on at night. However, depending on your computer schedule, this may not be enough, or the defragmentation process may be interrupted by you. In this case, you need to start it manually. This is done as follows:

It is worth mentioning that defragmentation is a rather long process. You may have to spend several hours waiting.
Video: how to defragment a disk on Windows 7
SSD disk optimization on Windows 7
If you have an SSD drive, the situation is somewhat different. It does not require defragmentation, and the system takes this into account. Automatic defragmentation will not be performed when using an SSD drive. But in the case of such a drive, there are a number of other actions that can help increase the speed of the disk. And instead of manually setting up an SSD drive, it will be easier to use a special program - SSD Mini Tweaker.
After downloading the program from the Internet and downloading it, do the following:

The complex setup of your SSD drive has been completed. Of course you can customize most these options on your own, but it will take much longer. And also you can get information about each option that this program changes by reading the help data.
 In the help you will find information about all the settings of the SSD-disk
 Video: How to set up a system for an SSD using SSD Mini Tweaker
Disk Management utility
You may need access to Disk Management to set up a drive. With its help, you can change the drive letter, divide the drive into virtual volumes, or, conversely, merge them together, which can be convenient to create a separate partition for the operating system. In the future, this can help avoid the loss of important data and provide the ability to format the partition without the risk of deleting necessary files.
 To interact with the disk, use the context menu: it is called by pressing the right mouse button
 To open the Disk Management Manager in Windows 7, just call the "Run" menu by pressing the Win + R key combination and enter the command "diskmgmt.msc" there.
 Enter the command "diskmgmt.msc" and click "OK"
 Actions in the dispatcher itself are performed mainly using the context menu. That is, it is enough to select the required disk and call up the menu by pressing the right mouse button.
Hard drive bug fixes
Let's figure out how to solve the most common errors that may occur with your hard drive.
The disk is detected as dynamic foreign (indeterminate)
If you find in the manager that the disk is not defined as basic, but as dynamic with the addition "indefinite" or "foreign", then most likely you will not be able to access the data on this disk.
 Dynamic foreign disk won't work properly
 You can fix this error with the help of special programs. To fix it, we need to convert the dynamic disk back to basic, and this can be done using the free TestDisk program or the paid Acronis Disk Director. The possibilities of a paid program, of course, are much wider, and we will analyze this process using its example. Do the following:

Of course, if a malfunction occurs on a disk with an installed operating system, you won't be able to access it. The solution here is simple - insert the disk into another computer as an additional one and perform all the actions you need, and then return it to its place when the disk is restored.
Video: Working with Acronis Disk Director
Windows 7 has detected a hard drive failure
If, during any check, the system issued a message about problems with the hard drive, the first thing you should do is back up the necessary files. While your disk is still functioning, copy all the necessary files from the disk to another drive or upload them to the cloud. This can help you salvage those files later on if problems get worse.
You can determine which drive you have a problem with by carefully examining the error message. The letter designation of the virtual disk partition will be indicated there.
 At the bottom of the notification, you will see the drive letter
 The error could occur for the following reasons:
- problems appeared directly with the drive itself. This may be due to physical damage or contamination. In this case, it is recommended to take your drive to a service center for diagnostics and troubleshooting;
- operating system problems. If certain system files are damaged by viruses, an error may appear on its own without any reason from the disk. In this case, it is recommended to check the system antivirus programs, and then restore damaged files using the installation disk.
Regardless of the cause of the problem, the best thing you can do is to save your files in advance. If the error message continues to appear and you want to get rid of it, you can disable the disk diagnostics system. This is done as follows:

Formatting a disk to install the Windows 7 operating system
For more effective work disk when reinstalling Windows, it is recommended to format it, that is, completely clean the disk from the files on it. You can format the disk right at the time Windows installation 7. Be sure to make backup copies of all necessary files, as they will be completely deleted during formatting. To start formatting:

Thus, formatting is carried out quickly and without any frills. In addition, it is possible to perform formatting using special programs. For example, this feature is available in the aforementioned Acronis Disk Director program. The program must be written to disk, and the disk itself must be selected as the boot device. This can be done in the Boot BIOS menu or by pressing the appropriate key when turning on the computer (depending on your BIOS version).
 Set CD/DVD as first boot device
 After the disk with the program is loaded, do the following:

Disk programs
There are many programs out there that can help you optimize, clean, or otherwise take care of your drives. Let's explore the possibilities of some of them.
Disk Cleaner CCleaner
Disk Cleanup includes removing temporary files and installed applications at the choice of the user. A good cleaning program can delete your browser cache and temporary files of various programs, perform system diagnostics. And one of the best programs in this area is CCleaner. This program has the following features:
- automation of system cleaning;
- completely harmless and safe cleaning of temporary files, as well as analysis of registry damage and its correction;
- work with all popular browsers.
The interface of the program is simple and convenient, suitable for beginners who want to regularly clean their computer of debris. In addition, the free version of the program is not limited in functionality and has the same features as the paid one.
CCleaner will help you set up startup applications, which will also speed up your computer.
 CCleaner is a popular disk cleaner.
 Video: CCleaner program and its main functions
Hard disk cloning software EaseUS Disk Copy
Cloning in this case means transferring information from one disk to another. This can be extremely useful when reinstalling the system. EaseUS Disk Copy is a great free solution for this task. It differs:
- the ability to work with any operating system;
- support for disks up to a terabyte;
- high cloning speed;
- simple interface for novice users;
- support for dynamic disks.
In general, it does an excellent job with the task for which it was created, and its only serious drawback is the lack of the Russian language in the program.
 EaseUS Disk Copy - disk cloning software
 Restoring disk partitions using Starus Partition Recovery
In case of damage to a hard disk partition, one of the special recovery programs, Starus Partition Recovery, can help. She is good at this task. The main features of this program:
- deep scan of the disk for damage;
- recovery of partitions that have been damaged or deleted;
- data recovery on any type of media;
- comprehensive disk analysis.
The program is considered simple and effective among users.
 Starus Partition Recovery can repair damaged partitions on your disk
 Disk drive emulation software DAEMON Tools
If you are going to reinstall the system, you can not do without a flexible tool for creating virtual disks. DAEMON Tools Lite or another version of DAEMON Tools will help you create an installation disc or create virtual discs. The program also allows you to create multiple virtual drives immediately and their simultaneous use.
It is easy to use this program, and the limitations of the free version of the program are not too noticeable.
 DAEMON Tools - a program for creating and using virtual disks
 Video: DAEMON Tools Lite overview
It is important to know how to set up your hard drive for efficient operation. The disk optimization process is not a one-time process and actions to improve its performance should be carried out from time to time throughout the life of the device. Now you know how easy and simple it is to improve the performance of your disk with the Windows 7 operating system.
The performance and usability of the system depends on the condition of the hard disk. Cluttered media reduces performance, slows down the system, and is more prone to errors and crashes. Adequate disk management and the use of custom partitions improve its performance, increase comfort and positively affect the security of data and equipment. There are many tools and programs for working with a hard drive. Some of them differ only in graphical interface and price.
Selecting a program for working with hard disk partitions.
GParted is an advanced program for working with hard disk partitions that does not require the operating system to run. Once downloaded, the program is offered as an ISO disk image, which must be burned to a CD/DVD. After burning, restart your computer and choose to start from the CD/DVD. The program allows you to create, delete and resize an existing partition. A big plus of the program is the ability to change the size of the partition on which the system is installed. The program supports most known file types, including fat16, fat32, ntfs, ext2, ext3 and ext4. Before any operations on partitions, it is recommended to perform their preliminary defragmentation and backup of the most important files. Partition resizing can take anywhere from a few minutes to several hours.
How to use the program:
- Back up your important files!
- Download the GParted program and burn it to disk.
- Insert the disc into the drive and restart your computer.
- When the motherboard manufacturer splash screen appears, press the F8 key (sometimes it can be F9, F10, F11, F12, depending on the manufacturer) and select boot from CD / DVD.
- Once downloaded, select GParted Live from the list.
- Click "Don't touch keymap".
- Select language (Russian - 24).
- "Which mode do you prefer?" – 0 and confirm with ENTER.
- A search will begin for all available hard drives and partitions that have already been created on them. This may take several minutes.
- If you need to repartition the disk, first delete all previously created partitions. To do this, delete them one by one (the “Delete” trash can icon). If you don't have any sections yet, skip this step.
- In the list with sections, click on the place with unallocated space. Then click on the white sheet icon ("New").
- In the window that opens, you need to set the parameters for the new partition: size, partition type (primary, extended or logical) and its file system, partition name. Then confirm the addition of the section with the "Add" button.
- After creating the section, confirm the actions by selecting the green checkmark icon. The program will start creating partitions. This may take several minutes.
- The next step is to close the main window and double click on the "Exit" icon.
- Restart your computer.

After the reboot, the new disk partitions will be ready to use.
One of the most convenient disk management programs, EaseUS Partition Master, supports RAID devices. The application is equipped with a Wipe module, thanks to which the user can permanently erase files so that their recovery is impossible (especially useful before selling a hard drive). Each operation requires additional confirmation and becomes the first in the queue, so the risk of error is minimal. Let's see how to use this program to organize a disk that contains too many or too few partitions:
- Download the program and run the installation.
IMPORTANT. Please do not download additional tools during installation.
- After the application is installed, launch partition management to go to management.
- Select the drive you want to format, right-click it, and select the Delete Data option.
- Set the number of disk cleanup repetitions to 1, and click OK.

IMPORTANT. Formatting the drive means that all data will be permanently deleted.
- The task is added to the list of pending operations in the window on the left.
- Then select the "Create Partition" option.
- Then you need to set up a new partition, select its size, enter a name and select a letter. After entering all the data, click "OK".
You can create multiple partitions on a drive, but remember that if you create a partition on a USB drive, Windows will only be able to read the primary partition.
- To complete all tasks in the Pending Operations list, simply click Apply Changes.
How to create a new section:
- Select the system partition.
- The Actions panel displays the available functions.
- If you are using a hard disk, it is recommended to defragment the partition first. Select Defragment, then click OK.
- After defragmenting, select Resize/Move Partition.
In the next window, drag the borders to the left with the pointer - this will reduce the size of the system disk.
- If you perform SSD partitioning operations, check the "Optimize SSD" box.
- Click "OK" to confirm the operation.
- In the Apply Changes window, click Yes. A message will appear asking you to restart your computer. Click Yes. The disk will be partitioned and the computer will restart.
- Start EaseUS again. Click in an empty space and in the Actions panel, select Create Partitions.
- If it is an SSD, then check the "Optimize SSD" box. Click OK. Unallocated space will be formatted as a new drive.
Combining sections:
- In EASEUS Partition Master, select a partition on drive C. In the Actions panel, select Merge Partitions.
- Select the second section, it should be an adjacent section. Select the target drive from the list. Files from the second section will be placed in a separate folder. Click OK, then Yes. Sections will be merged.
The program also has a diagnostic module that allows you to search for bad sectors and manage the structure of the hard drive. important function is a preliminary separation before approving changes, thanks to which the user has full control over planned activities. The rest of the programs in the review work on the same principles as those described above.
One of the best hard drive software that supports hard drives with a capacity of more than 2 TB. Each partition can be archived as a backup, which allows you to restore data after a possible failure. The user can also change the file system from FAT to NTFS, and there is no need to reboot the system after each resizing of the NFTS partition. The application is equipped with interesting modules, including a disk map, which shows a graphical view of the partitions on the disk, Disk Surface Test, which offers basic disk diagnostics, and the Partition Surfece Test - analysis of a specific partition.

Free utility for Windows 7 and later Microsoft operating systems. Created on the Visual Operating System (ViOpSys) environment and runs from a bootable CD/DVD at system startup. Allows you to create new sections, divide, move and delete existing ones and copy their contents. In addition, the user has modules for defragmenting and formatting partitions. The program has small system requirements, so it can be used on older hardware (Pentium-class x86 processor, 32 MB RAM, or 16 MB in text mode).

A powerful and functional disk and partition management tool, equipped with diagnostic and repair modules for working in Windows 10 and earlier versions. In addition to the basic functions of creating, copying and deleting partitions, you can back up and restore data lost as a result of, for example, a hard drive failure. The application is equipped with a "tom finder" that allows you to find and recover deleted data. The program supports the most popular file systems such as FAT12, FAT16, FAT32, NTFS, EXT2 and EXT3, as well as DE, SCSI, SATA media. Allows you to manage virtual storage media and RAID. The built-in diagnostic module allows you to analyze the state of the disk, find and fix any errors (including recovering a damaged MBR).

A program designed to create copies of Windows system partitions. Allows you to quickly clone a partition to a new drive, so you can work on the new media without having to go through the operating system installation process. When moving a section, you can change its volume or leave it in its original size. The program supports files in FAT and NTFS, IDE, SATA, SCSII, USB and FIREWIRE interfaces.

An application designed to manage USB storage devices (cards, pendrives, external drives) that supports FAT16, FAT 32 and NTFS file systems. Allows you to create, copy and delete partitions, format memory and create bootable media, for example, with an operating system or another program. The program is equipped with a diagnostic module that checks the performance of the hard drive and the size of the media.

Allows you to analyze disk resources, provides detailed information about files and displays them in graphical form. For example, their size and location. The user can determine what data and in what form will be displayed. The application generates reports from the collected data in HTML, ASCII and XML formats.

Conclusion
Thus, we have introduced you to the best programs for working with hard disk partitions. You just have to try them out and decide which one suits you. in the best way. And if after reading this article you still have questions, then feel free to ask them in the comments.
Good afternoon!
For some reason, many users believe that the processor is the heart of the computer (for some gamers, the video card). But purely in my opinion - the most important piece of iron in a computer / laptop is a hard disk drive (HDD).
Whatever the breakdown of the iron is (if it is not related to the disk), by replacing and repairing it, you will restore your work and continue it as if nothing had happened.
But if the hard drive "flies" - then recovering data is far from always easy ... Okay, lyrics, on this page I want to collect the most necessary and useful programs for working with hard drive. I cite only the most popular and relevant programs that I myself have used more than once or twice.
I really like this utility for its clarity and focus on novice users. All you have to do is install the program, after a while you will know:
- status of the "health" of your disk in percentage terms;
- state of his performance;
- temperature;
- how much actual time he worked (not to be confused with age and date of manufacture).

The utility works in constant mode (minimized in the tray, next to the clock), and when alarms appear, it will notify you in time. What else is needed for diagnostics for inexperienced users ?!
Note. : not only work on PC is supported, but also on laptops, netbooks, etc. SSD drives are also supported.
One of the most famous utilities for testing and diagnosing disks. The program allows testing: HDD, FDD, CD/DVD, USB/Flash/SCSI.
Main functions:
- viewing complete information about the drive;
- support for IDE/SATA controllers;
- tests to check the "mechanics" of the disk;
- SMART monitor;
- low-level formatting and more.
In general, I must admit that the program is not very friendly and easy for novice users. It must be used with caution - here, more than ever, it is correct: "if you don't know, don't press!".
Developer site: http://mhddsoftware.com/
Very popular free diagnostic software hard drives. Allows for a fairly accurate diagnosis of fur. parts of drives, view SMART attributes, scan for bad sectors (note: bad blocks), it contains various tests, and other useful features.

Excellent program for testing disks. Its main advantage over MHDD and Victoria (discussed above) is support for all drives with a wide variety of interfaces: ATA/ATAPI/SATA, SSD, SCSI and USB.
By the way, the program does not work under Windows, to run it you need to burn bootable media (USB flash drive or CD / DVD), and after booting from it, run the utility.

A very high-quality utility for checking HDD and SSD for bad sectors, viewing S.M.A.R.T., for setting up special. settings (power management, acoustic mode adjustment, etc.).
The temperature of the hard drive can be displayed on the taskbar (to keep abreast of how things are going ☺).

Supported drives:
- HDD with ATA/SATA, SCSI, USB, FireWire or IEEE 1394 interface;
- SSD with ATA/SATA interface;
- RAID arrays with ATA/SATA/SCSI interface;
- Flash drives with USB interface.
A decent program for monitoring the status of hard drives that support S.M.A.R.T.
The program displays detailed information about your drives: interface, total time work, firmware, serial number, standard, allows you to manage AAM / APM settings, (useful when your drive is very noisy), displays S.M.A.R.T. (read errors, track search time, number of on-off cycles, performance, spindle starts/stops, sector errors, etc.).

Cleaning HDD from garbage
Advanced System Care
One of the best programs for cleaning your computer from garbage, fixing errors, editing the registry, removing invalid shortcuts, etc. Allows you to tidy up your Windows in a few minutes and make it work much faster.
Using the program is very simple: just install and run. In my example below, I did just that - it turned out that there were enough problems (although I regularly use the wizards to clean Windows ...).

Also note that after installing Advanced SystemCare - a special manager appears in the upper right corner of the screen: it shows the current CPU and RAM usage (in percent). Thanks to this manager, you can take screenshots, watch disk, memory, processor loading, perform quick cleaning, diagnostics. In general, it replaces the task manager ...


CCleaner
A free comprehensive cleaning utility for your Windows. Cleans various debris: temporary junk files, "leftovers" from remote programs, browsing history in browsers (all popular ones are supported: Firefox, Opera, Chrome, etc.).
There is a portable version: which does not need to be installed. The program works in all popular versions of Windows: XP, 7, 8, 10.
Wise Disk Cleaner
This program allows you to deep clean your Windows systems and hard drive from a variety of debris. As much garbage as Wise Disk Cleaner finds - no other utility will find it!
In addition to its main purpose, the program has a built-in defragmenter. The defragmentation carried out after cleaning has a very good effect on the responsiveness and performance of the hard disk.
Wise Disk Cleaner has a convenient and pleasant interface: all the main tabs are located on top, by clicking on one of them you can quickly complete the current task. In general, some positive emotions from such software ☺!

Formatting, splitting - working with sections
Very comfortable and multifunctional program to work with hard drives. Its capabilities are more than enough for the average user, here you have: resizing a partition (without formatting), moving a disk partition, joining (merging) partitions (without losing information), deleting a partition, formatting, backup wizard, migrating from HDD to SSD and much more.
What especially deserves attention: all operations with disks are performed using a step-by-step wizard, which at each stage will tell you what is used and what for. Also, most operations with disks occur without data loss (unless the program warned otherwise).

Aomei Partition Assistant - what can be done with the HDD partition
Acronis Disk Manager
A very powerful and reliable tool for managing disks and volumes on a computer. Main functions: split and merge disk volumes, disk formatting (all popular file systems are supported: FAT16, FAT32, NTFS, Exts, Ext3, Reiser3, Linux or SWAP), recovery of accidentally deleted volumes, the ability to boot the program offline (without using Windows - for this you need to prepare a bootable USB flash drive in advance), etc.

MiniTool Partition Wizard
A very convenient combine for working with a hard drive: it allows you to perform the entire list of operations that an ordinary PC user may need.
Main functions:
- Windows Migration Wizard to another disk/partition (useful, for example, when moving Windows from HDD to SSD);
- partition copy wizard;
- recovery wizard;
- merging, formatting, splitting, deleting sections;
- Russian language support;
- works in all popular Windows: 7, 8, 10.
EASEUS Partition Master Free
The best free solution for Windows 10/8.1/8/7/Vista/XP, which will help you create, delete, resize, move, expand, split, format, clone partitions of any disks: HDD, SSD, USB media (flash drives, disks etc.), memory cards, and other storage media.
The program allows you to change the file system (from FAT32 to NTFS) without data loss, change the MBR disk layout to GPT or the reverse operation - GPT disk layout to MBR (also without data loss).
In general, a convenient and indispensable manager for working with disks (certainly more convenient than the wizard built into Windows...).

defragmentation
If, when opening any files from a disk, your PC began to think, does it slowly and not immediately, then in the most harmless case, this is to blame fragmentation. To fix this disgrace, you need to reverse the operation - defragmentation(such a tautology ☻).
defragmentation- the process of optimizing the storage of information on the disk to ensure a continuous sequence of clusters. In general, if you deviate from incomprehensible terms, then after defragmentation your disk starts to work faster: reading and writing files is accelerated. Thanks to this, your programs become more responsive, it becomes more pleasant to work on such a PC!
By the way, Windows also has its own defragmentation wizard, but in my opinion it does not work perfectly ... Therefore, I will give a couple of necessary utilities.
Auslogics Disk Defrag
Despite his compact size- this utility will give odds to many competitors! The program works very fast, optimizes the file system, thereby accelerating your work. Needless to say, the program is used by more than 11 million users around the world!
Main functions:
- defragments files and unoccupied space on the HDD;
- special attention during defragmentation is given to system files (which affects performance);
- you can defragment specific files (not many programs where there is a data chip);
- the ability to work in the background (i.e. imperceptibly for you);
- free for home use!

A free and small utility for defragmenting HDDs, USB drives, memory cards, floppy disks. By the way, the launch time setting is very convenient in the program - you can set the work schedule so that the disk is analyzed and defragmented when you are not working on your PC.
Main functions of MyDefrag:
- there is a version that works from the command line (does not need to be installed);
- 2 algorithms for defragmentation;
- there is a scheduler (schedule) of tasks;
- the standard version of the program is automated and will not take you a minute to set up.

A free defragmenter from the manufacturer of the CCleaner utility (Piriform Ltd). The program allows you to work with a whole disk partition, as well as with individual files and folders.
After analyzing the desired hard disk partition: the program will display a list of fragmented files. You can select the ones you need and Defraggler will quickly optimize their placement. As a result, you do not waste time on defragmenting the entire disk (in general, it is very convenient in some cases!).

The page will be updated with new software as you work with the site.
Additions on the topic of the article are welcome!
Often, the standard tools offered by the system are not enough to work with the hard drive. And so we have to resort to more effective solutions, allowing you to get detailed information about the HDD and its partitions. The solutions discussed in this article will help you familiarize yourself with the operations that apply to the drive and its volumes.
With its toolkit, AOMEI Partition Assistant is one of the best programs of its kind. Wide functionality will allow you to effectively configure hard disk volumes. In addition, the program makes it possible to check a specific section for errors. One of interesting features- This is the transfer of the OS with all installed software to another hard drive or SSD.

It also supports writing an image file to a USB device. The interface is endowed with a pleasant graphical shell. Despite the large number of useful features, the program is available for free use, which makes it even more in demand. At the same time, it is possible to download the Russian-language version.
MiniTool Partition Wizard
This software has powerful functionality that allows you to merge, split, copy partitions, and a number of other functions. MiniTool Partition Wizard is completely free and available for non-commercial use only. The program provides the ability to change the disk label, and when creating a partition, the cluster size.

The surface test operation allows you to detect bad sectors on the HDD. The ability to convert is limited to only two formats: FAT and NTFS. All tools for working with disk volumes are placed in a very convenient way, so even an inexperienced user will not get confused.
EaseUS Partition Master
A program that opens up many possibilities when working with a hard drive. Among the main ones: disk cloning and OS import from HDD to SSD or vice versa. Partition Master allows you to copy an entire partition - this feature is suitable for the need to create a backup copy of one partition to another.

The program has a user-friendly interface, in which all operations are located in the left block - this allows you to quickly find the desired function. The peculiarity of EaseUS Partition Master is that it can be used to hide a specific volume by deleting a letter on it. Creating a bootable OS is another interesting and useful tool.
Eassos PartitionGuru
The convenience of working with Eassos PartitionGuru is achieved primarily due to the simple design. All tools are located on the top panel. Distinctive feature is the ability to build a virtual RAID array. To do this, the user only needs to connect drives to the PC, from which the program itself will construct a RAID.

The existing sector editor allows you to search for the desired sectors, and in the right block of the panel, hexadecimal values. Unfortunately, the software comes in an English-language trial version.
Macrorit Disk Partition Expert
A nice interface displays functionality that is divided into sections. The program allows you to scan your PC for bad sectors, and you can configure the checked disk space. Available conversion formats NTFS and FAT.

Macrorit Disk Partition Expert is free to use, but only in English version. The software is suitable for people who need to conduct a quick setting hard disk, but for more efficient work it is recommended to use analogues.
WonderShare Disk Manager
A program for performing various operations with a hard disk, which allows high-quality data recovery. Compared to other similar software, Macrorit Disk Partition Expert allows you to perform a deep partition scan for lost information.

You can trim and merge hard disk volumes without losing the files stored on it. Other tools will allow you to hide the partition if necessary, or to convert the file system.
Acronis Disk Manager
Acronis Disk Director is one of the most powerful programs with a set of functions and operations for managing hard disk partitions and more. Thanks to the capabilities of this software from Acronis, users can recover lost or deleted data. Among other things, it is possible to defragment the volume, as well as check it for file system errors.

The use of mirror technology allows you to save a backup copy of the partition selected by the user. Acronis Disk Director offers to use the disk editor, which makes it possible to find a lost cluster, taking into account that the execution environment for this operation displays hexadecimal values. The program can be safely used in order to carry out the most efficient work with the HDD.
Partition Magic
A program that allows you to carry out basic operations with a hard drive. The interface in many ways resembles the standard Windows Explorer application. At the same time, among the tools located in the graphical shell, it is easy to find the one you need. The advantage of Partition Magic is that it allows you to select multiple active partitions, each with its own separate OS.
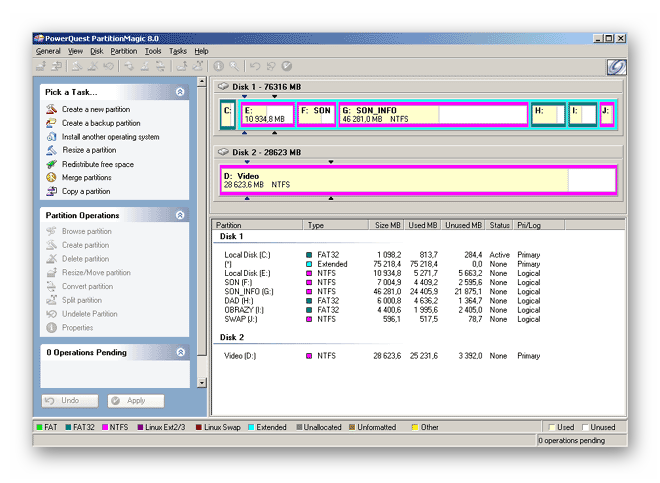
You can also use the services of converting file systems, among them two are supported: NTFS and FAT. You can resize the volume and merge partitions without losing data.
Paragon Partition Manager
Paragon Partition Manager delights users with an interesting set of features and their uses. One of them is the connection of the image virtual disk. Among them, image files, VMware and other virtual machines are supported.

Noteworthy is the function that allows you to convert HFS + file system formats to NTFS and vice versa. Other operations are basic for partitions: cropping and expanding. A large number of The settings provided by the program will allow you to customize all the functionality to your liking.
The considered software solutions have a unique potential, each in its own way. The powerful toolkit of the developed software makes it possible to save disk space and extend the working capacity of the hard disk. And the function of checking the HDD for errors allows you to prevent critical errors in the operation of the drive.