Stick ideas. Beautiful crafts from ice cream sticks with your own hands
Original gifts and souvenirs can sometimes be created from nothing. DIY ice cream stick crafts bright to that example. A little colored paper, ice cream sticks and inspiration - and in your hands is quite a nice present!
MK. Do-it-yourself souvenir from ice cream sticks
materials
- Plywood board or cardboard
- Sackcloth
- Braid
- Colored paper strips
- Glue gun
- Ice cream sticks 7 pieces.
To begin with, let's decide on the materials, their list can be slightly adjusted for themselves. In this work, a home-made plywood board was used, but you can make the basis for crafts from thick cardboard.
Strips of colored paper can be purchased ready-made or cut yourself. In addition, their width and length will require different.
The work is based quilling technique , all the figures are basic and there will be no difficulties.
So, let's begin:
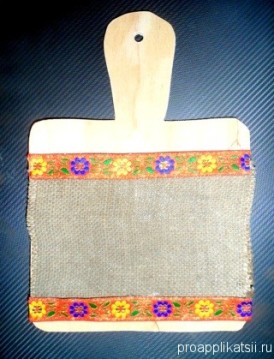
1. Cut out a blank from plywood or cardboard. You can also choose the shape of your choice.
2. We glue a piece of burlap suitable in width and height to the workpiece.
3. Glue the ribbon along the edge.
4. Glue 2 ice cream sticks in the center - this is the future couple. 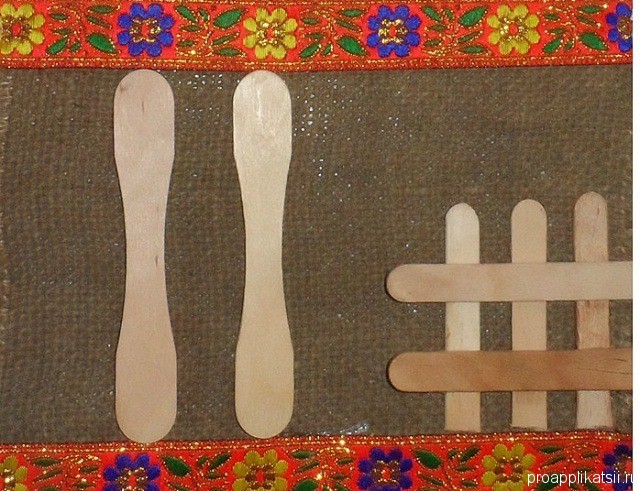
5. Glue a fence of flat ice cream sticks along the edge.
6. Let's start the transformation of the guy. We make 2 blanks using the oval quilling technique of a larger and smaller size. We glue ice cream sticks in the upper part - we get a cap.
7. We make flowers near the cap from a thin strip of paper, cutting a fringe on it and twisting it into a roll.
8. We draw a face, separate the neck, make small paper buttons. 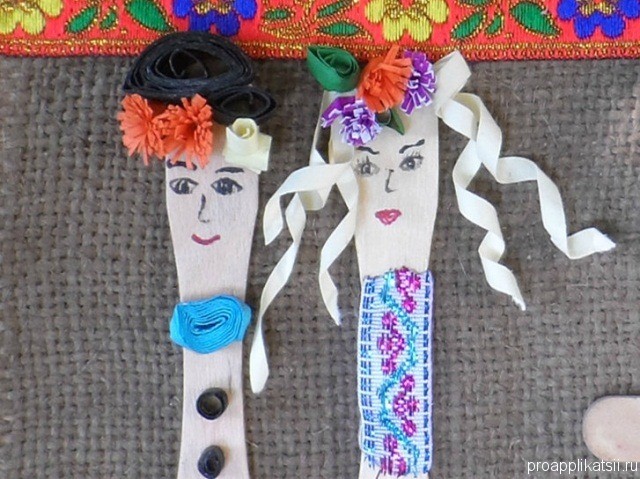
9. We draw the girl's face, glue a small piece of braid, wind it to make hair thin strips colored paper on a toothpick - curls are obtained.
10. We decorate her hairstyle with flowers. 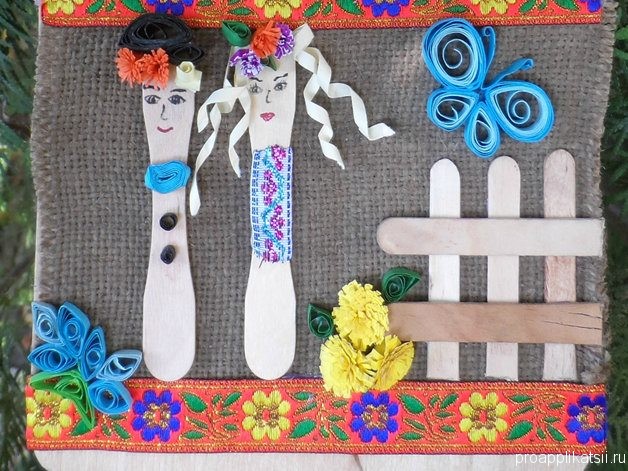
11. We supplement the composition with flowers, leaves, butterflies at our discretion. Yellow flowers are made of fringe, twisted into a roll. top we also decorate crafts with fringe flowers and others. 
In this example, the flowers are made from twisted rolls in the form of a "drop" and an "eye".
More information about this technique is described in the article “Quilling for beginners. Scheme."
Beautiful crafts from ice cream sticks with your own hands
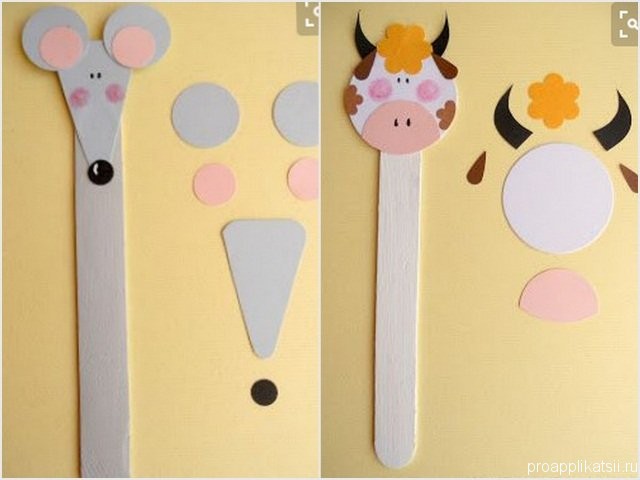
1. Bookmarks from sticks are very easy to create. Draw or glue.
2. You can make a lot of nice things for kids out of ice cream sticks, for example, fairy dolls for girls and puzzles for boys.
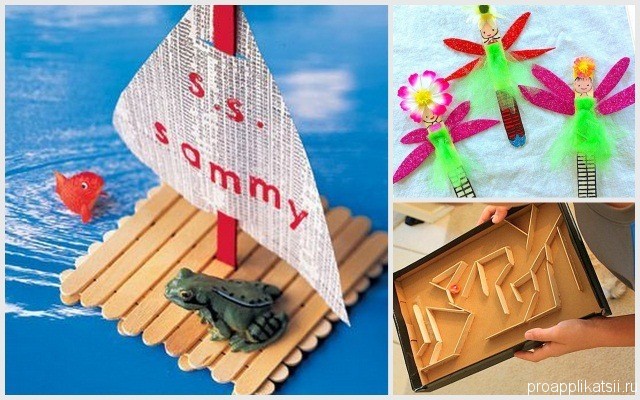
3. You can make nice and useful items together, like a jar for pencils, felt-tip pens and brushes.

.
As a matter of fact, it is very simple. You just need to be patient, free time, as well as one hundred percent use your imagination. Such a toy will be more expensive for a child than a purchased one, because he watched every step of its creation, and older children can participate or even make it on their own according to our instructions.
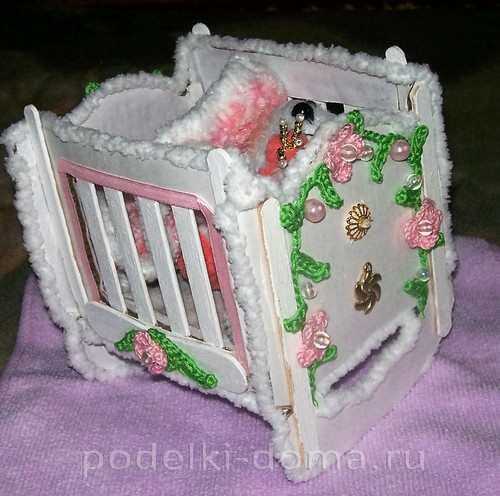
Consider today a master class dedicated to making a small toy house made of ice cream sticks.
We will need at work:
- a box of kefir or fermented baked milk, thoroughly washed and dried;
- glue "Moment";
- ice cream sticks;
- putty;
- paints;
- scissors;
- threads;
- beads;
- ribbons and more.
So, we have to carry out the following stages of work:
Stage one. stick sticking
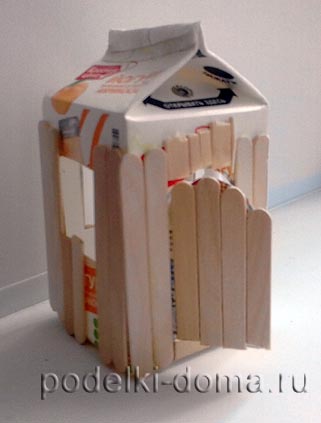
We take an empty box and cut through it with scissors three windows and one door.
Then we take the sticks and start gluing them to the outer walls of the box.
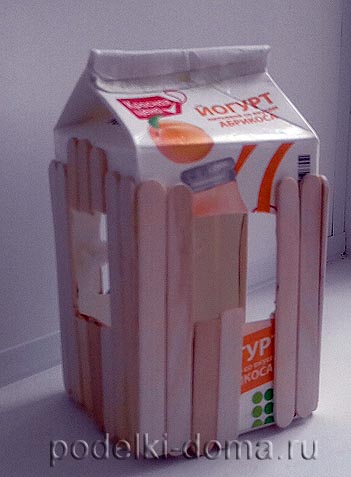
Some sticks will have to be cut, because the distance above the windows is small.
Next, in the same way you need to glue the door, this is how it will be.
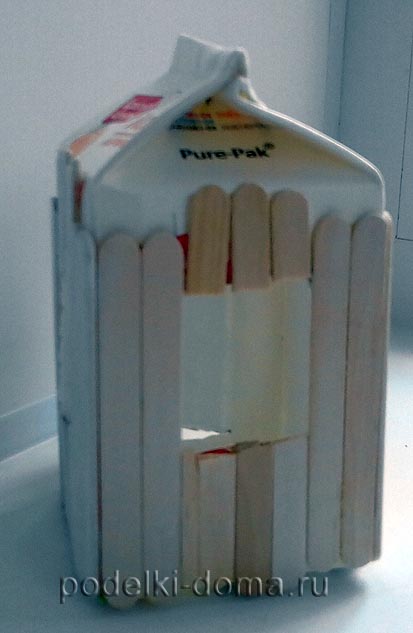
Stage two. Primer
Now we do two important things: first, we take matches, glue them crosswise and attach them to the windows. Secondly, we take a primer ( acrylic paint or an ordinary stroke to correct inaccuracies in the text) and begin to paint our sticks with this white color.
It turns out approximately the following. 
Then we make the roof. To do this, glue the sticks on top, wait until the glue dries, and then paint them with white paint. Here's what we get.
Then we make a kind of basis for our house from sticks. 
It turns out a nice white house.

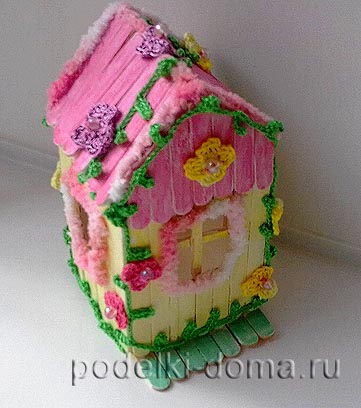
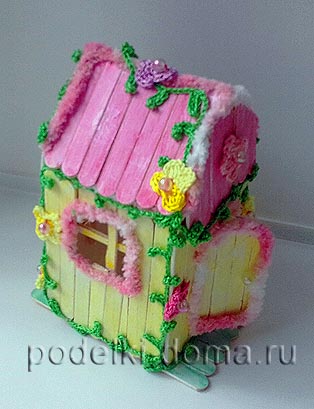
Stage three. Coloring and decoration
Now it's time to decorate our house. To do this, you can use ordinary paints: gouache or watercolor. Choose any colors you like and start our work.

And then, when the paints dry, we boldly pick up a hook, threads, beads, ribbons. We begin to glue them to our house. This is how we make our creation simply unique.
Look how the house has been transformed!

And you can do such a miracle with your own hands, spending about 3 hours on it. At the same time, you will receive a ready-made toy for your child, and also, thanks to contact with the world of beauty, you will experience real aesthetic pleasure!
Keep it up, you will succeed!
You can make a lot of interesting things out of ice cream sticks.


If you find an error, please highlight a piece of text and press the keys Ctrl+Enter. Thank you for helping to make our portal better!
picture frame
We continue the theme of boxes from under the cake. It's a pity to throw away such useful things, because they are sometimes with ...
Plastic bottle bracelet
What is not done in our time plastic bottles! And crafts for the garden, and vases with flowers, and e...
Children's crafts from vegetables and fruits
A few more photos of children's crafts from vegetables, fruits and other things natural material from school...
If you love ice cream on a stick, then you will definitely like this article. We will tell you how to make interesting crafts from improvised materials. The same sticks will be the basis for them.
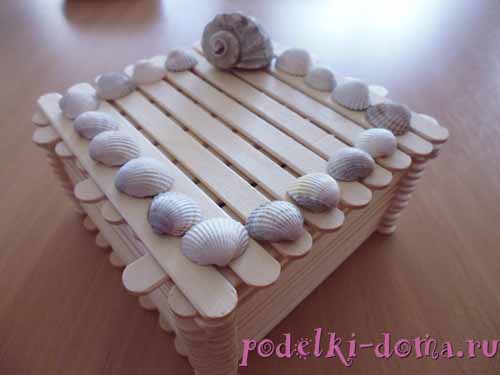
They are an environmentally friendly material that is quite pleasant to work with. You can make a variety of crafts from ice cream sticks. It can be caskets, coasters, vases and much more. But first things first.
Considering crafts from ice cream sticks, first we will focus on the frame.
photo frame
To make such a thing, you will need:
- glue;
- eight ice cream sticks;
- acrylic paints;
- various decorative ornaments (printed pictures on a sheet of cardboard).
The process of making crafts from ice cream sticks is as follows:
- Coat the sticks first (choose your own colors, for example, green, blue and pink are a good combination).
- After this action, you need to wait a bit until the paint dries. Then lay two sticks parallel to each other on the table. Using glue, connect them to the other two (they should lie perpendicular to the first, forming a square).
- Next, when the glue dries, glue two more sticks on the back. Wait a bit for the glue to dry, rotate the frame so that its double walls are located at the bottom and top.
- Then cut out the designs from cardboard and glue them to the frame with glue. On the back of the frame, in the center of the top double plank, apply glue (a small amount).
- Then set the frame on the table at the optimal angle and glue the stick (this will be the support). If you plan to hang the product on the wall, then just skip this step. The last thing you need to do is stick the picture on the back of the frame.
Pencil stand
What can be made from ice cream sticks? Vase-stand. It will help organize pencils, you no longer have to look for them in all the nightstands.

To make such a stand, you will need:
- glue;
- cardboard roll from toilet paper;
- paints;
- ice cream sticks;
- round cardboard base;
- decorative elements (optional).
Product manufacturing
First, attach the roll (pre-cut to the desired height) onto the cardboard base. Then stick sticks on its outer side, make sure that there are no gaps between them.
If desired, the stand can be made curly, for example, with teeth. If you want, you can paint the finished vase with acrylic paints.
Some more interesting ideas
What can be made from ice cream sticks? Lots of stuff. After all, sticks are a malleable material. From it you can easily make more complex products. For example, a house made of sticks looks very beautiful and impressive. Such a product will appeal to the child, and will also serve as an excellent interior decoration.
Considering crafts from ice cream sticks, one cannot but touch on the topic of making bracelets. To make something like this, you will need:
- sticks (quantity depends on product design);
- rolling pin (to give the desired shape);
- adhesive tape (or bandage);
- decorations.

The manufacturing technique is very simple. First, boil the sticks in water for half an hour so that they become elastic. Then wrap them around the rolling pin and secure with either bandage or tape. After they dry, glue them together and decorate with beads.
A small conclusion
Now you know what crafts you can make from ice cream sticks. We have provided you with a master class on the manufacture of these gizmos. We hope that you will be able to make such crafts together with your child.
Making a house out of ice cream sticks is quite an interesting and uncomplicated way of spending time. You can make your masterpiece from sticks in millions various ways, but, as it seems to us, it is best to start with the construction of walls from. After that, it will be possible to take up the roof, creating something like crossbars. Well, the third and most interesting stage will be the house of your choice!
Steps
Part 1
Building walls- If you do not want to use hot glue, then you can take a jar of PVA glue.
- Always be careful when working with glue gun for hot glue, as they can get burned.
-
Line your workspace with newspaper or wrapping paper. Since you'll be working with glue, it's best to line your work surface with newspaper, a disposable tablecloth, or something else that can protect it.
- Hot glue can sometimes be difficult to remove from surfaces, so be extra careful. It also sometimes leaks from the gun, so always place this device on a covered surface.
-
Make four squares of popsicle sticks. Lay two sticks parallel to each other at a distance equal to their length. Place two more sticks on top, forming a square. Glue the sticks on the corners. Repeat the procedure to get three more squares.
- These squares will become the walls of the house.
-
Paste the prepared wall frames with sticks. Lay one square in front of you and stick enough sticks on it to cover its entire area. To do this, apply glue with a line on two opposite sticks, and then glue the rest of the sticks in place on top. Repeat the procedure with the remaining squares to get four sheathed walls.
- Be sure to lay the sticks close to each other so that there are no gaps between them.
- You may not have enough room for the last stick when you get to the opposite edge. In this case, take a utility knife and cut the last stick to the desired width.
Part 2
roof construction-
Prepare the frame. Take three ice cream sticks and fold them into a triangle, stacking the sticks on top of each other at the corners. It doesn't matter which of the three sticks is on top of the other two. Secure the sticks at all three corners with small drops of glue. Repeat the procedure to make another triangle of sticks.
- The simplest roof uses just two triangles for support, but for a stronger roof, you can also make a third triangle that sits midway between the two main roof frame triangles.
-
Cover one roof slope with popsicle sticks. Put a drop of glue on both flat ends of one stick. Glue this stick immediately to two triangles perpendicular to their plane. Continue sticking sticks on the triangles until you completely cover one of the roof slopes with them. Place sticks close together. Hold each stick in place for at least 5 seconds so that the hot glue has time to fix it.
- Carefully stick each subsequent stick so as not to accidentally tear off any of the previous sticks from the triangles.
-
Cover the second roof slope. In the same way that you covered the first slope of the roof, glue the second slope with chopsticks. Handle the roof with the same care so as not to accidentally tear off previously glued sticks from it.
-
Sew up the gables of the roof. At this stage, your roof is open at both ends (gables). As an additional step, you can completely close from view inner part roofs. Starting from the very bottom of the gables, also paste over them with chopsticks. You will have to shorten each additional stick a little, as the gable triangle will narrow towards its top.
- The sewn-in gables of the popsicle stick house will give it more realism, as this is how real houses are built.
Part 3
Assembling the house-
Cut through the windows. If you want to improve the house, you can cut one or two windows in its walls. The easiest way to do this is before gluing the walls together. Take a utility knife and carefully cut into the wall (or several) square (s) measuring 2.5 cm by 2.5 cm.
- The window can be positioned both in the center and a little to the side, if you want.
- To further decorate the house, you can use the elements you just cut out to create shutters or a window frame.
-
Cut through the door. The house made of ice cream sticks will become even more realistic if you make a door in it. The size of the door will be determined by the size of the popsicle sticks you use. In this case, the door should turn out to be almost the full height of the house and about a third of its width. Cut through the door with a utility knife.
- Along the edge of the doorway, you can stick a piece of paper according to the size of the door, so that it is he who performs the function of the door. Bend the paper along the glued area to simulate a door opening and closing.
Prepare everything you need. You will need about a hundred pieces of ice cream sticks. Alternatively, you can purchase special craft sticks from a craft store or the appropriate section of a large supermarket. You will also need glue. A hot glue gun is best for the job, but children should use it under adult supervision. You also need to take paper, scissors and a utility knife.
I have accumulated a lot of Chinese sticks and I began to look for what to make of them ... I have my own thoughts, but strangers will not interfere either.
You have made repairs and the interior of your apartment has acquired a Japanese-Chinese style, but you also want to hang your favorite photos on the walls, and the photo frames do not fit into your interior, how then to get out of the situation? I suggest you make your own photo frames.
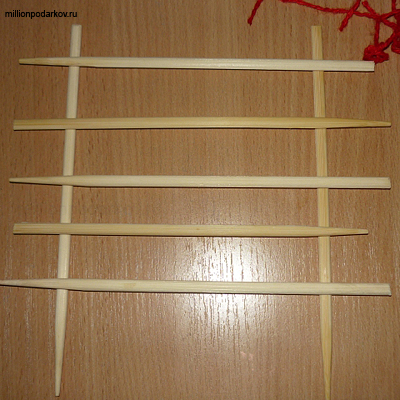
Making a layout
Arrange the sticks in the form of a lattice. To do this, we put two sticks parallel to each other at a distance of about 20 cm, then we put 5 sticks perpendicularly on them at a distance of 2.5-3 cm.
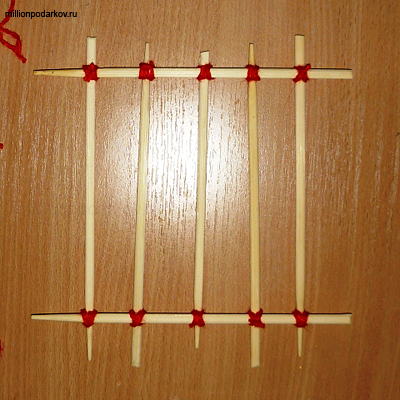
Preparing the components
We fasten all parts of the layout with threads. Then we repeat the same thing again. We should get 2 lattices, the same as in the picture.
We connect the components
We put the lattices together, and we connect them together.

The photo frame is ready!
We make a loop so that our frame can hang. Then glue the photo with double-sided tape. That's all, the product can be placed on the wall!