How to connect two identical drawings. How to merge multiple photos into one in photoshop
If you've always wondered how to combine “two photos in one” - our new app has the answer!
This photo blender is the perfect “photo editor” for you and a great “photo montage app” where you can use your photos and add frames and effects to create extraordinary collages instantly by merging photos together. Just download our 📸Merge Two Photos into One Photo Editor📸, merge and overlay multiple images, gradually blend two photos, merge two photos in one and easily adjust the transparency effect. Choose the color, pattern and shape of your favorite photo frame and show your friends that image matching has never been easier. Take a transparent photo and then mix multiple photos into one amazing collage. Become a true picture manipulation pro and use our photo mix blender for free to create beautiful custom photos. Go and get it right now! Show your creativity, create a wonderful collage and have a great time with your friends!
🔸📷🤳📸🔹🔸📷🤳📸🔹🔸📷🤳📸🔹🔸📷🤳📸
🤳 One of the best easy-to-use photo editing apps;
🤳 Merge images, perform best image blending with transparency and mirror effect and various photo effects effects;
🤳 Take a picture with your camera or select an image from your phone gallery;
🤳 merge two photos together;
🤳 Add cute photo frames to decorate your montage;
🤳 Adjust photo blending and blending level and crop, resize, rotate and drag photos with best app for image editing;
🤳 Save photos to the gallery of your phone or tablet;
🤳 Merging two pictures has never been easier than now with our 📸Merge Two Photos into One Photo Editor📸, try it out and share your photo with your friends on all social networks!
🔸📷🤳📸🔹🔸📷🤳📸🔹🔸📷🤳📸🔹🔸📷🤳📸🔹
Make your imagination free and enhance your pictures using the best photo blender collage maker!
You don't need complex blending programs to blend two photos because now you can do great manipulations on your own phone.
If you have always wondered how to “blend two pictures together” - our new app has the answer!
This “photo blender” is the perfect “photo editor” for you and a great “photo montage” app where you can use your pics and add “picture frames and effects” to create unusual collages instantly with “blending photos” together. Just download our 📸Photo Blender - Mix Photos Editor📸, “merge and overlap multiple image”, “blend two photos” gradually, “combine two pictures in one” and adjust the transparency effect with ease.
AT modern world a person may always need to combine two photos into one when creating a collage for any presentation or for some other purpose. However, not everyone is ready to spend their time learning complex professional and semi-professional programs like Adobe Photoshop or the like.
Not all personal computer users are so advanced in areas such as graphic editors. And what an experienced person can do in just a few minutes, a user who is still learning how to work at a computer can take quite a long amount of time.
However, now it is not at all necessary to be a web designer, a professional, or to carefully study all the subtleties and nuances of working with complex programs. Nowadays, there are a great many much simpler analogues of Photoshop, there are also entire online services for these purposes. Furthermore, in this article we will also consider a method that allows you to merge two photos into one using the simplest graphic editor Paint, which is present on every computer by default. After reading this article, you can easily understand how to combine two photos into one, and at the same time the process will not take you much time, and the final result will surely please you.

First way
So, for starters, let's look at the first, most simple method of how you can combine two photos into one using standard program Paint, which is already installed on your personal computer if you use operating system Windows. However, keep in mind that despite the ease of use of the program, the disadvantage of this method is the quality of the final image, especially if you start resizing the photo.
To merge two photos into one, do the following:
- Open the Paint program. As a rule, for this you need to go to the "Start" tab on the bottom panel of Windows and find the item "Programs" there, and then "Accessories". This tab contains the Paint image editing program in most versions of Windows.
- After the program opens, in the upper left corner, click on the "File" button, and then on the "Create new document».
- Using the arrows located along the edges of the currently empty image, stretch it to the size you need.
- Then select the "Insert" item in the menu, and then - "Insert from" and then you will need to select the file with the photo you are interested in.
- After. Once the photo is inserted, adjust its size by simply dragging the arrows. (It is at this point that the disadvantage of using the standard Paint program lies - the fact is that when adjusting the size of the photo, its quality decreases and this is very noticeable. If you use a more professional program for the same purposes, such as Photoshop, for example , then the image quality will not suffer. Therefore, decide for yourself whether the resulting photo suits you or is it worth exploring some other way to combine photos, which we will also consider later).
- In the same way as in the previous paragraph, insert the next photo that interests you.
- After all the manipulations with photos are completed, click the "File" button in the upper left corner of Paint, and then select "Save As". It is best to save the final image in .png or .jpg format, while choosing the highest quality, since these are the most common formats.

Second way
The next method to combine multiple images into one is to use a more complex program photoshop. Although this system is considered professional program with rich set of features, in this article we will try to explain the work in it the most plain language. However, keep in mind that we will not consider where you can download or buy the program in this article. To do this, there is an official website of the software product and many other resources on the Internet.
Combining images


So, the procedure is as follows:
- Open two images using Photoshop. You can drag and drop images into the field of the program itself, or use the "Open with" item, which is called by the right mouse button when hovering over the image, and then select the installed Photoshop program.
- Once both photos are open, select the very first Rectangular Marquee tool from the left panel of the program.
- Select the image you want to overlay with the tool.
- Next, you need to select the "Move" tool (this is the second tool from the top with the image of an arrow).
- Drag the selected image onto the second photo.
- In order to resize the photo you just overlaid, select the "Edit" menu, and then "Free Transform", and then you can increase or decrease the size of the image to the values you need.
- After everything is ready, you just have to save the result. This is done roughly by analogy with working in the Paint program. That is, you will need to click on the "File" button located in the far left corner of the program, and then select "Save as" or "Save as" (if you are using the English version of Photoshop) and then select the format for the image. It is best to use png or jpg formats.

Third way
In the event that all the above methods seem rather complicated for you, there is another extremely easy method for combining photos. This method is in using online photo editing services. For example, such services include the site croper.ru or a browser extension Google Chrome- doubled. By the way, the latter allows you to combine two photos into one using a rather stylish overlay effect.
Using the services of such sites is as simple as possible. Just enough to move images you are interested in in the site or browser extension field and then follow the prompts that appear.
We hope this article was useful for you, and now you have learned how to easily implement merging photos, without resorting to the services of expensive web designers or complex professional utilities.
Video
Using the example of this video, it will be easier for you to understand how you can combine two photos.
Didn't get an answer to your question? Suggest a topic to the authors.
Create colorful photo collages - it's fast and convenient! Need to glue photos together? With the help of the Home Photo Studio program, this procedure will take no more than two minutes. Watch the video tutorial and see for yourself how to merge two or more photos into one image in Home Photo Studio.
Method number 1: quickly combine several photos into one
"Home Photo Studio" will help you smoothly connect two, three or four 4 photos and effectively mask the connection line in just a couple of mouse clicks. Similarly, you can create an unusual collage from several photos! Photos may be different in size or the same. You can design collages as you wish, for example, add a bright fill that effectively completes the photo composition. The finished image can be saved to your computer or printed immediately!
Method number 2: simple photomontage
To combine two photos, you can use the Photo Montage tool, which implements the most simple work with layers and masks. By fine-tuning the parameters, you can create the effect of old paper on the background layer, beautifully trim the edges, or give objects a mystical glow. Ours has a convenient search function, and the tool for combining photos is easy to find by searching for "Join" or "Photomontage". From brief instructions you will learn how to combine two photos into one using our program.
Step 1. Install the program
To do this, you need to download it. Installation file. After installation, you will need a couple of photos that you want to process and a little time. We recommend that you make copies of these images in case something goes wrong and an unsuccessful adjustment option is accidentally saved.
Step 2. Choose a way to add a photo
Click the "Open Photo" button to select the desired image. Alternatively, you can type in the search bar at the bottom of the list "Connect" or "Photomontage" (without quotes). You can also use one of the images that have been recently edited - they will be displayed above the search bar.
Step 3. Adding a photo to the program
Select the photo that will become the background layer. Only one image option can be selected. In this mode, the main characteristics of the picture are shown and in the preview window you will see what is shown on it. This is very convenient if you have a lot of photos and the folder is configured to display small icons, a table or a list.

Step 4. Go to the "Photomontage" mode
If you worked through the "Open Photo" button, then the program will display the picture you selected. You will see the main menu of the program, where you can retouch the photo before sending it to "Photomontage" or go directly to this option. If the photo was uploaded directly to the photo montage section after searching by functions, the image will be opened in the corresponding mode.

Step 5. Working with layers
To select a second photo to sit on top of the background photo, click the Add Layer button and choose one of the options from the drop-down menu. The catalogs for decorations, backgrounds and textures contain basic images supplied with the program. To use a different picture, click on "Photo".

Step 6: Selecting And Editing The Overlay Frame
This is how the second photo selection interface looks like. After selecting a picture, it will immediately be placed on top of the background as a new layer. It can be moved with the left mouse button, stretched, tilted under different angles, set transparency. Layers, with the exception of the background, are easily removed using the red "X" button. Button in the form of two blue sheets paper copies the layer. Each layer can be cut without harm to the whole picture. You can immediately save your creation through the "Save to file" button - in the lower left corner.

Step 7. Saving the result
After pressing the "Apply" or "Save to file" button in the "Photo montage" mode window, all changes made to the photo will be saved, and it will not be possible to roll them back. Therefore, do not forget about backup copies of the original pictures. In any case, the program will take you to its main window, where you can retouch the photo and save it as a keepsake. You can also try experimenting and find out using the Styling menu settings.

Gluing two or more photos into a single image is a fairly popular feature that is used in photo editors when processing pictures. You can combine images in, but this program is quite difficult to understand, in addition, it is demanding on computer resources.
If you need to combine photos on weak computer or at all mobile device, numerous online editors will come to the rescue.
Today we will talk about the most functional sites that will help you combine two photos. Gluing is useful in cases where you need to create a single panoramic photo from several pictures. The considered resources are completely in Russian, so ordinary users will also be able to deal with them.
Method 1: IMGonline
The online editor for working with photos will delight users with its simplicity. You just need to upload photos to the site and specify the parameters for their combination. The imposition of one picture on another will occur automatically, the user can only download the result to the computer.
If you need to merge several photos, then initially we glue two pictures, then we attach the third photo to the result, and so on.

The site has many additional tools that will help you get the desired image at your disposal without having to install and understand the functionality of Photoshop. The main advantage of the resource is that all processing takes place automatically without user intervention, even with settings "Default" a decent result is obtained.
Method 2: Cropper
Another resource that will help you connect one image to another in just a few clicks. The advantages of the resource include a fully Russian-language interface and the availability additional features, which will help to carry out post-processing after gluing.
The site requires stable access to the network, especially if you are working with high quality photos.

Method 3: Create Сollage
Unlike previous resources, on the site you can glue up to 6 photos at the same time. Create Сollage works quickly and offers users many interesting templates for gluing.
The main drawback is the lack of advanced features. If you need to further process the photo after gluing, you will have to upload it to a third-party resource.

Joining a photo takes a few seconds, the time varies depending on the size of the pictures you are working with.
We talked about the most convenient sites for linking images. Which resource to work with depends only on your wishes and preferences. If you just need to connect two or more pictures without further processing, the Create Сollage site will be an excellent choice.
Today's lesson in GIMP is about combining two photos (images) into one using elementary commands and graphics editor tools.
For example, very often when scanning, you get several different images of one whole fragment (drawing, page, large format drawing). And you need to get a digital analogue of this sketch in one file, but your A4 scanner cannot scan the full spread of your favorite magazine. Then after that you need to glue different parts of the photo into one, and here the free GIMP graphics editor will come to your aid.
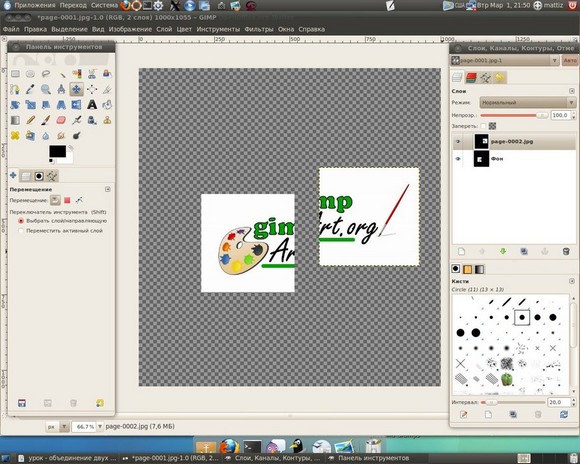
Step 1. Opening the images like layers, through the menu "File-Open as layers" and select our images one by one with the Ctrl key pressed.
Step 2 For freedom of action, we need to increase working area, i.e. set new canvas size options. Thus, the images can freely fit unfolded on the "canvas". To do this, call the menu "Image - Canvas Size" and enter new height and width parameters.

Then with the help of the move tool we spread our layers apart on the canvas
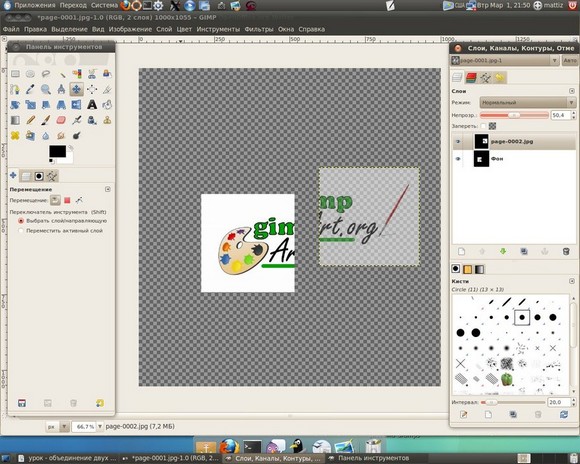
Step 3 Select the top layer in the layer stack and reduce its opacity to 50%. In this way, we will ensure the visibility of the superimposition of the second layer on the first and achieve a better match between the elements in the image. In our case, it is necessary to get the matches of the captions on the photo, which we do with the help of the “Move” tool
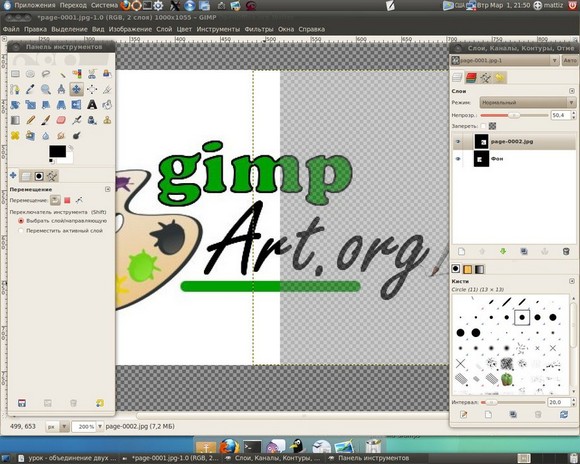
Step 4 Right-click on the active top layer and from the drop-down menu, click "Merge with Previous".

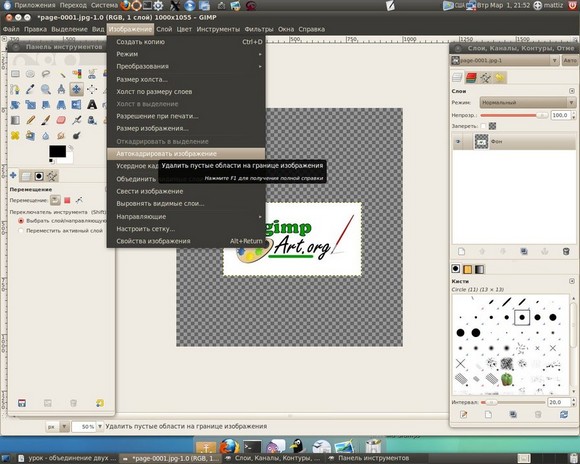
Step 5Using the tool "Image - Auto Crop Image" crop our photo.
Thus, on simple lesson In Gimp, we learned how to quickly merge 2 photos into one. Remember, only the algorithm is presented here. possible actions, which you will need to repeat when editing your images.

Thank you for your attention!