What is virtual boxing. How to use a virtual machine? How to set up the VirtualBox program
The benefits of VirtualBox cannot be overestimated. It is perfect for when you need to test new operating systems or familiarize yourself with them. By the way, it received great popularity for good optimization and flexible configuration of many parameters. With its help, even an inexperienced user can easily launch a new operating system. But, unfortunately, not everyone knows how to use VIrtualBox, so in this article we will try to clarify the main points.
Installation
Before using the VirtualBox program, you first need to download and install it on your computer, so let's start the article with that.
- It is important to download the installer from the official site in order not to pick up viruses.
- After downloading the installer, run it.
- In the welcome window, click the Next button to proceed to the next step.
- In the Custom Setup window, you can remove or, conversely, add additional components for installation. This is done in the corresponding window. To change the decision, you need to click on the drop-down list next to the name of the element and select the action that will be applied to it. By the way, you can learn more about the element in the adjacent area, which contains a brief description of it. After selecting the components, click Next.
- Now you need to choose where the program shortcuts will be added and set or remove file associations. The first item puts a shortcut on the "Desktop", the second - in the quick launch bar, and the third sets the virtual disks. After selecting the items you want, click Next.
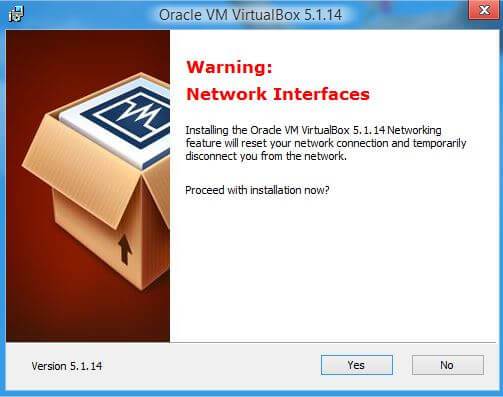
- In some cases, a notification appears that when installing the application, the Internet connection will be disconnected. If everything suits you, click the Yes button.
- Now it remains to click the Install button to start the installation process of the program.
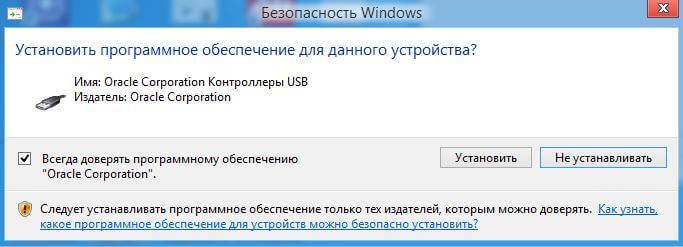
- During the installation process, a window will appear in which you will be asked to install USB controller drivers as well. You need to do this, so give permission.
When the installation is completed, a window will appear notifying you of this. In it, you can put a checkmark in front of the Start ... item so that after clicking the Finish button, the program starts. If you do not want this, then do not check the box, but simply click the Finish button.
Setting
We have installed the program, but it's too early to move on to the story of how to use VirtualBox: it needs to be configured. That is what we are going to talk about now.
- First you need to go directly to the application settings menu. To do this, you can press the key combination Ctrl + G or select the item of the same name in the "File" menu.
- A window will appear in which the "General" section will be opened - let's start with it. Here you can specify the directory in which the files of the program - the image of virtual machines will be stored. Please note that these files are quite large, so keep this in mind when choosing a storage folder. Leave the VRDP authentication library as default.
- In the "Input" section, you can view and change the program's hotkey combinations.
- In the "Updates" section, it is possible to set the interval for checking the release of new versions of the program, as well as their edition.
- In the "Language" section, everything is simple, you can define the language into which the program will be translated.
- You can skip the Display and Network sections for this step, as these settings can be set when creating the virtual machine.
- In the "Plugins" tab you can install them. Please note that their version must match the version of VirtuakBox.
- Well, in the "Proxy" section, you can specify a proxy server.

Having dealt with all the settings, you can go directly to how to use Oracle VM VirtualBox.
Operating system installation
To create a new virtual machine, you must first download the operating system image in ISO format. After that, do the following:
- In the main menu of the program, click the "Create" button.
- In the window that appears, specify the name of the machine, select the type of OS and specify its version, then click Next.
- Now select the amount of RAM that will be allocated for the program. Please note that the recommended volume is listed just above the slider. Click Next.
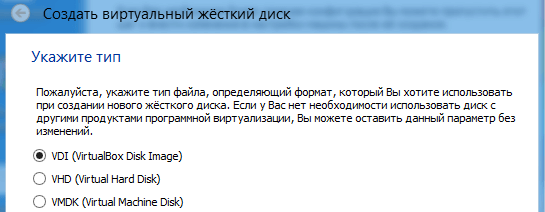
- When creating a hard disk, it is recommended to select the second item, and then define its type as VDI.
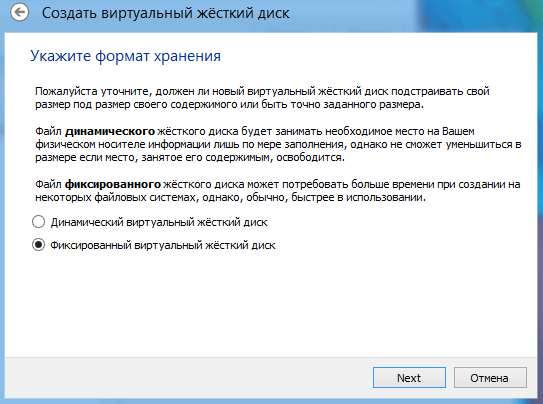
- Set the storage format to "Dynamic" and click Next.
- Now you need to specify the folder where the disk image will be stored and set the amount of memory for it. After that click "Create".
- So, the disk is created. To launch it, press the button of the same name on the panel.
- A window will appear in which you need to select an operating system image to run. Do it.

The OS installer will start. You just need to install it, after which you can use the system in normal mode.
Create Shared Folders
Now let's talk about how to use in but first create them.
- After starting the OS in the program, click on the "Machine" button and select the "Configure" item.
- Go to the "Shared Folders" section and click on the plus icon.
- In the new window, select "Other" from the "Folder Path" list.
- In the Explorer window, select the folder you want to share.
- Give it a name and click OK.

This is how easy it is to create a shared folder in a virtual machine. Now it will be visible in the "Network Connections" section, which is located in the "Explorer".
Create permanent folders
We already know a lot about how to use VirtualBox, but in the end I want to tell you how to create a permanent folder. The fact is that the previously created shared folder is temporary, that is, after restarting the program, it will disappear.
It's actually very easy to make a folder permanent. To do this, when creating a shared folder, check the box next to "Create a permanent folder" and click "OK".

Now you know almost everything about how to use VirtualBox. We hope the article was useful for you and helped you understand many aspects.
VirtualBox is a free program that allows you to run an operating system inside another one by virtualization. For example, by installing this program on Windows 10, it will be possible to run other versions of Windows, Linux, Android and others in it. It works like this:
The program reserves part of your PC's resources (Processor, RAM, video memory, OS storage space) for the operation of the operating system.
Installing VirtualBox
First you need to download VirtualBox from the official site, where you can find the latest versions of programs for different operating systems. I'm downloading the Windows version.
There are no difficulties in installation, everything is as in ordinary programs. It is not recommended to change the installed components in this case.


If you wish, you can uncheck some of the checkboxes, but I recommend leaving the second and fourth. Next, you will receive a warning that the Internet network connection will be interrupted to install the virtual driver, we agree. Click "Yes".
Then click "Install".

The installation process will begin, where you will be prompted to install the driver, for all such offers, click "Install".
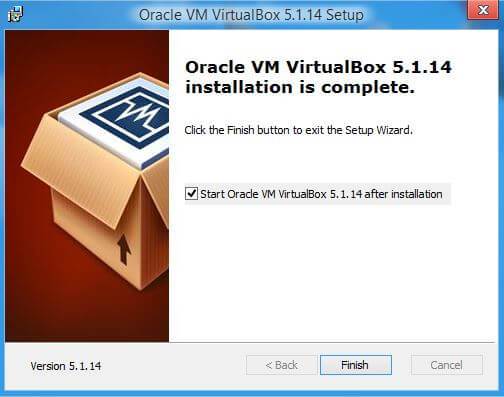
This completes the VirtualBox installation process. Click "Finish".
Creating a virtual machine in VirtualBox
There should not be any difficulties in creating a virtual machine. Run the program and click the "Create" button.

In the next window, you will need to specify the name and type of OS that you will install.

Next, we determine the size of the RAM allocated to the virtual machine. For Windows XP, I will allocate 512MB of RAM. It all depends on the amount of memory you have installed. If there is enough, then much more can be allocated.

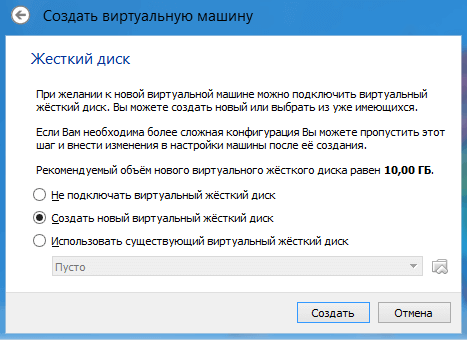
In the next window, you are prompted to select the location and size where the OS will be installed. Since we are setting up a virtual machine for the first time, we need to select "Create a new virtual hard disk". Click "Create".
In the next window, you need to select the type of disk, fixed or dynamic. It depends on your preferences, I will choose fixed.
Choose how many GB of memory you want to allocate for installing the OS and its programs. I will allocate 5GB. And also the place where the created disk will be stored, choose where there is free memory. Click "Create".

The process of creating a virtual disk will begin.

This completes the creation, and you will see that you will have a virtual machine with the name that you gave it earlier, I have Windows XP.

Addition:
If you click on the "Configure" button, then you will see sections in which you can configure the properties of the machine in more detail.

For example, how many cores do you want to give away and their download limit. And in the "Display" section, you can increase the amount of video memory for the video card.
Installing the operating system on VirtualBox
To start the installation, click on the green button (arrow) "Run". You will be prompted with a window asking you to select the path to the installation disk image.

Specify the path to the pre-downloaded OS image.
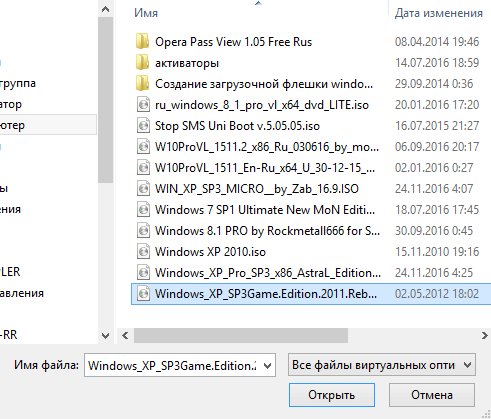
Click "Open". After that, click "Continue". The usual for everyone, the usual installation of the OS will go. You will also need to create one or more local drives. When the installation is completed, you will need to remove the installation image. To do this, click on the "Devices" tab,

in it, select the sub-item "Optical discs" and click there "Remove the disc from the drive", and restart the newly created OS. That's all for now, good luck.

If it seems to you that a computer system emulator is purely specialized software, you should try to change your mind. If you don't know how to use a virtual machine, you miss the opportunity to get acquainted with programs, games, systems without changing the current state of the computer. But even Microsoft has put its OS on the conveyor and supplies users with them with decent regularity. When there is a desire to see everything with your own eyes, but you don’t want to (or cannot) reinstall the system, virtual machines will become a useful tool.
Why you need a virtual machine
A virtual machine is the general name for the results of the work of computer hardware platform emulators, with the help of which it is really possible to create an isolated software environment. So, on a computer with Windows 7, you can run Windows 8 and work fully in it, while no changes will occur in the "master" OS. The "guest" system uses the hardware resources of the host (that is, it will not work, of course, to increase performance), ignoring the system ones. When setting up a virtual machine, you can set a variety of parameters and check, for example, whether GTA V will run on an old computer with 2 GB of RAM and a 1 GB video card.
So, a virtual machine is needed so that with maximum comfort:
- work in another (or several at the same time) operating system;
- run programs designed for a specific OS;
- test software products for compatibility;
- increase the level of network security;
- experiment with OS and BIOS settings.
A person who has not encountered emulators probably does not know how to install and use a virtual machine. Therefore, any terms and instructions seem to him complex, specialized. In fact, the emulator is installed in the same way as any other program: run the installer, answer system questions, wait for the installation to complete. Next, we create and configure a virtual platform to suit our needs.
To install a virtual machine on a PC, we need:
- installer of the selected emulator (VirtualBox, VMware Workstation, Microsoft Virtual PC, 1C-Bitrix: Virtual Machine, DOS-Box);
- PC that meets the system requirements of the program developer;
- free hard disk space;
- boot image of the OS that you plan to install.
If your computer is running Windows 7, then Microsoft Virtual PC is already included in the software package that comes with the operating system. Similarly, the Hyper-V hypervisor is included in Windows 8, so you don’t have to install anything else: just enable this component in the menu and restart the computer. If solutions from Microsoft do not suit you (or the OS assembly is corrected and the necessary components are missing), you can use third-party software products, the most popular of which are considered to be VirtualBox from Oracle and VMware Workstation from VMware.
Hyper-V on Windows 8
The Hyper-V hypervisor is included in the build of the operating system, only it is not enabled by default. To enable this component, follow the path Control Panel - Programs and Features - Turn Windows features on or off - Hyper-V (check the box). After the computer restarts, you will see shortcuts to the management programs and start the virtual machine. Installation on this is completed, now you need to create a virtual platform directly.
Launch the Hyper-V Manager, select the tab Actions - Create - Virtual Machine. The setup wizard will prompt you to choose manual setup or automatic (default, with standard settings). By clicking on the Done button, the new platform will be created and you can start working. The Next button will allow you to select step by step the location for storing program files, the amount of RAM and hard disk (no more than real ones, of course), enter the name of the virtual machine and install the OS on it from a disk image, from a bootable flash drive or DVD.
During the manual configuration process, you will have to select the generation of the virtual machine if you have one of the latest releases of Hyper-V installed on your system. There are no significant restrictions for the first generation, while the second one involves installing only Windows 8/8.1 (64-bit) and Windows Server 2012. In this case, outdated hardware will not be emulated (COM ports, IDE drives), only SCSI will remain, and BIOS will be replaced by UEFI.
One more thing to keep in mind: by default, the program will create an expandable virtual hard disk in VHDX format for the virtual machine. To work with operating systems earlier than Windows 8, you will need to create a VHD disk that supports up to 2 TB.

To access the network on the new platform, you must configure a virtual switch. For the interaction of virtual machines with each other, we select a private network, communication with the main system is provided by the internal network, and Internet access is provided by the external network. You can allow WAN access for both guest and host systems at the same time. In the settings of the already created virtual machine on the Options tab, select the desired virtual switch. You can later remove it for this system and choose another one.
After starting the guest system, you can work in it in the same way as in the main one. The window is minimized and unfolded, cursor movements and keystrokes are intercepted by the emulator. The Hyper-V component is also implemented on Windows 10, so users of this OS do not need additional software to install virtual platforms.
Microsoft Virtual PC on Windows 7
This virtual machine is included in one of the Windows 7 update packages. If you don’t have it in the Applications and Features menu, then you just need to download the required update from the Microsoft website, read the license agreement, and restart the computer after installation is complete. Virtual PC will appear in the programs along with the already installed software.
In fact, Virtual PC was created as a tool for interfacing Windows XP with Windows 7 to make it easier for users to switch to a new operating system from the old legendary one that broke all records of longevity. Therefore, XP Mode was immediately included in the program, which allows you to install a virtual WinXP in a couple of clicks without a bootable system image. To do this, just select XP Mode, then the location where the virtual system files are stored, accept the license agreement and set the account settings.
XP Mode is one of the options that demonstrate how to use a virtual machine on Windows 7. You can install any Windows OS in manual mode. In the Start menu in the Virtual PC folder, we launch the program and work further in the familiar explorer. Select the Create virtual machine button and follow the instructions of the system. Going forward, the Virtual Machines folder will display all of our guest platforms.
During the creation process, we indicate the location of the files of the new system, a friendly name, the amount of RAM of the future virtual PC, network connectivity (we select a real network adapter), and virtual hard disk parameters. Everything, the platform is ready, you can proceed to install the guest operating system!
This is done in the virtual machine options menu. At the first stage, a bootable OS image is mounted: select a virtual DVD drive and an .iso file with the desired system. Or just insert a regular boot disk into a regular drive. Now you can start the machine, the installation will be exactly the same as in the case of a real PC. Upon completion of the process, you will need to install the integration components: on the Virtual PC Service tab, select the appropriate item and run the application. The installation wizard will do the rest, all that remains is to reboot the new system.
You will most likely find the following information useful when working with guests through Virtual PC:
- USB devices can be connected to the guest system, for this it is enough to select the necessary USB flash drive, camera or scanner in the USB menu and allow sharing. However, you cannot use them in both systems at the same time.
- In order to be able to print documents from the guest system, you must select Add a new device - Network printer and install the driver (you can use it as PnP). The print will go to the local printer.
Features of working with VMware and Virtual Box
If you want to work with operating systems not created by Microsoft, you will have to use software from other developers. One of the most popular programs is VMware and Virtual Box. They differ significantly from each other in functionality, but the algorithm of work for all emulators is very similar:
- Program installation.
- Create a virtual machine with the specified settings.
- OS installation.
- Starting the guest system.
VMware Workstation is a paid program that is not cheap by Russian standards, but supports working with any OS, fine-tuning network adapters, USB 3.0, any hardware platforms. There is a free version of VMware Player that allows you to create virtual platforms, but the functionality has been cut. However, users believe that Player is quite suitable for home use.
Installing a virtual machine on your computer is not as difficult as it might seem at first glance. In this article, we will detail how to install and configure virtualbox, as well as how to add new virtual machines. Let's first understand what a virtual machine is.
For example, you have a Windows 7 operating system or higher, but you need to use an application that runs exclusively on Windows XP. Agree, if you need to work with this application, it is not always advisable to reinstall the OS, especially to an outdated version of Windows. It's easier to install a virtual machine on your computer, deploy Windows XP in it and run the necessary application without any problems.
Thus, a virtual machine is a full-fledged computer (containing a processor, RAM, hard drive and BIOS) running inside the computer through an emulator application.
With a virtual machine, you can:
- test applications;
- run programs that your OS does not support;
- Familiarize yourself with the capabilities of other operating systems;
- test the operation of network programs in closed virtual networks, etc.
Step by step installation of Virtualbox
To download Virtualbox, go to the official website www.virtualbox.org. At the moment, the latest version of the utility is 5.0.10.


Run the downloaded installer file, click "Next".

After that, the next window of the program will start. Don't change anything in it. Click next.

Leave the checkboxes in the default options box. Click Next.

After that, another installation window will appear. The Virtualbox installer will inform you that a new network connection will be created during the installation of the program. This means that your main connection is temporarily deactivated. Click "Yes", then in the next window "Install".
Wait for the app to install. Upon completion of the installation, a notification will pop up regarding the successful completion of the Virtualbox installation process. Click "Finish".


If everything was successful, the "VirtualBox Manager" will start.

"Manager" is a shell that provides work between Virtualbox and a desktop PC. The range of options for this app is quite small. True, it is not worth wasting time on reviewing them, since the program works with default settings that can satisfy most users.
How to add a new virtual machine?
To install a new virtual machine, select the "Create" option. We enter its name, select the type and version of the operating system. In our case, Windows XP.

In the new window, select the amount of RAM. Keep in mind that you will not be able to allocate more memory than is installed on the PC.

The next window will prompt you to create a new virtual hard disk or use an existing one. Since this is our first launch. Since we are running the program for the first time, create a new one using the "Create a new virtual hard disk" option.

In the next window, you need to specify the type of hard disk. We recommend leaving the VDI type, then your virtual disk will be fully synchronized with the virtual machine, and the speed of its performance will be no less than that of a real hard drive.

A dynamic virtual disk, the volume of which tends to change in the process of adding information. It is formed faster, but functions very slowly.
A fixed virtual hard drive, the volume of which will be static and will be indicated by the size that was specified during creation. It takes longer to create, but works much faster.

Which type to choose is up to you. But in our example, we will focus on the dynamic type.
Let's go to the next window. Here you need to enter the name of the disk, specify its size and location.

Click on the "Create" button and a window with the newly created virtual machine will open in front of us. This is where our preparatory steps come to an end.

How to set up a new virtual machine?
Go to the virtualbox settings, click "Configure":

After the done actions, click "OK", then "Run".
If you did everything correctly, the operating system will start loading, as shown in the figure.

This article is devoted to the virtualization platform Oracle VM VirtualBox, its installation, configuration and preparation for work.
VirtualBox - the program is absolutely free and completely in Russian, which makes it very attractive for use on both home and work computers. The system was first provided in 2007 by InnoTek in two versions - open source and closed source, both of which were free for non-commercial use. In 2008, the platform was purchased by Sun Microsystems, which is currently developing it.
The platform is a virtualization system for host systems Windows, Linux and Mac OS and provides interaction with guest operating systems Windows (2000/XP/2003/Vista/Seven), Linux (Ubuntu/Debian/ OpenSUSE/ Mandriva, etc.), OpenBSD , FreeBSD, OS/2 Warp.
Key features of VirtualBox:
- x86 virtualization (in this case, support for the hardware implementation of Intel VT and AMD-V is optional);
- support for multiprocessor and multicore;
- support for audio device virtualization;
- support for virtualization of network devices;
- support for USB-host virtualization;
- high performance and modest consumption of PC resources;
- support for various types of network interaction (NAT, Host Network, Bridge, Internal);
- the ability to save snapshots of the virtual machine (snapshots), which can be rolled back from any state of the guest system;
- configuring and managing the VirtualBox application and virtual system from the command line.
For a more detailed introduction to the Oracle VM VirtualBox platform, you can visit the manufacturer's website Welcome to VirtualBox.org!
Installing the Oracle VM VirtualBox platform
You can download the platform suitable for your system at the link: http://www.virtualbox.org/wiki/Downloads
Within the framework of this article, we will consider working with the VirualBox platform version 3.2.8 r64453 (download), the latest at the time of this writing.
After the installation package is on your hard drive, you can proceed to install the program. This article discusses the installation and configuration of the VirtualBox platform in the Windows Vista Home Premium SP2 operating system environment.
After starting the installer, you will see a welcome window. Click the "Next" button and in the new window, agree to the terms of the license agreement by checking the box "I accept the terms in the License Agreement". In the next window (Fig. 1) you will be prompted to select the components to be installed and set the location of the executable files. By default, all components are installed on the hard drive (and we need everything), and the program itself is installed in the Program Files folder on the system drive. If you want to specify a different location, click the Browse button and select a new folder to install the application.

Note. When installing the application on the Windows XP operating system, a message may appear stating that the platform has not been tested for compatibility with this OS. You can ignore the warning and continue the installation - you will not have any problems during operation. When installing the application on the Windows Vista/Seven operating system, after installation is complete, you should enable compatibility mode. To do this, go to the folder with the installed program, find the VirtualBox.exe file, right-click to open the context menu, select "Properties" and on the "Compatibility" tab check the box "Run this program in compatibility mode for", as the operating system by selecting "Windows XP (Service Pack 2)".
Creating and configuring a virtual machine
Let's launch the Oracle VM VirtualBox application (when installing the platform, a shortcut is created on the desktop that you can use). A window will open in front of us, and in it (which is very nice) everything will be in Russian. To create your first virtual machine, click the "Create" button:
Fig.2: Main window
Note. In my virtualization platform, the created virtual machines already exist, and therefore, when you first create your own, you will not see a list of virtual operating systems.
A new window will open in front of you, in which there will be a message about starting the virtual machine creation wizard. We press the "Next" button and we see a new window prompting you to select the name of the operating system, its family and version. On fig. 3 is my selection, but you can choose any of the available systems to your liking.

Fig.3: Initial parameters
After pressing the button " Next»You will be asked to determine the size of the RAM allocated to the virtual machine (Fig. 4). I choose 1024MB, but 512MB will be enough for stable work with the Windows XP virtual system.

Figure 4: Allocated memory
Next, you need to create a virtual hard disk (Fig. 5). If you have already created virtual disks, you can use them, but we will look at the process of creating a new disk. Confirm that the hard drive we are creating is bootable, check the "Create a new hard drive" box and click the "Next" button.

Figure 5: Creating a hard disk
Next, a new window will appear, which will inform you that the running wizard will help in creating a virtual disk, click the "Next" button to continue working. In a new window (Fig. 6) you will be prompted to select the type of disk being created - "dynamically expanding image" or "fixed size image". The difference is explained in the help of this window, but on my own note that it is more convenient to create a fixed size boot disk directly - this will allow you to automatically limit its size, simplify and speed up storage, recovery and backup of the disk. In addition, you can create several hard drives for your system, and now those that will not be bootable are more convenient to create dynamically expanding.

Fig.6: Creating a hard disk - type selection
In the next window (Fig. 7), you will be required to select the location of the virtual hard disk to be created and its size. For a bootable hard drive with a Windows XP system, the default size (10 GB) is enough, but it is better to place it outside your system partition, because. do not overload your real boot disk and create files of this size on it.

Fig.7: Creating a virtual hard disk - choosing the size and location
After that, the "Result" window will appear (Fig. 8), in which the type, location and size of the hard disk you are creating will be indicated. If you agree to create a disk with these parameters, click "Finish" and watch the process of creating a hard disk.

Fig.8: Hard disk creation - creation process
Upon completion of the creation of the hard disk, a new window “Result” will appear (Fig. 9), in which the parameters of the virtual machine you are creating will be indicated. If you have not changed your mind on any of the described points, click "Finish" and proceed to setting up the hardware of your virtual machine.

Fig.9: Hard disk creation - Finish
Configuring the virtual machine hardware
So, you have created a virtual hard disk, now it's the turn to assemble our virtual computer completely. To do this, return to the main window of VirtualBox again (Fig. 10), in it you can already see the newly created WinXP-2 virtual machine, and in the field on the right side its description is presented, which does not yet look like a description of a full-fledged PC.
Fig.10: Hardware setup - start
In the column on the left, select our WinXP-2 and open its properties (Fig. 11), where the column on the left side resembles a device manager. On the first tab of the "General" section, we see the main parameters of our virtual machine:
Fig.11: Hardware setup - general, 1
Let's go to the advanced tab (Fig. 12) and see what system settings we can make:
- "Picture Folder" If you have placed your hard drive in your own location, then it is better to move this folder there as well. snapshots are heavy and, again, you should not overload your system disk. My recommendation is to take snapshots before every major change you want to make to the virtual system, and even per virtual machine you can take multiple snapshots containing different settings and installed applications;
- "Shared clipboard" - defining how the clipboard will work between your host system and the virtual machine. There are four options for buffer operation - “off”, “only from the guest OS to the main”, “only from the main OS to the guest”, “bidirectional”. We will choose the latter option, because this will provide us with maximum convenience in work;
- “Removable storage media remember changes in the course of work”, here we check the box as a sign of consent, because this option will allow the system to remember the state of CD\DVD drives;
- "Mini toolbar" is a small console containing virtual machine controls. It is better to use it only in full screen mode, because. it is completely duplicated by the main menu of the working window of the virtual machine. It is really better to place it on top, simply because you can accidentally click on some control, trying, for example, to maximize a window from the virtual machine taskbar.
Fig.12: Hardware setup - general, 2
Let's move on to the system section and on the first tab, the motherboard (Fig. 13), we will make the following settings:
- if necessary, we will adjust the size of the RAM of your virtual machine, although you can finally make sure that the selected amount is correct only after starting the virtual machine. You can choose the size based on the amount of available physical memory installed on your PC. For example, if you have 4 GB of RAM, 1 GB will be optimal, i.e. one-fourth part, which will allow your virtual machine to work without the slightest freeze;
- let's correct the boot order - the floppy disk drive ("floppy disk") can be disabled altogether, and be sure to put the CD / DVD-ROM first to ensure that the OS can be installed from the boot disk. In this case, both a CD and an ISO image can act as a boot disk;
- all other settings are described in the dynamic help below, and their application depends on the hardware of your real PC, and if you set the settings that are not applicable to your PC, the virtual machine system simply will not start;
Fig.13: Hardware setup - motherboard
Let's move on to the "Processor" tab (Fig. 14), here you can select the number of processors installed on your virtual motherboard. Note that this option will only be available if AMD-V or VT-x hardware virtualization is supported (Figure 15) and the OI APIC option on the previous tab is enabled.
Fig.14: Hardware setup - processor
Here I will again turn your attention to the AMD-V or VT-x hardware rendering settings. Before enabling these settings, you need to find out if your processor supports these features and if they are enabled by default in the BIOS (often they are disabled).
Fig.15: Hardware setup - acceleration
Let's move on to the "Display" section (Fig. 16). In this section, on the "Video" tab, you can set the memory size of the virtual video card, as well as enable 2D and 3D acceleration, and enabling 2D acceleration is desirable, but 3D is optional. On the Remote Display tab, you can enable the option for your virtual machine to act as a Remote Desktop (RDP) server.
Fig.16: Hardware setup - display
Let's move on to the media section (Fig. 17). Here you can see the previously created virtual hard disk and the position labeled empty. We select this position and carry out the settings (Fig. 18).
Fig.17: Hardware setup - media, 1
There are two ways to set up a virtual CD drive:
- the first option - in the "Drive" drop-down menu, select your real or virtual CD / DVD-ROM (existing in a real system) and load into it a physical disk with a Windows XP distribution kit or an ISO image if it is an emulator;
- the second option - click the icon as shown in the figure below (Fig. 18) and in the window that opens (Fig. 19) add the ISO image of the Windows XP boot disk, we will go this way.
Note. At this point, you can no longer choose a distribution kit for another operating system, because. the OS version was already determined at the very beginning of the virtual machine setup process.
Fig.18: Hardware setup - media, 2
The figure below shows the procedure for adding ISO images to the Virtual Media Manager. You can add any number of images for various purposes to it, for example, games, application distributions, databases, etc., which you can then quickly switch through the main menu of the VirtualBox virtualization window.
Fig.19: Hardware setup - media, 3
Fig.20: Hardware setup - media, 4
Further (Fig. 21 and 22) you can configure the slots for connecting drives, to simplify the description, I give screenshots, according to which you can perform configuration actions. Out of habit, I set the CD drive as Primary IDE Master, the hard drive containing the boot partition as Secondary IDE Master, and the secondary VHD as Primary IDE Slave.
Fig.21: Hardware setup - media, 5
Fig.22: Hardware setup - media, 6
Configuring the network and network interaction is not covered in this article, so I will only note that the NAT type network adapter (Fig. 23) is enabled by default, and this is already enough to provide your virtual machine with Internet access. The type of adapter you select must be "Pcnet-Fast III (Am79C973)", because only this adapter has drivers in Windows XP.
Fig.23: Hardware configuration - network adapter
I do not describe the COM section in detail, because there is nothing to connect to ports of this type. If you still need to connect a device with an RS-232C interface, then it will be most convenient to enable the COM-port of the virtual machine in the “host-device” mode, and use the real port name of your PC as the “path to the port”, which you you can look in the device manager.
We go to the USB section (Fig. 24), here we put both available checkboxes, and then, using the button with the image of the USB “plug” and “plus”, we add all available controllers.
Fig.24: Hardware setup - USB controller
Go to the "Shared Folders" section (Fig. 25) and select the folders that you want to make available to the virtual machine.
Fig.25: Hardware setup - Shared folders
Note. Pay attention to the dynamic help below - in this way, through the command line window, you can connect shared folders to your virtual machine.
This completes the configuration of the hardware of your virtual machine, and you can proceed to install the operating system.
Configuring the operating system of the virtual machine
The description of the installation of the operating system is not described in the article, because. the site provides enough information about the methods and subtleties of this operation, so I will indicate the first step - we return to the main window of VirtualBox and press the "Start" button.
Figure 26: Setting up the operating system - the first step
After carrying out the action described above, you will see the following window:

Fig.27: Operating system setup - installation process
This means that you have made all the settings correctly, and the only thing left is to install and configure the operating system. This window is most likely familiar to you (if you have ever installed an OS of the Windows family on your own), and the installation process is no different from installing an OS on your real computer. After the system is installed and loaded (Fig. 28), you can start setting up the operating system of your virtual machine.

Fig.28: Operating system setup - installed system
First we need to install drivers for all virtual hardware components of our virtual PC. To do this, in the main menu (Fig. 29), select the item "Devices" - "Optical disc drives" - "VboxGuestAdditions.iso". Subsequently, in the same way, you can connect a physical CD-ROM to your virtual machine or download an ISO image.
Figure 29: Operating system setup - download "VboxGuestAdditions.iso"
After connecting the “VboxGuestAdditions.iso” image in the My Computer folder, you will see that this virtual disk is loaded into the CD drive - all that remains is to launch it by double-clicking the left mouse button.

Fig.30: Operating system setup - installing VboxGuestAdditions.iso
The installation process itself takes place practically without your participation, and only if you have enabled 3D acceleration earlier, you should select the appropriate component (Fig. 31) for additional installation.

Fig.31: Operating system setup - selection of add-ons
During the installation, two warnings will be issued about the lack of test results for this software in the Windows XP operating system, and both times you can safely continue the installation - the installed drivers and additional software will work fine. In the last window of the installation process, you will be prompted to restart the virtual machine - agree, after the reboot you will see that the image has become clearer, the size of the virtual machine window changes dynamically, the mouse integration function is enabled and there is Internet access.
Let's now connect the shared folders in order to be able to transfer the files necessary for work to the created virtual machine and install applications. This can be done using the command line by following the VirtualBox help, but I will provide a method using Windows Explorer. To do this, open the My Computer folder, in the main menu select "Tools" - "Map network drive" and in the window that opens, in the folder field, enter \\vboxsrv\shared_folder_name, i.e. in our case:
\\vboxsrv\WinXP-2-Share
After these steps, your shared folder will appear in the "My Computer" folder, available as a network drive.
Let's now check if you have Internet access. To do this, open: menu "Start" - "Programs" - "Accessories" - "CMD-command line" and in the window that opens (Fig. 32) enter the following command:
Ping ya.ru
If, as a result of processing the command, you see that the packets have been sent and received, even if only partially, then you have succeeded, and the virtual machine has Internet access.

Fig.32: Operating system setup - Internet connection test
Quick access and comfortable work
Shortcut to quickly launch a virtual machine
For a faster and more convenient launch of your virtual machine, we will create a shortcut just for it. You can do this in the following way:
- By right-clicking on the desktop, we will call the context menu and select the "Create Shortcut" item;
- In the window that opens, in the "Specify the location of the object" field, enter
- In the next window, enter a name for the shortcut, for example, "WinXP" and click the "Finish" button;
- On your desktop, the created shortcut "WinXP" appeared, right-click on it;
- In the context menu that opens, select "Properties";
- In the window that appears, select change icon and the field for selecting the icon source file, enter
- Click the OK button and then Apply.
After the done operations, your shortcut will look like this:

Figure 33: Creating a shortcut for the virtual machine
Display integration mode
In display integration mode, you can easily organize access to the desktop and controls of the virtual machine from your desktop, i.e. all windows you open in the virtual machine will be displayed on your desktop instead of in a separate VirtualBox window. This feature greatly facilitates access to the virtual machine, its controls and applications installed on it. To enable this mode, you need to select the item with the appropriate name in the main menu of the VirtualBox visualization window or press the key combination "HOST + L", where the "HOST" key is the left "Ctrl" (by default).
Fig.34: Display integration mode
Conclusion
In this article, we have reviewed the main points in installing and configuring the Oracle VM VirtualBox virtualization platform, I want to additionally note the ease of setup and ease of use of the platform, as well as many additional features, for example:
- built-in proxy module;
- custom startup;
- automatic collection of statistics;
- management and configuration using the command line;
- the ability to save and quickly apply various settings;
- various ways of organizing network interfaces.
In addition to these pluses, I’ll add that the efficiency of using system resources by the VirtualBox application is beyond praise - on my home laptop (2.5 Hz 2-core CPU, 4 GB of RAM) I run up to three virtual machines simultaneously without any freezes (simply because different operating systems installed on them).
The material presented above will allow you to create your own virtual machine without much difficulty, but nevertheless, if you have any questions or difficulties, do not forget to refer to the help of this software - it is quite complete and detailed. Moreover, you can always refer to the "online help" for this platform UserManual, posted on the official VirtualBox website.