The sequence of applying gel polish at home
Women who once discovered gel polish rarely go back to a regular manicure. Beautiful appearance and durability of the coating make it indispensable for busy ladies. Subject to the technique on the nails will not be within three or even four weeks.
Beautiful manicure
Today, manicure equipment and products are available to everyone. The point is small - study the sequence of coating nails with gel polish and you can start applying.
What you need for a manicure
At home, you need the same tools that are used in salons.
For a manicure you will need:
- dehydrator;
- base, color and top coat.

Base coat application
Today you can buy gel polish of different price categories. When choosing a base and top, do not save money, because the durability of the manicure depends on them.
Choosing a lamp
There are two types of lamps on the market - LED and UF. The sequence of applying gel polish does not depend on them, but the drying time of the nail plate depends. For manicure at home, most often they buy UF lamps, since they are much cheaper. Among the minuses are a long curing time and the need to change light bulbs. However, this does not affect the quality of the coating.
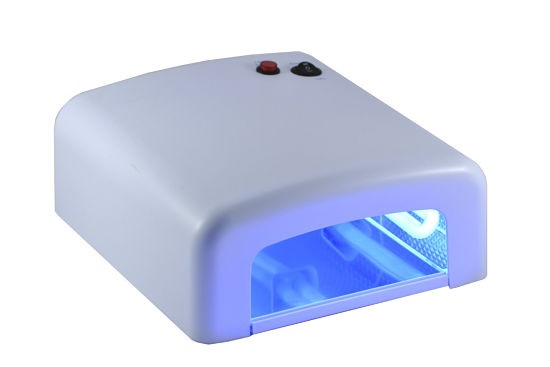
Ultraviolet lamp
An LED lamp will cost several times more. It does not require replacement parts. In addition, the hardening time is much less - about 10 seconds. In addition to the high cost, the disadvantages of LED lamps include the fact that they are not suitable for some types of varnishes.
For home use, it is better to opt for a UV lamp. The main condition is the high power of the device.
Preparation for application
Any manicure should begin with the treatment of the nail plate and the removal of the cuticle. To do this, we lower our fingers into warm water, after which we carefully cut off the cuticle or push it away with a spatula.
Then we give the nails the desired shape and process them with a grinding file. It is better to choose an abrasive buff to remove the gloss. This will provide a better connection to the base.
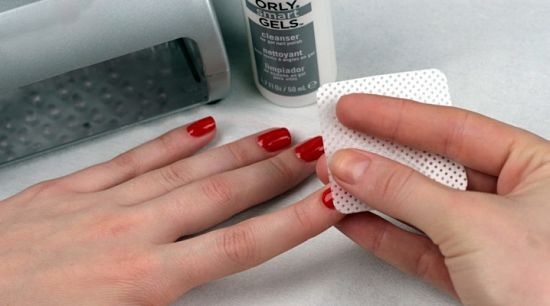
The sequence of gel polish coating includes the treatment of nails with a dehydrator. It is applied with lint-free wipes. Thus, we remove excess fat and moisture. In extreme cases, you can use, but they are very dry and can even affect the final color.
At home, it is not necessary to apply a primer. If you want to follow the rules as much as possible, then apply it after treatment with a degreaser.
Application process step by step
Remembering what sequence of manicure with gel polish is quite simple. It uses the base, colored varnish and finish.
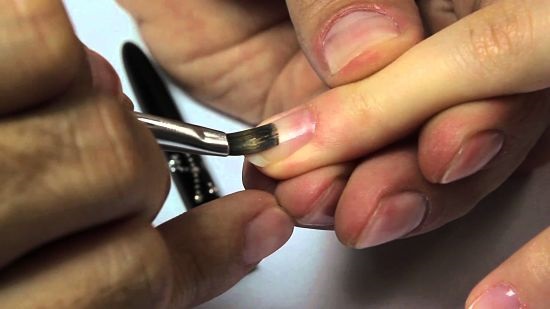
- First you need to apply a base coat on your nails. Use a quality base and you won't have to worry about how long the gel polish will last. The base also provides additional protection against coloring pigment. It must be applied in a thin layer so that voids do not form. It is better to leave quite a bit of the product on the brush and gently distribute it, starting from the tip of the nail. We seal the end. If gel polish gets on the skin, remove it with a wooden stick. Then dry in a lamp for 2 - 3 minutes (10 seconds if it is an LED lamp).
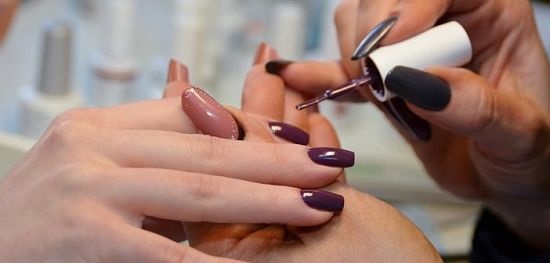
- Apply the color layer in the same way. Make sure that the product does not spread around the edges, otherwise bumps will form. Dry the gel polish in the lamp. Typically, 2-3 coats are required for good coverage. Each of them is dried separately. You can not remove the sticky layer from the colored varnish.
- The manicure sequence includes the application of a finishing agent. The top, like the base, seals the edge of the nail. The finish can be applied in a slightly thicker layer, but it also takes a little longer to dry. Remove the sticky layer with a degreaser. Once done, use cuticle oil.
Popular nail design techniques
If you are doing a manicure at home, do not immediately use a complex design. Learn to work with basic colors, after which you can start learning additional techniques.
Today, at the peak of popularity, there are two main methods:
- gradient;
- broken glass effect.
Use the instruction, which explains step by step how to make an unusual nail design.
Gradient
In order to create on nails, you will need a sponge, brush or sponge. Before starting the application, we repeat the same steps as for a standard manicure. We remove the cuticle, grind the nails, use a degreaser and apply a base coat.
- Visually separate the nail into upper and lower parts. Gently spread one color of lacquer on the bottom, the other on top. Quickly press the sponge several times, mixing the shades. You can also use a brush. Dry the layer in the lamp.
- With another method, varnish of two colors is distributed on a sponge or sponge, after which it is pressed against the surface of the nail. Excess funds are removed.
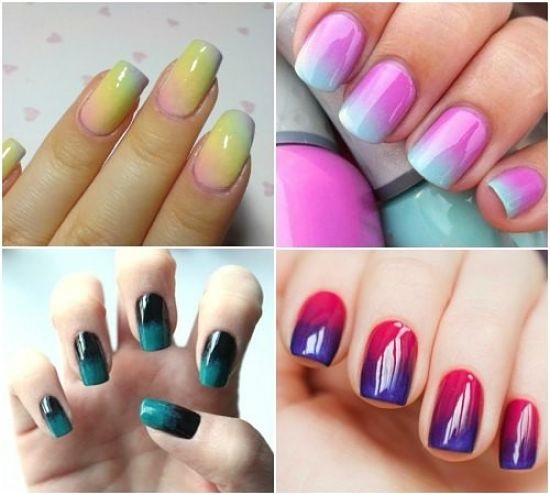
Types of coating technique gradient
If you don't succeed right away, don't despair. For starters, you can practice on paper.
shards
This design uses holographic particles, which have a fairly dense structure and create the effect of broken glass. The beginning of a manicure is exactly the same as in other techniques. After you have spread the base and color varnish, fix the decorative elements on the sticky layer. Distribute them one at a time, best with tweezers or a rhinestone pencil.
Important! Try not to use too many large particles on the side of the nail. The top coat may not completely cover them.
Top coat is the final step. After that, remove the sticky layer and you can enjoy the finished manicure.

Technique fragments (broken glass)
What determines the service life of the coating
If , this indicates that you have sanded the insert too hard. Chips can occur due to poor-quality base. With poorly sealed ends, already on the second day you may encounter the fact that the varnish moves away from the nail.
Follow the sequence of techniques, and the coating will last you 3-4 weeks. The advantage of gel polish is that, if desired, you can change the design if you carefully remove the top layer and apply a different color.