How to paint nails correctly. Tricks and secrets
“Teach me how to paint beautifully! Well, at least kill me - I can’t paint my nails evenly. Even light varnish comes out crooked, what can we say about red! Generally, give advice on how to paint nails. Best regards, Olga"
Well, Olga, you are not alone in this problem. And if long nails can still be painted neatly, then you have to tinker with short ones. I, as the owner of short nails (for a number of reasons), know for myself how difficult it is to evenly make up my nails without hitting the cuticle and the area around the nail.
So, the women's site site says, how to paint nails to look beautiful and look well-groomed.
How to paint your nails evenly: general rules
Before you start painting your nails, treat the surface of the nail nail polish remover, or wash your nails with soap and dry well. On clean, fat-free and dry varnish will last a long time without peeling or bubbling.
Next, we apply first coat of varnish- a transparent shade or a special base for varnish. This will make the surface of the nail even, which will allow the varnish to last longer, and also provide the nail plate with additional nutrition - vitamins and other useful substances.
ALWAYS apply 2 coats of colored polish, whether it is translucent or a bright saturated shade. Only two coats will allow you to enjoy the true color of the nail polish, only in this way the lacquer will lie flat without streaks, and the manicure will look complete and perfect. Usually, one layer of colored varnish is not saturated, why the nails look faded.
 On top of the colored varnish (second layer), you can apply and special fixer. This is done so that the nails do not peel off for as long as possible, and sometimes it gives extra shine to the nails. Although, if you have already applied 2 layers of colored varnish, and under them a transparent shade, this is enough. So decide for yourself whether to apply a fixer. Personally, I get along just fine without it.
After the nails are dry, use a toothpick(match and cotton swab are too thick), around the tip of which wrap a small piece of cotton wool. Dip a toothpick in nail polish remover and Wipe off the varnish that is smeared around the edges of your nails. In doing so, keep in mind:Dry your nails as long as possible! You can dip them in cold water, wave your hands, but soak for at least 20-30 minutes after applying the last layer. Otherwise, the imprints of everything you touched will remain on the nails. Remember - the more layers of varnish, the longer the nails dry.
- Wash the varnish that has got on the skin, preferably after the nails are completely dry. So you will not spoil your manicure if you accidentally touch your nails.
- Try to paint evenly, without getting on the skin. Because, even erasing flaws, manicure will no longer look 100% neat.
That's all. Now let's move on to the technique of applying varnish.
Apply polish on long nails
There is nothing complicated here. Indeed, it is easier to paint long nails beautifully than short ones. The women's site tells how to do it right:
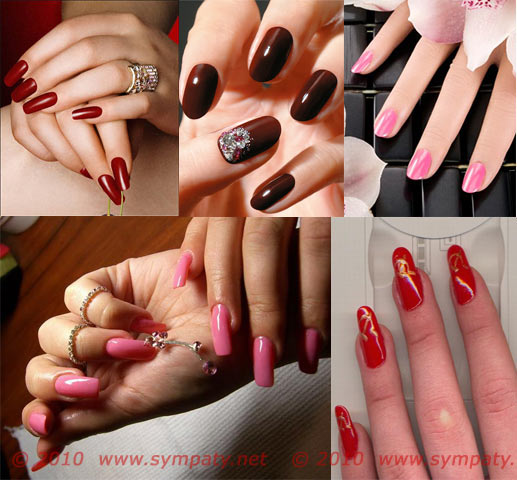
- For long nails Suitable for any lacquer color- from bright to discreet, which cannot be said about short nails. As you can see in the photo, all shades look amazingly chic. Main condition: so that the varnish looks on the nails - it must be!
- If the colored varnish has thickened, then one layer is enough. If you see that it has thickened so much that it will not be possible to neatly paint your nails - dilute it special tool.
- Before applying nail polish - Warm the bottle in your palms and shake well. The varnish will become a homogeneous consistency, mix and thereby lie more evenly.
- Start painting your nails from the little finger. Place your fingers on the edge of the table so that the palm hangs down, and the fingers are stable and comfortable for you on the edge of the table. The light on the nails should fall from the left-top (if you are right handed).
- Dip the brush into the varnish so that she is completely immersed in it. Then wipe the brush against the edge of the vial, leaving most of the polish on the outside of the brush. And with this side, start painting the nail.
- Mentally divide the nail across into 3 parts. And stepping back from the cuticle 1 part, lower the brush with varnish on ( not to stain the cuticle). Then, with quick, confident movements, brush to the tip of the nail in the middle, and then another 2-4 brush strokes along the edges. If a varnish was not enough- dip the brush into the bubble again. If, on the contrary, you see too much nail polish- Gently draw a brush there, removing the excess.
- Painting one nail dip the brush into the polish again, each time updating it on the brush.
- Paint over all nails and leave to dry.
Only after the first layer of colored varnish has dried, apply the next Otherwise, the nails will dry for a very long time.
How to check if the varnish is dry? With the nail of one hand, touch the other, as if lightly patting. If the nails do not stick together, the varnish is dry.
When you're done with colored polish, apply nail dryer or fixer.
IT IS BEAUTIFUL!!!
How to paint short nails
Do not confuse short nails with medium length nails! The latter are just as easy to make up as long ones, but when the nails are short, it is difficult to make them up neatly and beautifully.
For short nails always use a sufficiently liquid varnish. On long nails, thickened varnish is easy to apply evenly, and a second coat is not required, but on short thick varnish will definitely stain the skin around the nail.
Also refrain from bright colors - red, black, yellow, fuchsia. As you can see from the photo, it looks pretty ugly. Best for short nails pastel shades and translucent nail polishes.
IT'S NOT BEAUTIFUL!!!
Principles of applying varnish- the same as for long nails, but with some nuances:
- Take a little varnish on the brush to avoid excess and smearing of the varnish around the edges.
- If a leave unpainted edges on the sides of the nail- short nails will visually appear longer and more elegant.
- If, trying to paint short nails, you still hooked the area around the nail, and at the same time you understand that you won’t be able to gently erase it - remove only large spots of varnish. In the gaps between the skin and the nail itself the varnish will come off by itself when washing hands or dishes. The main thing is not to get varnish on the cuticle, it’s better not to paint 1 mm before it than to hurt it))
That's all the subtleties that will help you paint your nails correctly. Have a nice manicure!
For copy You do not need to obtain special permission for this article, however active, a link to our site that is not closed from search engines is MANDATORY! You are welcome, observe our copyright.